When it comes to wilderness survival, getting your hands on enough food is challenging. But no matter where you are, chances are pretty good there will be some variety of small game that can be caught.

Animal protein is one of the best things you can get when it comes to calories in the bush, so you should get it at every opportunity. And setting up traps is one of the best ways to multiply your efforts in that regard. You can have multiple traps set up and ready to spring even while you sleep or focus on other tasks.
And one of the best traps for reproducing is the simple, humble snare… Snare traps have been around since basically forever, and you don’t need much to make a good one. Learn how to make an easy but effective one with the guide I will share with you below.
Learn Where the Prey Will Be!
It’s a good time to remind you that, no matter how effective any given trap is, it isn’t going to do you a lick of good if you don’t understand where your prey will be!
It is imperative that you get in tune with the environment: find out what paths your quarry takes to travel to and from water or when entering or exiting their den or bedding area. Once you know where to set your trap, or traps, the battle is half won.
But the other half of the battle is picking a good spot along those routes that will allow your trap to function with maximum effectiveness. Keep that in mind as you read the instructions below.
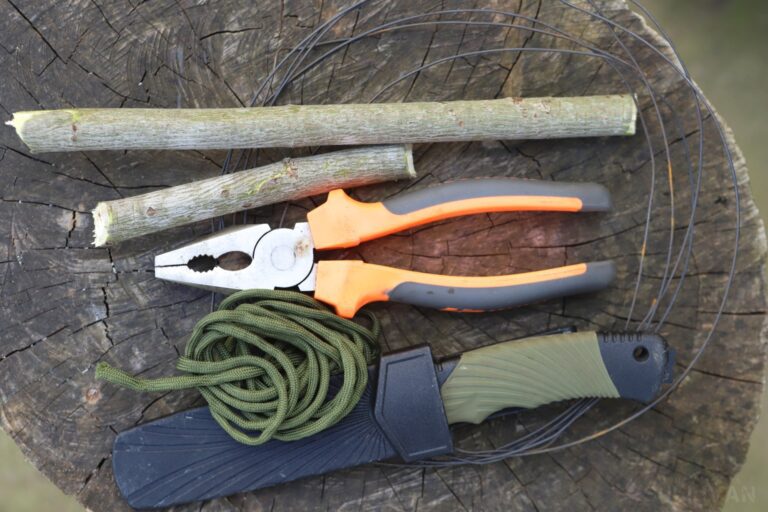
snare wire tools materials
What You’ll Need
The best thing about the classic snare trap is that it’s so simple and quick to make with just a little bit of practice.
Assuming you have a few basic supplies and tools with you already, all you need is a little bit of time and soon you can have half a dozen traps set and ready to nab your quarry.
Snare Wire, around 20 inches (50 cm) in length: the most important part of our trap.
Snare wire or some other thin metal wire is critical because, compared to most kinds of cordage, it’s flexible enough to cinch down on the limb or body of the animal we’re trying to catch, but strong enough to resist being chewed through by that same animal desperate to escape.
Paracord (or more snare wire), 6-7 feet (80 cm). This length depends on the height or length of the branch or sapling you use. If setting multiple traps, make sure you have a roll of it.
Dowel rod or Drill Bit: a small dowel rod, or lacking that, a pencil or pen, or smooth, uniform twig about 3/8 of an inch (1 cm) in diameter, is ideal for making a nice and perfectly formed loop in your wire that is essential for the function of the trap.
If you’re really in a pinch, you could even use your pinky finger, a roll of chapstick, or something like that – as long as it’s round and sturdy enough for you to wrap the wire around to form a loop.
Wire Cutter: you’ll need something to cut the wire. If it’s thin-diameter stuff, you could use your knife but it’s going to tear the blade up. Use a wire cutter attachment built into the sheath or a dedicated wire cutter – or snips if you have them.
Knife or Other Carving Tool: you’ll need a carving tool to fashion notches and trenches in several pieces of wood that you’ll gather in order to form the components of the trap and make them work together.
Whatever you can get your hands on that’s better suited for this task, the quicker and easier the work will go. A hatchet will work, for instance, but a good, sharp camping or bushcraft knife is better.
Two Small Branches: you’ll need these to form the hook and the base of your trap. These are the components you’ll be carving the notches into that interface with each other to form the triggering mechanism of the snare.
These should be significantly thicker and sturdier than your dowel rod, at least half an inch thick for the hook and closer to an inch thick or larger for the base.
Young Sapling or Springy Shrub: you’ll need a springy sapling or shrub to serve as the energy source for your snare.
It should be tall and elastic enough that you can bend the top down far enough to put the trap under considerable tension, like a bow.
When activated, this is what will supply the energy to your wire, cinching it down, lifting the animal and, hopefully, keeping it securely in place until you show up to collect it.
You can use a young sapling for this which is ideal; just make sure it will immediately whip back into its original shape when you bend it over!
Note: Leave the sapling in its place: don’t cut it or break it in any way.
And that’s it! There are 101 variations on this trap, but this is one of the oldest, simplest and best using the most commonly available materials.
Steps
The following steps will tell you how to make an effective and simple snare trap. Read through all of the steps, check out the photos, and then circle back before you start practicing so you’ll know what to expect.
Step 1: create loop in wire. Taking your dowel rod or other similar item, make one and a half complete turns around it with the wire:

You should have at least 3 inches of wire extending back over the standing part of the wire.
Step 2: twist working and standing part of wire together. Now simply twist the working end of the wire over the standing part repeatedly, like so:

You can rotate the dowel rod or other item like a windless to assist with this. Make sure it is snug, then knot to secure and keep it from slipping.
Step 3: remove drill bit. Now slip the rod or drill bit out of the loop you just formed. Take care not to deform the loop.

Step 4: form noose. Now slip the opposite end of your wire through the loop you just formed to make a simple noose.

This is the active part of the snare that will cinch down instantly around the leg or body of an animal once the trap is activated. Assuming, of course, that all goes well.
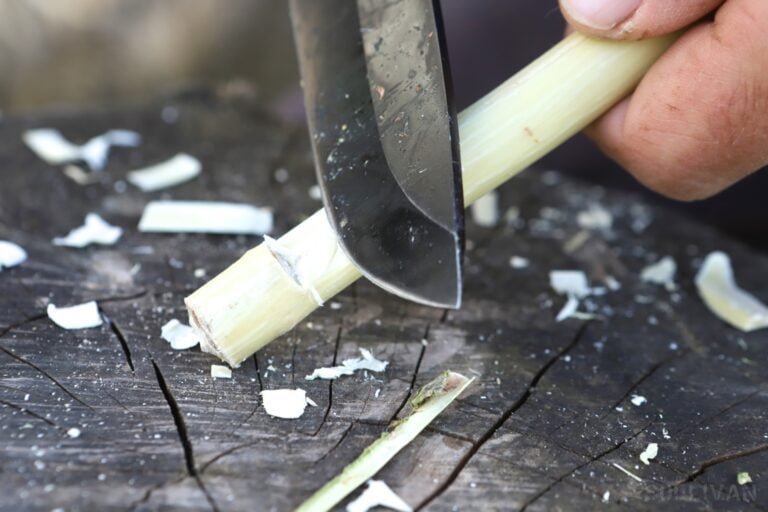
Step 5: prep hook. The hook is the thing that holds the noose and connects to the line, which is the other part of the wire connecting the hook to the sapling.

Using your knife and the smaller of the gathered branches, split it in half along three-quarters of its length. Then make a clean, 90° cut to remove that long piece.
Take the time to clean up the resulting flat surface so it’ll mate neatly with the piece you’ll prepare in the following steps.
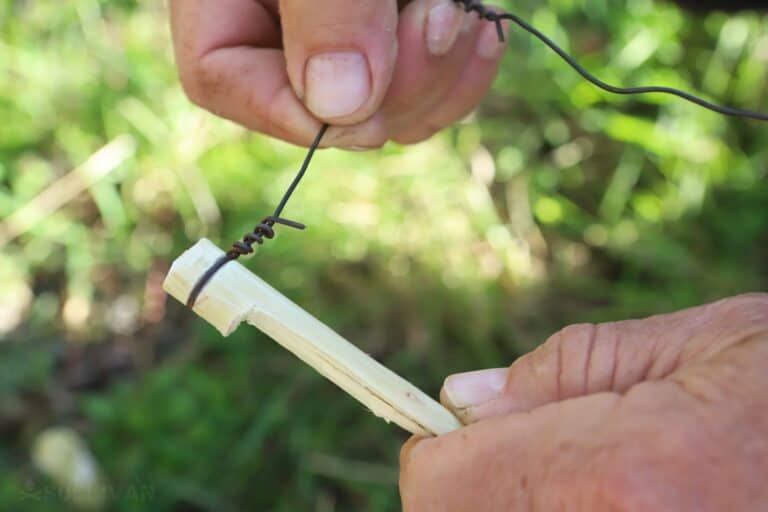
Step 6: carve notches in both ends of hook. Now taking your cutting tool, carve a shallow notch around the circumference of both ends of the hook. This will allow you to secure the noose and the line to the sapling.

Step 7: carve the base peg. The base peg is the thing that you need to secure into the ground; the part that will securely anchor the hook and the whole trap when it’s set. Make this from the larger of the two branches.
Cut off one end at an angle so you can drive it into the ground like a stake:

…then cut an identical or nearly identical surface into it to match the hook:
Here’s how the two wooden pieces will fit together:

Step 8: Place base peg. Very near where you want the target location to be for your trap, securely anchor the base peg into the ground.

Make sure it won’t come out even with a couple of good tugs so you’ll know it is strong enough. Remember, this must be near and in line with the sapling you will use to provide power to the trap.
Step 9: measure line. Now you need to bend the sapling over toward the base peg enough that it will have some snap when you release it. If it doesn’t, your trap won’t activate quickly enough or forcefully enough to capture your quarry.
Once you think you have it on the sweet spot, take note of how much distance is between the end of the sapling and the top of your base peg. This is how much line you will need.
Typically, this is the distance from the tip of the sapling to the ground when it’s fully bent, plus another foot or two.
Step 10: attach line to sapling. Using the measurement you just established, securely tie or anchor one end of the wire to the end of the sapling.

Step 11: check fit of trigger components. Before we complete the assembly of the trap, take the time to fine-tune and check the fit of the hook and the base peg. It should look like you have hooked the little legs of two uppercase Ls together.

They must fit securely so the trap will remain armed, but not be so snug that they won’t come undone when disturbed by your prey. You might need to fine-tune this later.
Step 12: attach noose to hook. On the same end that you carved out, the one that connects to the base peg, attach the working end of the noose securely to the hook around the notch you carved in its circumference earlier. Make sure that the noose cinches up easily when you pull on the working end.
Step 13: Tie line around opposite end of hook. At the other end, securely tie or secure the free end of the line hanging from the sapling you tied in step 10. You should now have the hook connected at one end to the sampling by the longer line, and at the other end of the hook, your noose.

Step 14: set snare. Now, carefully pull down the sapling keeping the hook under control with your other hand.
Once it is pulled low enough to fit the hook into the base peg, carefully fit the two together so the trap stays under tension. If there is not enough tension or too much, you should adjust the length of your line between the hook and the sapling.

Step 15: test it. You’ve got to be sure that the trap will spring easily when the target animal blunders into it. Using a long, sturdy stick and taking care to stand in a safe spot, tug on the noose and see how easy it is for the trap to trigger.
Too easy means you’ll be getting accidental activations and wasting time. Too hard means the animal can pass through it and take the bait without setting it off.
Step 16: adjustments. If necessary, change the positioning of the base peg, the geometry of the hook, and corresponding surface on the base peg, the length of your line or noose, and the tension of the sapling. Once you get a feel for it, you’ll be able to get it just right in no time.
Step 17: set trap and place bait if you have it. Once you have all the kinks worked out, set your trap one last time and place bait in the target area. Make sure you come back to check on your trap regularly if it isn’t within line of sight or earshot. Animals can escape if left alone!
Step 18: finished! Your snare trap has been built, tested, tuned, and is now set and ready to bag you some dinner.
If you’re not near it, you’ll have to look really closely to notice it. The green paracord and greysh-brown snare wire fit really well with the surroundings:
Variations
- Don’t have a knife? You can still make this trap work by finding a hook and base peg that have angled branches you can snap off. With a little fiddling, you can make the two hold together just by hooking the stumps of the branches together. No carving required!
- Animals not entering trap? Try using a baited trigger approach. If you have soft bait like peanut butter or something else, you can smear it on the bottom of the hook so that your prey must actively tamper with it to get the bait. This works especially well if you can position it so that the prey must stick its head through the noose.
- Try a horizontal base peg. If you have something small and sturdy, like a nail or screw, or a crevice that you can wedge a wooden base peg into, you can have it sticking out of a surface horizontally. You can then attach the hook to it directly under the end of the base peg.

The post How To Make a Snare Trap With Snare Wire appeared first on Survival Sullivan.
https://www.survivalsullivan.com/classic-snare-wire-trap/
 CampingSurvivalistHuntingFishingExploringHikingPrivacy PolicyTerms And Conditions
