At a Glance
- The Axle Pack from Old Man Mountain is a unique way to add bottle and gear cage mounts to any thru axle fork.
- It’s well designed, rock-solid, and fairly light especially for how sturdy it is.
- It’s a bit expensive compared to DIY solutions like hose clamps, but far more convenient, reliable, and sturdy.
- I’m testing the Axle Pack on my suspension fork to add capacity and redistribute my load closer to the ground. It would also be a great fit for carbon or tapered forks without cage mounts.
Fork cages are one of my favorite ways to add capacity to a bikepacking bag setup. They keep weight low to the ground, fit a just-right amount of stuff, and don’t require any expensive bags (a simple dry bag works fine, or they’re great for large water bottles). As a small person on a 29er bike, I wouldn’t have gotten very far without my fork cages and the gear, food, and water they carry.
As someone on a mission to help more people get into bikepacking, I’m very excited about OMM’s Axle Pack. It adds rock-solid mounting points to forks that don’t have them, and it makes so much sense you’ll wonder why it didn’t exist sooner. It’s another step in Old Man Mountain’s mission to “make every bike a bikepacking bike,” which I wholeheartedly support. I also have experience with OMM’s Elkhorn and Divide racks (over 2000 miles on the latter) and have always found their stuff to be reliable and sturdy.
My rigid forks have built-in mounts, but I’ve been working on my hardtail setup lately and decided to test the Axle Pack on my suspension fork. I recently put it through a long weekend trip (with 6600 feet of vert!) on singletrack and rugged fire roads in Henry Coe State Park. It performed flawlessly, unlocking a new way of loading my hardtail with worry-free mounting even on the roughest terrain.
I’ve written this detailed look at the Axle Pack installation process, and its performance during my test trip, to help you decide if the Axle Pack is right for your upcoming bikepacking adventures. My focus here is on suspension forks, but the other stellar use case is carbon forks (or any fork that tapers downward) without built-in mounts.
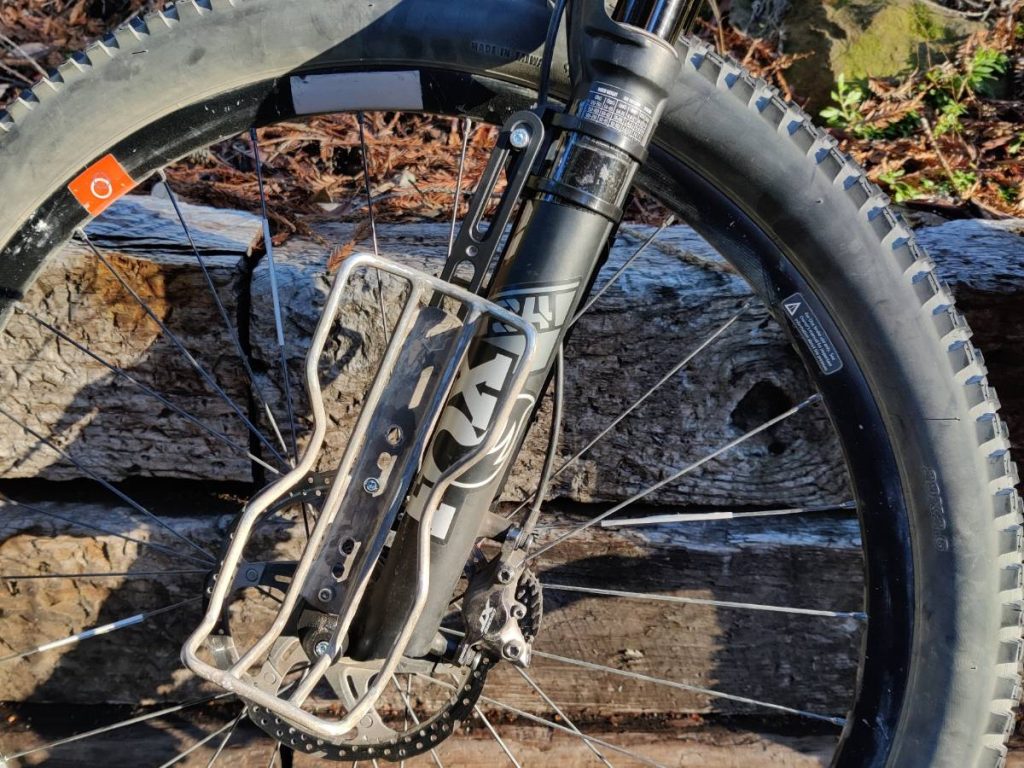
The Axle Pack can add cage mounts to your suspension fork, carbon road bike fork, and everything in between.
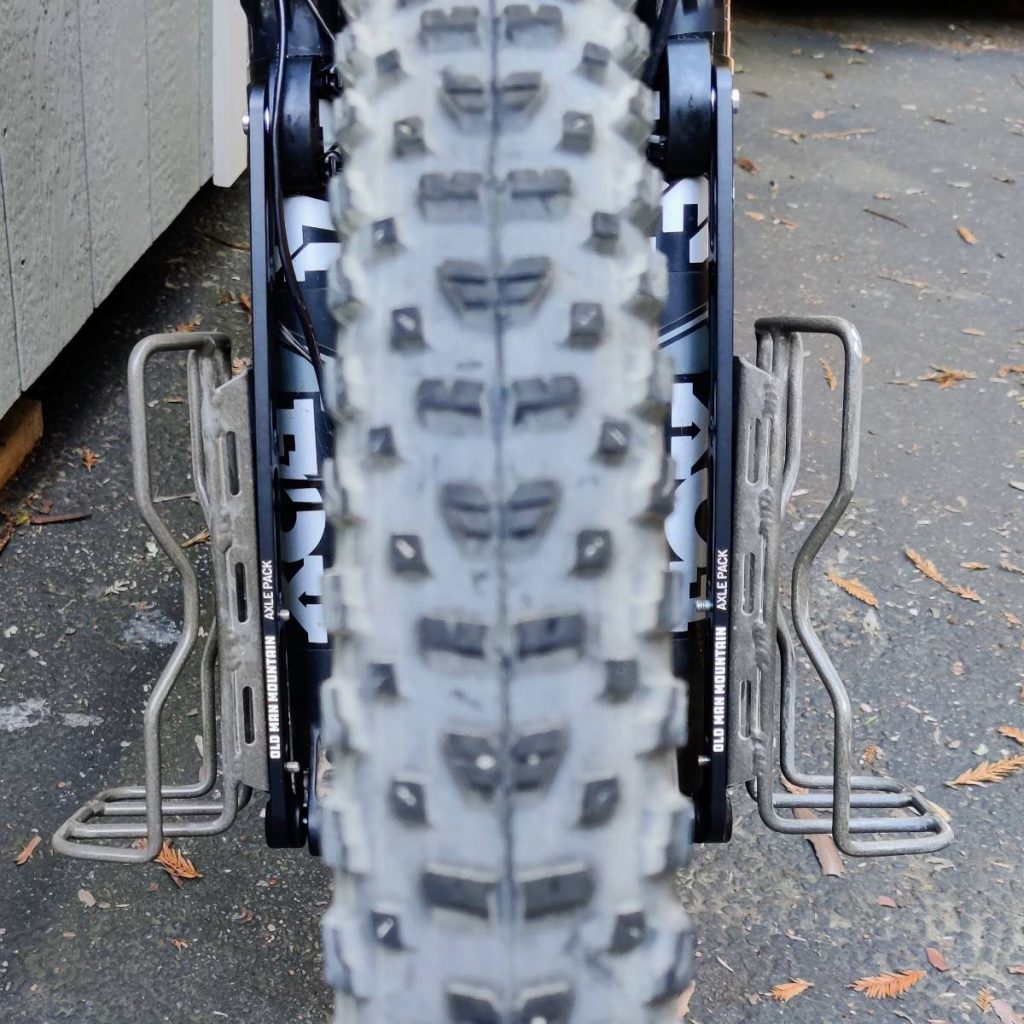
The Axle Pack mounted to my suspension fork, with two cargo cages ready to load up.
Old Man Mountain provided the Axle Pack for testing, but this has no impact on my review or opinions. When you buy through affiliate links in this post, I may earn a small commission. Thanks for your support!
Summary
Product: Old Man Mountain Axle Pack
The Axle Pack adds rock-solid cage mounts to any thru axle fork, opening up an ideal cargo location to many more riders with no risk of slipping, spinning, fiddling, or damage. It isn’t cheap, but it is reliable, lightweight, and convenient. I installed it on my suspension fork and so far it’s performed flawlessly.
Price: $60 for the pair plus $80 for Fit Kit = $140 total
Weight: 73g per side
Max load: 5 kg / 11 lb per side
Material: 6061 aluminum
My rating: 4.8 out of 5 stars, impressed by both the unique idea and the execution
What I love about the Axle Pack:
- Opens up incredibly useful cargo options for bikes without fork mounts
- Works with nearly any bike from road to full-suspension, as long as fork has a thru axle
- High load capacity of 11 lbs per side
- Tall enough for big (5 liter) dry bags
- Fairly light, only a few ounces more than much less reliable solutions
- Removes risk of slippage, dangerous wheel jams, and fork damage from DIY solutions like hose clamps
Could be better:
- Expensive compared to scrappier solutions
- Doesn’t work with QR skewers, only thru axles
Which Forks?
What type of fork does the Axle Pack work with? Almost any fork, as long as it has a thru axle (sorry QR skewer folks).
The axle pack mounts to… you guessed it… the axle. Thanks to OMM’s Fit Kit system (explained below) almost all thru axle standards are supported. This means the Axle Pack can mount to your carbon road bike, your mountain bike with suspension fork, and everything in between.
My Suspension Fork Setup: Unexpected Benefits?
When I heard about the Axle Pack my first thought was actually: “Brilliant idea for other people, but I don’t need it.”
I usually bikepack with a rigid fork that already has 3-pack mounts. Only rarely do I bikepack with a suspension fork, and only for technical trails. For that type of riding I try to keep weight as light as possible, avoiding cargo cages and the extra capacity they allow.
But when I started thinking about it, I realized there is plenty of room to improve my hardtail bikepacking setup. First of all, I’m a small person on a 29er with a dropper seatpost, so limited cargo space means I can’t run my suspension fork on a more gear-intensive trip without rack or cages. And a rack, even a minimalist one like the OMM Elkhorn, would add more weight than the Axle Pack.
Then there’s ideal weight location. To compensate for lack of space elsewhere I carry a fairly heavy load in my handlebar harness. This requires adjusting my fork’s air pressure and isn’t ideal for technical trails from a weight distribution standpoint. With the Axle Pack I’m excited to transfer some of this load to my fork lowers and see if it improves handling in any noticeable way.
I’ll report back once I’m able to take a bikepacking trip on some respectable trails. But in the meantime I’m thinking this setup has benefits for riders of mountain bikes who need a bit more cargo space but want to keep weight “as low as possible,” with a double meaning of close to the ground and light overall.
Design
The Axle Pack is a simple design, just two aluminum uprights with four 64mm spaced mounting bolt holes through each. The bolt holes in the Axle Pack are drilled and threaded all the way through, so they accommodate a wide range of bolt lengths.
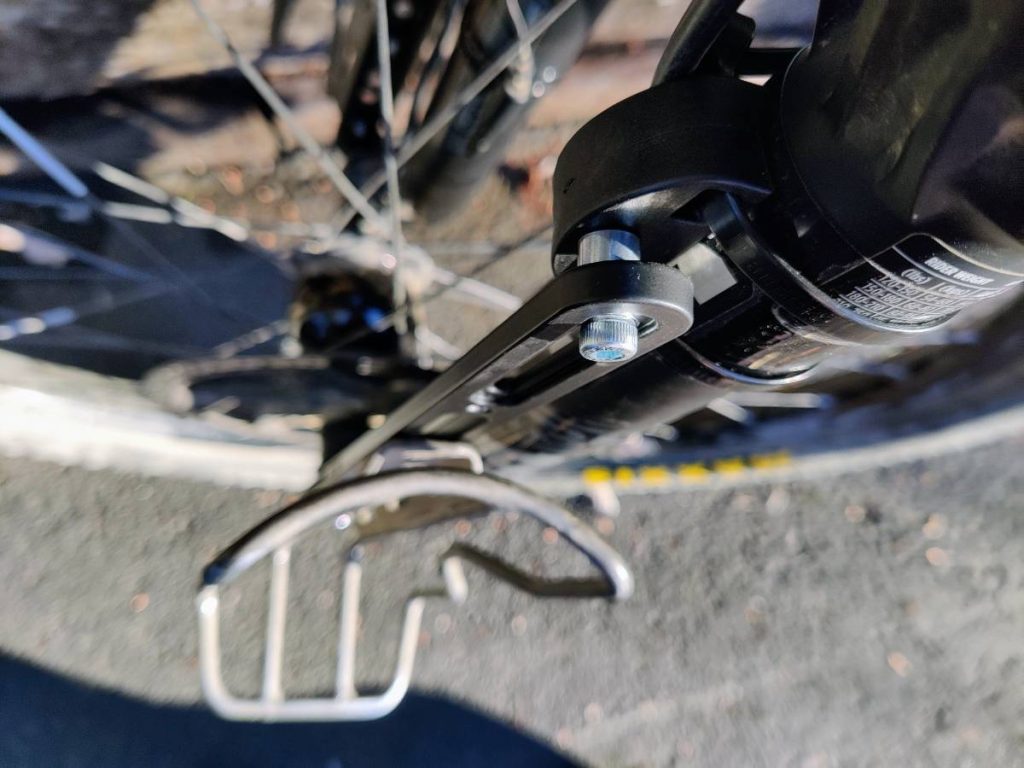
The bottom end bolts onto the end of a special axle that replaces the one in your fork (see the Fit Kit section below). The slot at the top bolts onto a “puck,” a little piece of plastic that attaches to your frame with extra-burly zip ties. (Or, if your bike happens to have eyelets in the right place, it can attach to those.)
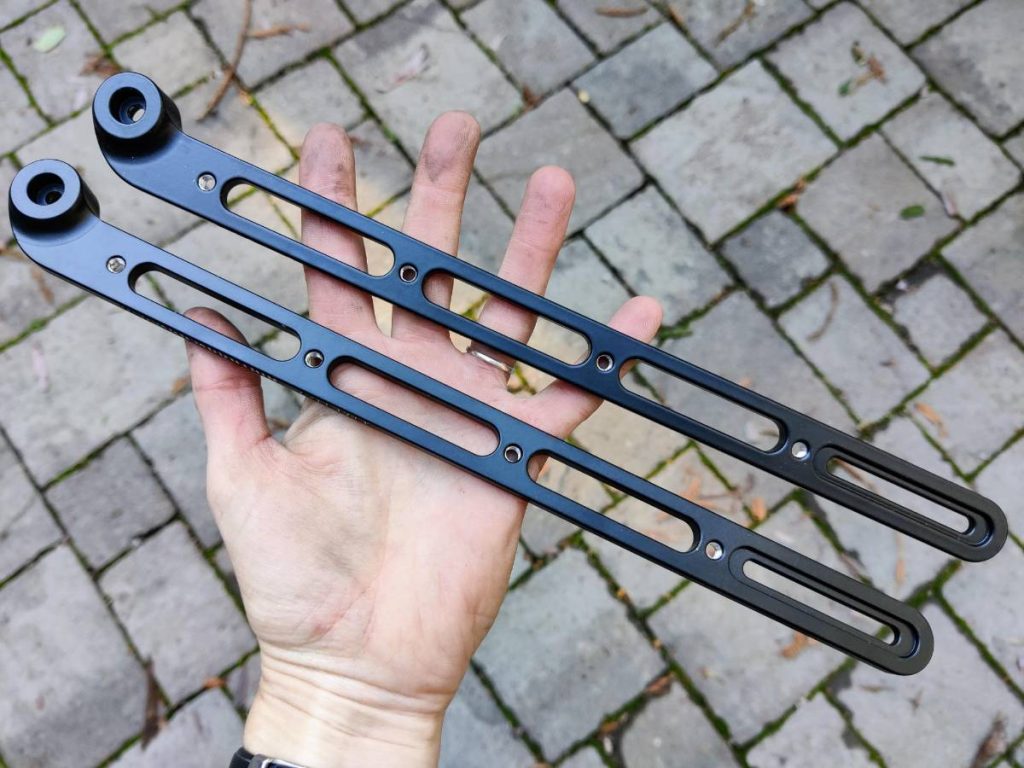
Once the Axle Pack is in place you have two aluminum strips running roughly parallel to your fork blades. Each strip has four 64mm spaced bolt holes to which you can mount any standard bottle or cargo cage. Four holes gives you flexibility to mount two and three bolt cages in the best position for your setup.
How Fit Kits Work
Fit Kits are the magic behind Old Man Mountain’s claim that their racks mount to any bike.
A Fit Kit consists of two parts: an axle that replaces yours and provides the main load-bearing mount points, and two plastic “pucks” that attach to your frame with extra-strong zip ties. For racks like the Elkhorn and Divide these pucks attach to the seat stays. For the Axle Pack they attach to the upper fork blades.
There are a few different styles of pucks for different types of forks, and a few possible orientations of the pucks and uprights. This allows Old Man Mountain to make a single version of the Axle Pack that fits pretty much any fork, no doubt after some careful design work to account for all the possibilities.
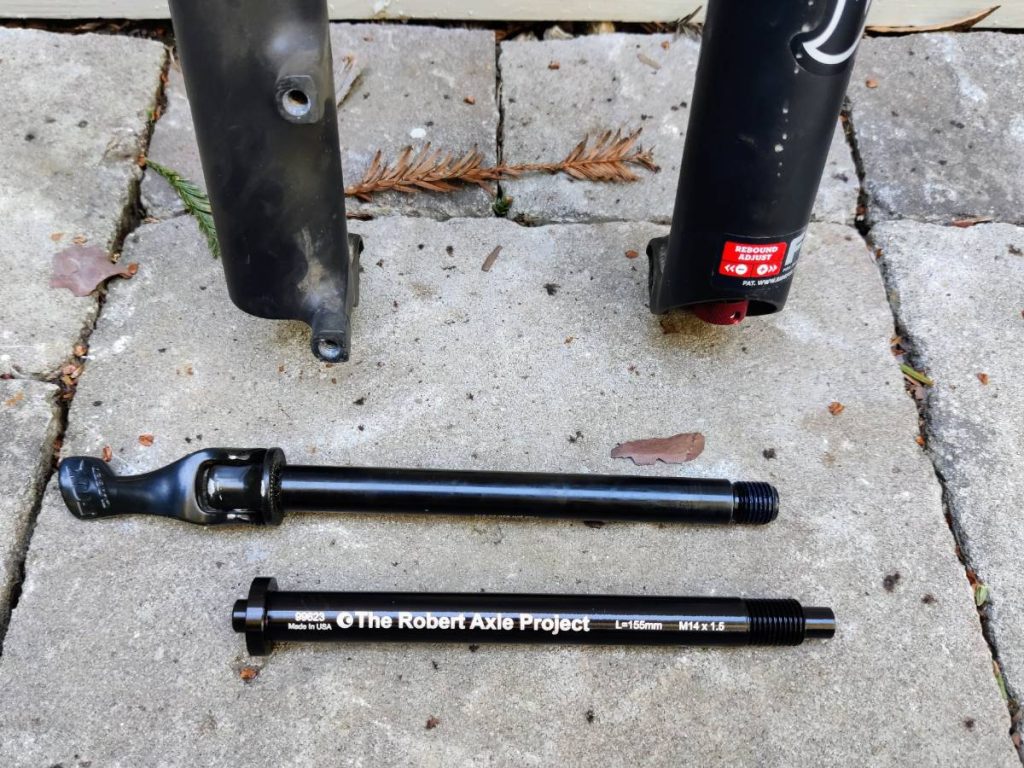
The Fit Kit axle from Robert Axle Project (front) will replace my fork’s stock axle (back).
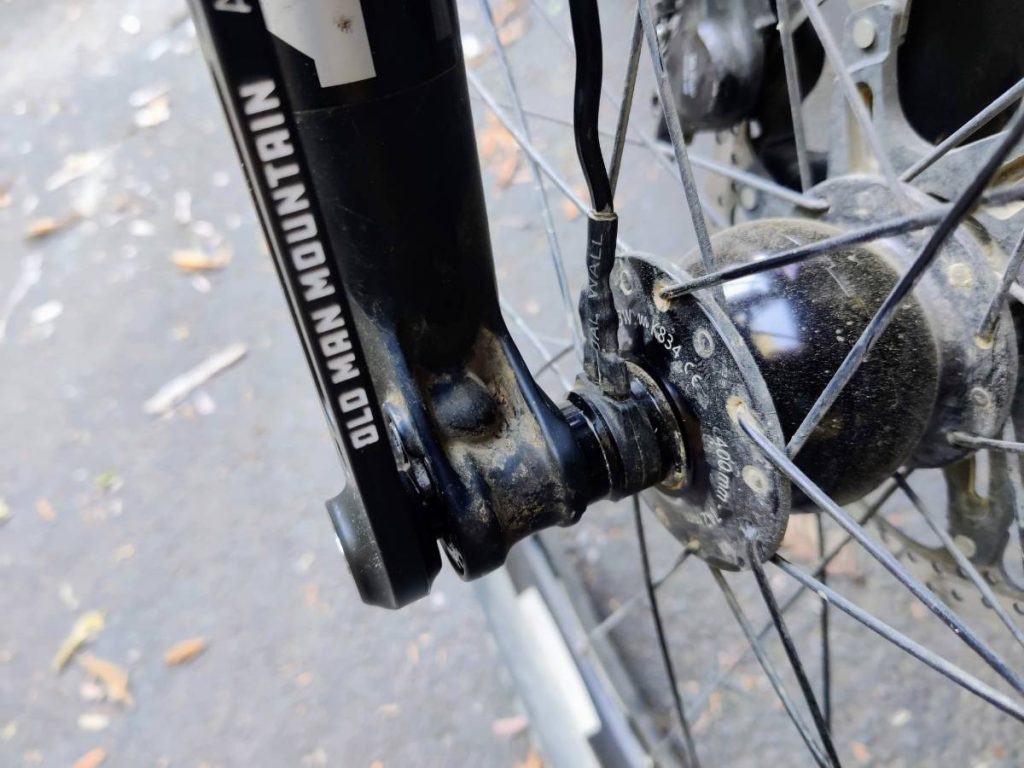
Axle Pack mounted to the end of the Fit Kit replacement axle.
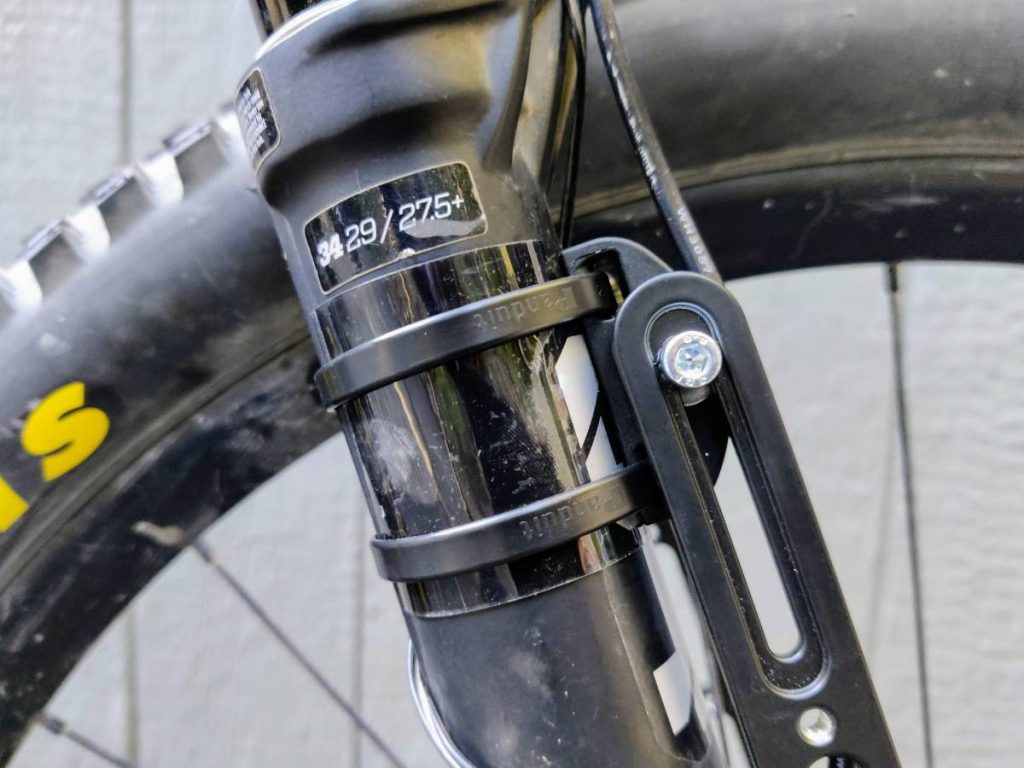
Axle Pack attached to my fork with the puck and special zip ties from the Fit Kit.
Axles are a varied bunch, but OMM offers an array of Fit Kits for most combinations of thru axle length, diameter, and thread pitch. They even offer QR skewer Fit Kits for their racks, though the Axle Pack is only for thru axles.
These Fit Kits aren’t cheap. At $80 a thru axle kit is more expensive than the Axle Pack alone, and you can’t use the Axle Pack without one. But the extra expense makes it more likely that you’ll get your money’s worth from the rest of the system over time. If you’re willing to shell out for multiple Fit Kits you can use the Axle Pack on any thru axle fork, from your road bike to your full-squish mountain bike and probably any new bike you buy for many years to come.
The Fit Kits are cross-compatible with all of OMM’s products. So if you have a Fit Kit for a specific fork you can use it with the Axle Pack or any of OMM’s racks (Elkhorn, Divide, Pizza, whatever they come up with next). For example, I previously bought a Divide rack and rear Fit Kit for heavier touring, and now that I have the front Fit Kit for the Axle Pack I could also run my Divide in front.
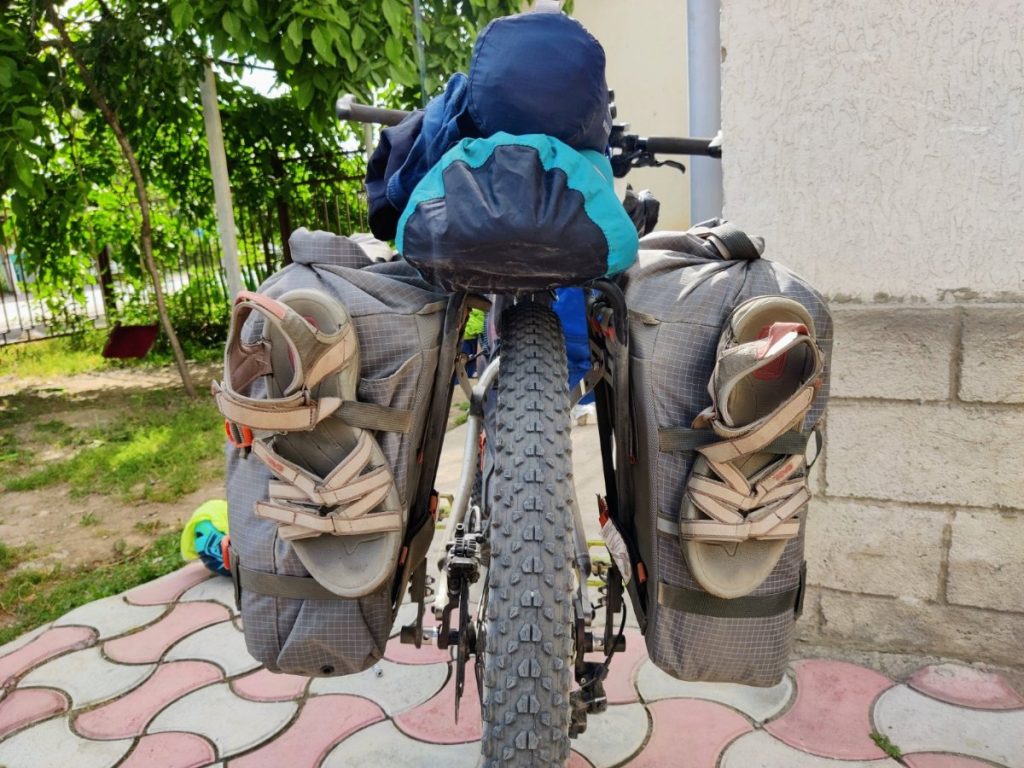
My front Fit Kit can now do double duty, allowing me to run my Divide rack (shown here in Kyrgyzstan) in front if I need more capacity than the Axle Pack provides.
Installation
Installing the Axle Pack on my Fox 34 Performance Elite suspension fork was easy once I figured out what all the hardware bits were for. Most of the baggies were labeled and there are good instructions online.
The first step is to replace the fork’s axle with OMM’s Fit Kit axle. In my case this was super straightforward, no spacers or other hardware needed and the new axle was a perfect fit.
Next step: attaching the uprights to the ends of the axle with bolts and lock washers. Again, super easy. The uprights are symmetric and interchangeable so there’s no “wrong side” to install them on. Each can face forward or back depending on what works best for the fork. In my case I needed to put the “feet” facing backward in order to sit cleanly against my fork lowers.
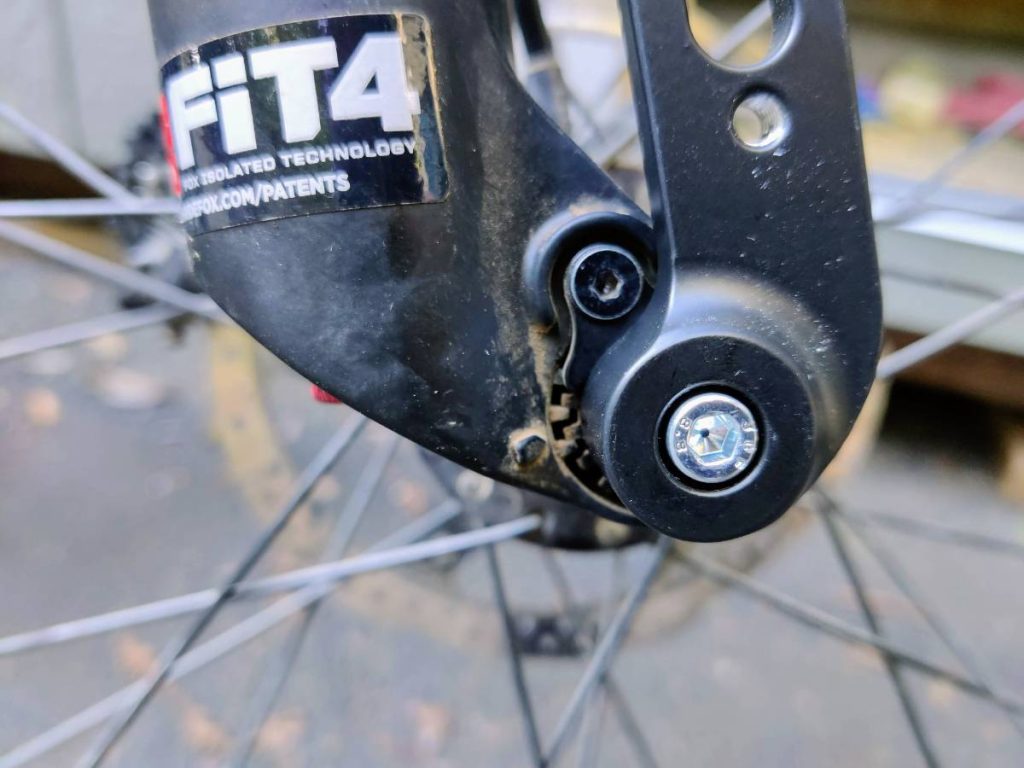
The uprights can face either direction, so I installed mine with the “feet” facing rearward to clear the various bits in my suspension setup.
The last step is to attach the pucks to the fork. I’ve used this same style of puck before when securing the Divide and Elkhorn racks to my seat stays, so the process was familiar. First I loosely attached the pucks to the uprights so I could find the ideal puck position on my fork. OMM recommends attaching the pucks as high as possible in the slot, presumably to leave room for a cage in the top bolt position and for maximum stability.
The little hex nuts that sit inside the puck have nylon inserts to prevent accidental loosening. The round side of the nut (where the white nylon insert is) should face outward, toward the end of the bolt and toward the wheel.
Pro tip: Open the cardboard packaging all the way to find all the hardware! At first I missed the baggie with the spacers in it, so I bolted the uprights directly to the pucks. It seemed to work but did put a bit of inward strain on the uprights. Once I found the spacers the entire setup was perfectly aligned.
I applied the protective tape to my fork (nice quality, thick yet easy to apply) and loosely ran the zip ties through the pucks, adjusting in small increments. When everything seemed perfectly aligned I tightened the zip ties, snipped off the extra (nail clippers make a clean and close cut), and tightened the bolts at the pucks and axle.
Though you do want to get the zip ties tight, don’t worry if there’s a tiny bit of slack. With the uprights attached they can’t slip downward.
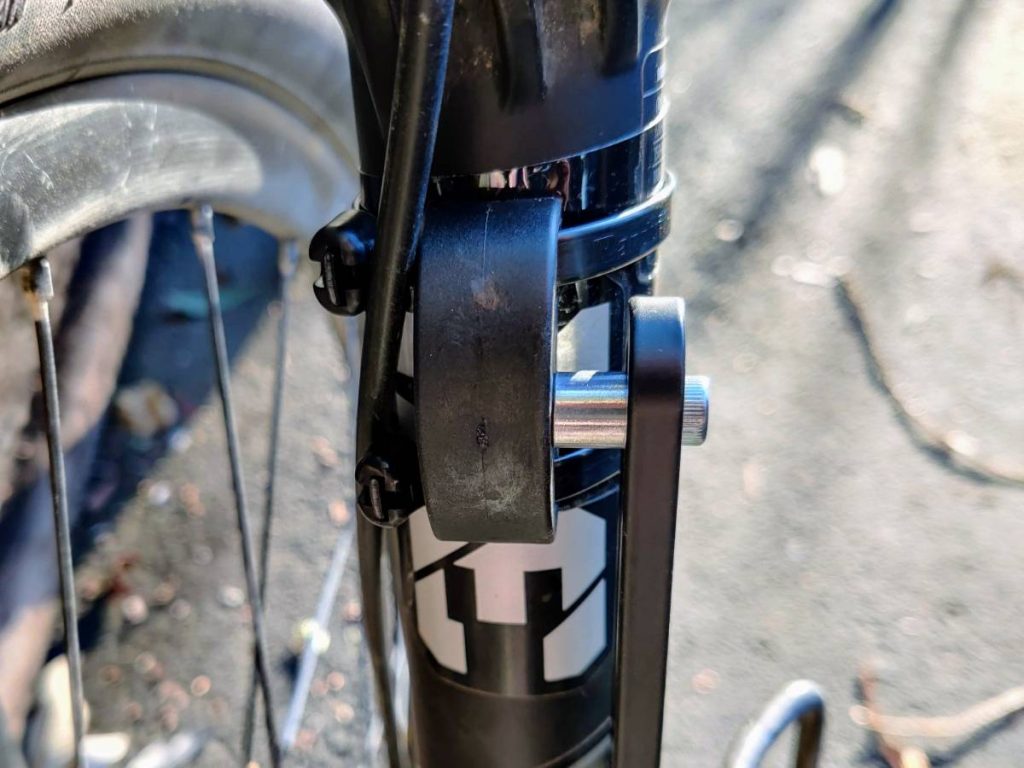
The upright attached to the puck, with a spacer for perfect alignment.
With the Axle Pack installed, I mounted up a couple of my typical Blackburn Outpost cargo cages. The Axle Pack will work with any 64mm spaced cage, from a 2-bolt bottle cage to a burly 3-bolt cargo cage. It comes with six standard M5 mounting bolts, but the ones that came with your cages should work too.
The finished setup is well-aligned and feels very secure. I have a few cables wrapped around my fork lowers for my dynamo hub and little cycling computer, and they sit under the Axle Pack uprights with no problems. There is enough space between the uprights and my fork lowers to thread Voile straps, handy if your cage doesn’t have slots in the right places or you want to give the bolts some extra support.
Weight
The Axle Pack’s claimed weight is 73 g per side, which I assume is just for the uprights since that matches my scale. We also need to factor in the weight of the hardware and pucks (unless mounting to upper eyelets on the fork). On my scale all of this together measures 208 grams or 7.3 oz.
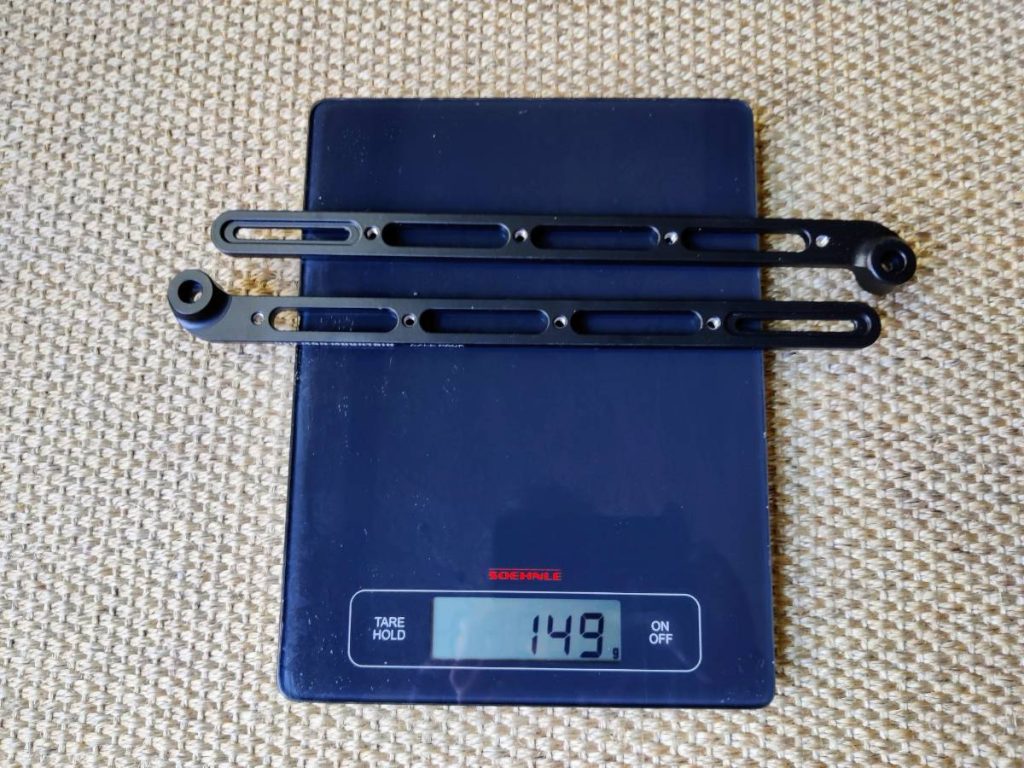
I measure the uprights alone at 149g for the pair.
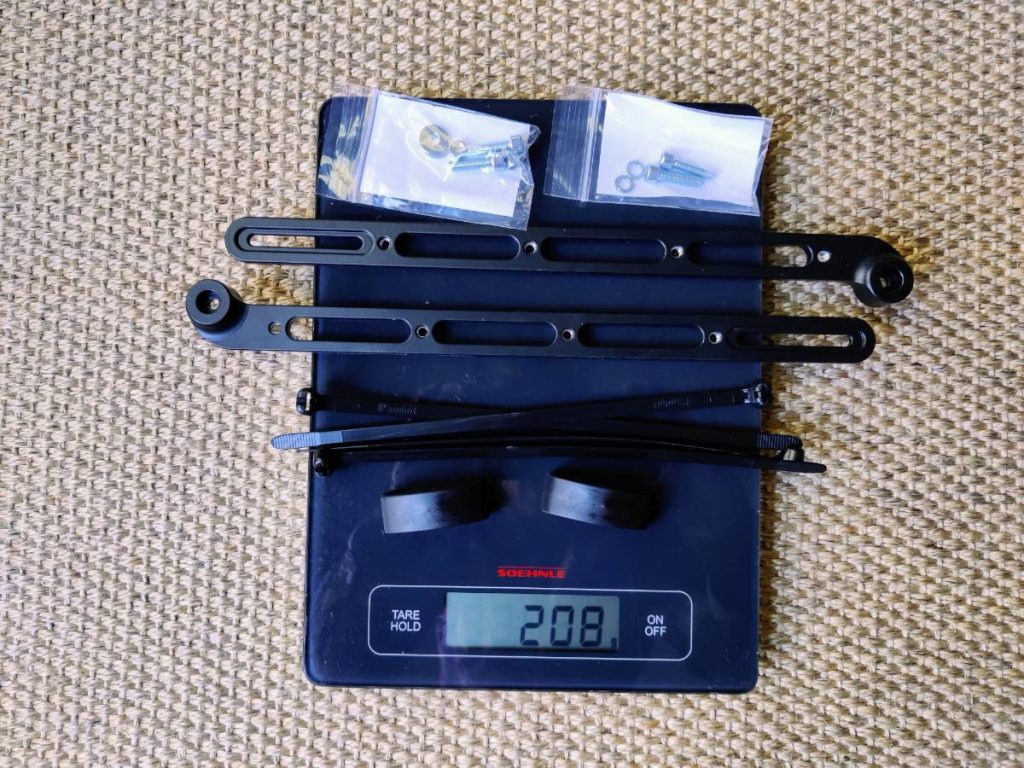
I measure 208 g, or 7.3 oz, for the uprights, pucks, and hardware.
Technically I should also compare the weight of the Fit Kit axle versus my original one, and my scale above is missing some spacers I didn’t find until later. And those heavy plastic bags might be skewing the results. 🙂 But close enough!
So that’s an extra 208 grams or 7.3 ounces, a bit under half a pound, for the ability to mount cages on your fork. Not bad, but not nothing. How does it compare to the alternatives?
A 2-pack of Topeak Versa Mount clamps weighs 26g, so two sets would add 52g or a 3-pack would add 78g. But for a far less reliable solution in my opinion! A pair of Versa Mount clamps are only rated to 3.3 lbs, compared to the Axle Pack’s 11 pound rating.
Even hose clamps weigh something, about 20g for a larger diameter clamp according to my scale which adds up to 120g for two 3-packs. That’s heavier than the Versa Mounts, even without all the necessary electrical tape or other protection underneath.
What about compared to a rack? OMM’s Elkhorn, which has cargo cage mounts on the uprights, weighs about 800g including pucks. Though the Elkhorn is reasonably light as far as racks go, that’s almost 4x the weight of the Axle Pack. You wouldn’t get the Elkhorn just to add cargo cages to your fork unless you really also want the extra cargo space of the deck.
With all that said, the Axle Pack’s weight is looking very reasonable. It weighs 4-5 oz more than most clamp solutions but with a much bigger load capacity and better reliability. And it weighs a whole 1.3 pounds less than a minimalist rack designed to carry cargo cages.
Performance and Reliability
Where I live, it’s hard to bikepack anywhere worthy of a suspension fork in the middle of a rainy winter. So I’m still awaiting my first real trip with the Axle Pack, but I have plans for spring! I’ll be updating this review with my impressions from the field once I’m able to test more thoroughly.
So far during my test loads and short rides the Axle Pack seems rock solid. I’ve also put some serious miles on OMM’s other Fit Kit systems (the Divide and Elkhorn racks) and both have been very reliable. It’s hard to imagine the Axle Pack not working reliably, but I’ll have to take it on a rugged bikepacking trip before I say for sure.
Alternatives
Technically there are other solutions to the problem the Axle Pack solves, but they are less reliable, safe, and convenient in many cases. Here’s an overview of the other options and how they compare.
Scrappy DIY Solutions
So the elephant in the room is, do you really need to pay $140 for the Axle Pack + Fit Kit when bikepackers have been attaching cargo cages to their forks with hose clamps and electrical tape since the dawn of time?
Hose clamps are the classic way to mount cages to forks without built-in mounts, and they’re dirt cheap. Sturdy zip ties are a similar idea. Be sure to put a few layers of electrical tape, cloth rim tape, or thin innertube underneath for padding!
Related: Creative Ideas for Bikepacking on a Budget
Hose clamps and related solutions can work well in limited cases: mounting certain types of cages with light loads to round fork blades with uniform diameter. I would feel comfortable using them to mount a standard bottle cage to my suspension fork, for example, but not to mount a heavy cargo cage to a carbon fork that isn’t round and narrows toward the bottom.
Caution: Be very careful using clamps on carbon forks (risk of damaging the fork) and especially tapered fork blades that get narrower toward the bottom. If your cage were to slip downward and loosen, it could rotate into the front wheel causing a nasty crash. Though I’m sure people have gotten away with it, the official advice is not to try it.
Electrical tape is other option for carbon forks and non-round shapes. Carefully pad the fork blade under the cage, then wrap an obscene amount of electrical tape around the entire length of the cage. This is obviously a pain to mount and remove, so don’t plan on swapping your cages between bikes. It’s also not safe for blades that taper toward the bottom due to risk of slipping, no matter how sticky that tape seems.
Compared to these cheap and cheerful alternatives, the Axle Pack has some significant advantages:
- No risk of spinning into wheel and causing a crash
- No slipping or fiddling
- Can reliably support a heavier load
- Easier to install and remove
- Works with carbon forks or other shapes that aren’t round
- Works with certain cargo cages, like the Salsa Anything EXP, that aren’t shaped well for DIY mount solutions
- No risk of damaging fork by overtightening or not getting the protection layer right
It’s worth noting here that the Axle Pack has a rated max load of 11 pounds per side. Coincidentally(?) this is the same as the rating of the highest-rated cage I’ve seen, the Blackburn Outpost, and probably exceeds the rated max of most other cages out there. So you can feel good about loading it up in ways you would never dream of with clamp-style mounts.
Fancier Clamp Mounts
Purpose-built mounts like the Topeak Versa Mount, and a variety of questionable cheap gadgets on Amazon, are suggestive of hose clamps with a bit more polish. Zefal used to make one that I can’t find anymore, but years ago I used it to mount bottle cages on my Long Haul Trucker. It was workable and did carry my 1.5 liter bottles successfully, but it made me nervous, and eventually it broke in a way that made it very hard to remove from my fork.
These types of mounts are a step above hose clamps but they do have some of the same drawbacks: lower load capacity, risk of slipping or spinning, and a poor choice for some shapes of fork blades. Most of them are designed to hold a single standard water bottle cage, not a 3-bolt cargo carrier loaded down with five days of food in a dry bag.
The only promising clamp-style mount I’ve seen in the bikepacking realm is the BarYak Mule, and it’s probably the most direct competitor to the Axle Pack. It uses burly UV-stable zip ties (that look a lot like the ones in OMM’s Fit Kits) and Gorilla Tape adhesive to create a slip-free, spin-free attachment. It’s targeted at bikepackers and has a loyal following, so it’s been thoroughly trail tested and seems to be reliable. The biggest drawback I can see is a bit more futzing with tape and adhesive to switch between bikes, and potentially some fit issues with certain sizes and shapes of fork.
Front Rack
It’s worth noting that OMM’s own Elkhorn rack (see my review here) is a versatile alternative to the Axle Pack if you’re in search of more cargo capacity. It’s heavier by about 1.3 pounds and costs $108 more, but in addition to cargo cage mounts on the uprights you also get a rack deck. And, it can switch between front and rear (with an extra Fit Kit).
Who Is This For?
Considering all this, who will get the most value from the Axle Pack? My thoughts:
You need reliable fork mounting for heavier loads on a long or rugged trip where you don’t want to risk dealing with a cheaper solution that fails.
You want to carry heavier loads on a carbon fork and don’t want to risk damage by messing up a DIY solution (overtightening, slipping and abrasion, etc).
Your fork blades are tapered or not round, which makes clamp-style mounts tricky and potentially dangerous.
You want to regularly and easily transfer cargo cages between multiple bikes or forks (assuming all have thru axles).
You already own an OMM rack and perhaps a front Fit Kit. Now you have a bit of an “ecosystem” where you can swap between the rack for long tours and the Axle Pack with fork cages for lighter bikepacking missions.
You have more money than time or patience to futz with DIY solutions.
More Bikepacking Resources
If you liked this post, you might also like these:
Or visit the bikepacking section for lots more!
About the Author
Hi there, I’m Alissa, founder of Exploring Wild. I’ve traveled over 19,000 miles by bike and still can’t stop planning my next ride (and helping you plan yours). Pavement and panniers or singletrack and seat bag, I love it all. On my bike I feel free. Learn more about me here.
Shop Bikepacking Resources
Bike resources in your inbox?
There’s more where this came from! Sign up here for occasional emails full of inspiration and information about bikepacking and bicycle touring.
Share the Adventure
If you found this article helpful, please consider sharing so more people can benefit from it:
The post Old Man Mountain Axle Pack: Tested and Reviewed on My Suspension Fork appeared first on Exploring Wild.
https://exploringwild.com/old-man-mountain-axle-pack-review/?utm_source=rss&utm_medium=rss&utm_campaign=old-man-mountain-axle-pack-review
 CampingSurvivalistHuntingFishingExploringHikingPrivacy PolicyTerms And Conditions
