In matters of survival, you’ve got to be crafty. You have to make the most of what you have and get the job done even with suboptimal tools. For instance, you might be forced to survive eating nothing but plain bread baked in a… Altoids tin? Really?
Yes, I’m serious, but not that serious: it’s hard to imagine a set of circumstances where all you’ll have is an Altoids tin and the ingredients to make bread and be forced to survive on that alone.
That being said, it’s a fun little trick that can allow you to pop out a biscuit pretty much anytime and anywhere, even if you don’t have access to a kitchen or electricity.
It’s a fun little project to do if you’re bored, to try with kids, or just to impress your friends and family. You never know when a craving for fresh baked bread will strike! Keep reading, and I’ll show you what to do.

Tools and Supplies
As you might have already guessed, you really don’t need much to pull off this recipe. Still, you will have a little prep work to do if you want to do it safely. Gather the following tools and materials, and then we’ll move on to the ingredients.
Altoids Tin: just a common Altoids tin with all the mints and paper removed. Nothing to it! Make sure it has the lid still, and that it’s securely fastened.
Steel Wool: you’ll need some coarse steel wool, 00 works well, to scour the paint and coating off of the tin. I know this seems superfluous, but it is important so you don’t release nasty chemicals into your bread during baking. If you don’t have steel wool, a copper or other metal brush will make short work of the paint.
Mixing Bowl, Small: any mixing bowl you want is just fine for this recipe as long as it’s clean. If you’re really in a pinch, you can mix the dough inside the tin itself, although it is a pain in the you-know-where.
Spoon: a small spoon for stirring the dough ingredients together.
Toothpick: you’ll use a toothpick to check the bread for doneness during the baking process.
Rack: to hold the Altoids tin over your heat source. There isn’t really a purpose-made rack for this sort of thing, as you can imagine. You can fashion one out of a bare wire coat hanger or some other kind of wire that can tolerate heat without releasing noxious fumes.
You’ll need to improvise, but in a pinch, you can usually use a couple of empty soda cans side by side to balance the tin on if you want.
Heat Source: you’re not going to bake bread without heat! For this task, a single large candle or two small tea lights will do the job. Make sure they’re as low as possible so you can easily position the tin above them.
Alternatively, you can use a hobo stove or Penny stove if you really want to show off your survival know-how and MacGyver skills.
Timer: some sort of timer so you know how much time has passed when you start baking the bread.
Ingredients
No surprises here, you’ll need common ingredients used for making bread dough, and a couple of optional add-ins.
- Water: a little bit of water, just an ounce or maybe a little more. You need it just enough to bring the dough together.
- Flour, Self-Rising: self-rising flour has everything that you need already in it, including salt and a leavening agent. You’ll need a ½ cup per loaf.
- Salt: an extra pinch of salt is fine if you want a little extra flavor.
- Olive Oil: a dash of olive oil will give your bread more flavor and make the whole affair just a little bit classier. Also, spare a dab to coat the inside of your tin so the bread doesn’t stick.
- Herbs (optional): if you really want to kick things up a notch, stir some herbs of your choice into the dough. Rosemary, paisley, oregano, and thyme are all good choices.
- Shredded Cheese (Optional): bread and cheese go together like, well, bread and cheese. A pinch of shredded cheese will make your finished bread delectably tasty.
That’s it. Grab your apron; it’s time to bake.
Instructions
Give these instructions a quick read-through before you begin so that you know what to expect.
Step 1: Strip and wash the tin. First things first, time to strip that tin. Grab your steel wool or your wire brush and give it a good clean.

Step 2: Clear workspace. Clear the workspace where you want to bake the bread. You can do this pretty much anywhere because it doesn’t need much room, but you must take care to do it on a heat-proof surface.
If you want to do it on a desk, floor, or somewhere else, put down a tile or some type of heat-resistant coaster or trivet.
Step 3: Mix dough. Dump the flour into your mixing bowl, along with just a dash of olive oil and the extra salt if you are using it. Stir.

Very slowly, drizzle in just a little bit of water at a time as you continue to stir. Keep adding the water until the dough just comes together. It should be a sticky blob, not runny and not dry.
Step 4: Coat tin. Use a couple of drops of olive oil on your fingers and coat the entirety of the tin’s interior. This ensures your bread won’t stick. If you skip this step, your bread will tear out and crumble as you try to remove it, and that will spoil the presentation. We can’t have that.

Step 5: Dump dough into the tin, smooth. With the dough formed, use your spoon and carefully dump out the dough into the bottom of the oiled tin. Use the spoon to spread it around in a level layer.

Look closely and make sure the dough is not coming up more than halfway on the bottom part of the tin. If it does, it’s going to overflow during baking when it isn’t firmed up, and you’ll have a nasty mess to clean up and a potential fire hazard.
Remove a little bit of dough with the spoon if you need to. Sprinkle the cheese on top, if you are using it.
Step 6: Position and adjust the rack. Before you kick in the heat, place the rack over the heat source and assess things. When your stove or candle is lit, you want the flame to stop just shy of the bottom of the tin. If the flame is contacting the tin directly, you’ll have burnt bread for sure.

This isn’t an exact science for obvious reasons, so play around with the positioning of the rack and the tin until you have it just right before you ignite.
Step 7: Ignite heat source. Light your candles and place them on the heat-proof surface that you’ve chosen. Spare another couple of moments to make sure there is nothing flammable that could get near it, or you’ll have more to worry about than burned bread.
Step 8: Place tin over heat source. With the fire started, position the tin on the rack and double-check to make sure the spacing is correct.

Step 9: Close lid gently, start timer. Swing the lid on the Altoids tin closed gently; don’t snap it shut. We want to help hold heat in and bake the top of the bread evenly, but not prevent it from rising.

With this done, start your timer or watch the clock. You’ll let the bread bake for about 10 minutes before you check it. Time to wait.
Step 10: Check for doneness. Once the 10 minutes have elapsed, carefully flip open the lid using your toothpick, then poke the center of the loaf with the toothpick. When you pull it out, check to see if any dough is sticking to it; if it comes out clean and dry, your bread should be done.

Step 11: Finish baking if needed. If the toothpick is moist or has dough clinging to it, it needs to bake longer. Gently close the lid as before and give it another two to three minutes before checking it again in a fresh spot with the toothpick.
Step 12: Remove from heat and cool. Once your bread passes the toothpick test, cut the heat or carefully remove the tin from the heat and allow it to cool for a couple of minutes.
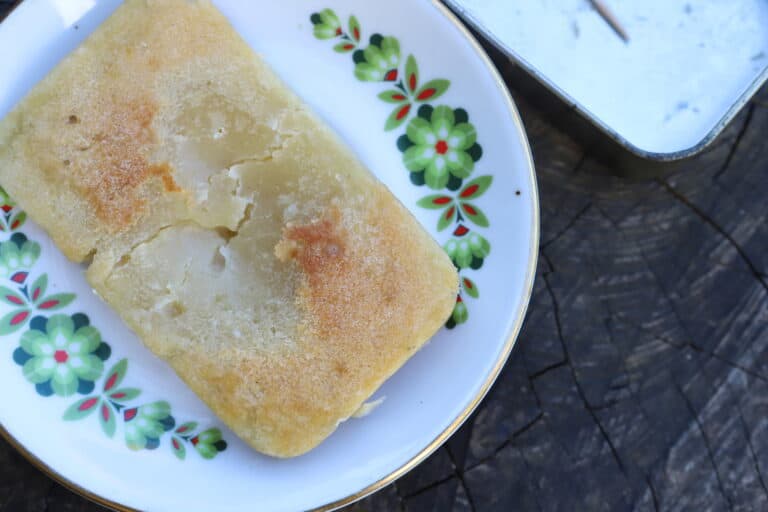
Step 13: Tap out bread. Once you can safely handle the tin, swing open the lid, flip it over, and tap out the bread onto a plate.
Step 14: Eat and enjoy! Break out the fine china and your best Merlot, then serve your Altoids tin bread with a flourish and enjoy a round of applause from your friends and family.
And it’s as simple as that. Now no matter where you are and what you are facing, at least you’ll always be able to make the warm, comforting goodness of fresh baked bread.

The post Baking Bread in an Altoids Tin (Step-by-step Photos) appeared first on Survival Sullivan.
https://www.survivalsullivan.com/baked-bread-in-altoids-tin/
 CampingSurvivalistHuntingFishingExploringHikingPrivacy PolicyTerms And Conditions
