× CampingSurvivalistHuntingFishingExploringHikingPrivacy PolicyTerms And Conditions
Subscribe To Our Newsletter

Pedals for Bikepacking: Find Your Spot on the Walk-Ride Spectrum

Pedals may not be the first thing you think of when putting together your bikepacking setup, but perhaps they should be. Beyond the usual features “regular” cyclists care about – quality, comfort, cost, etc. – we bikepackers have a few more interesting factors to consider.

How much walking do you plan to do in your bike shoes?

Will there be sections of tricky technical terrain?

Might there be mud so sticky you can’t clip in for miles?

Will you carry a second pair of shoes or sandals?

What’s the chance of a pedal crapping out in the middle of nowhere, leaving you stranded (been there done that)?

I’ve bikepacked and toured tens of thousands of miles with both clipless and flats, “right pedals” and “wrong pedals,” on everything from pavement to technical singletrack. My setup has evolved dramatically and I’m now very happy with it, but there was a lot of learning along the way.

Now I’m here to share that learning with you as you choose the best bikepacking pedals for your particular riding aspirations.

When you buy through affiliate links in this post, I may earn a small commission. Thanks for your support! I always offer unbiased opinions based on real experience from the road and trail. Learn more.

Clipless vs. Flats in a Nutshell

If you’re reading this article, chances are you’re in one of two camps:

  • You ride clipless on your day rides and want to know if that can work for bikepacking. Answer: Definitely, read on.
  • You ride flats and aren’t comfortable with the idea of attaching your feet to your pedals. Perfect. Stick with flat pedals for bikepacking too.

The term “clipless pedal” confusingly refers to the type of pedal that you “clip into” or “click into” with a metal cleat on the bottom of your shoe. It comes from the old days when toe clips were the only foot retention mechanism available. When the more modern cleat system developed it was said to be “clipless” because it lacked toe clips. Now we’re stuck with the linguistic contradiction of clipping into clipless pedals.

Why attach your feet to your pedals? The clipless vs. flat debate runs far too deep to wade into here, but here’s a 10,000-foot overview:

Clipless advantages:

  • Consistent foot placement: once you’re clipped in your foot is always in the right spot.
  • Feet can’t bounce off on rough terrain.
  • Ability to pull up on pedals can give quick boost of acceleration and may (this is debatable) lead to more powerful and efficient riding overall.
  • Once you get used to them, many cyclists simply prefer the feel.
  • That satisfying “click” sound as you set off on an adventure. 🙂

Clipless drawbacks:

  • Learning curve: requires practice to feel confident and you’ll probably fall over a few times in the beginning.
  • Requires specific cycling shoes, usually stiffer than regular shoes and less comfy for walking.
  • Cleats or pedals can become clogged with mud.
  • More mechanical parts that can fail or fall off.
  • Can lead to sloppy pedaling technique over time.

You might notice that many of those drawbacks are especially tricky in the unpredictable context of bikepacking. But don’t worry, as I’ll explain below, there are some great best-of-both-worlds options to consider.

2-Bolt SPD Clipless

The most popular clipless standard, especially for bikepacking, is Shimano’s 2-bolt SPD. This style used to be considered a mountain bike thing, but these days it’s used by gravel cyclists and even roadies who appreciate the versatility and comfort.


Close up of bottom of cycling shoe with a 2-bolt SPD cleat


This is a 2-bolt SPD cleat recessed into the bottom of my bikepacking shoe.

2-bolt SPD cycling shoes have cleats that are recessed into the bottom of the shoe, making it almost possible to walk normally. This is key for bikepacking where time off the bike abounds: walking around the grocery store to resupply, walking up that super-steep hill, walking around camp if you didn’t opt to bring camp shoes.

What Bikepackers Care About

Choosing pedals for bikepacking isn’t that different from choosing pedals for cycling in general. You want them to be comfortable, long-lasting, and a good match for your favorite terrain.

Mountain bikers, for example, often choose grippy flat pedals for the ability to put a foot down quickly in rough sections of trail. Road cyclists usually prefer clipless pedals for the consistent foot placement and efficient pedaling.

In the context of bikepacking specifically, we care about things most day riders don’t. When you head out on a single type of terrain (gravel, trail, etc) in predictable conditions, then come home and slip off your cycling shoes a few hours later, you don’t care as much about these factors.

As bikepackers, we care a lot more about these factors:

Versatility: Long bikepacking routes often span a wide range of terrain, from silky smooth pavement to rocky trails.

Walkability: Bikepackers spend more time on foot than general cyclists. We wander around town on a rest day, take a little hike as a side trip, or hike-a-bike for a couple hours up a steep mountain pass. If we don’t want to carry camp shoes, our bike shoes need to meet all our walking needs.

Comfort: Foot pain and nerve issues can pop up when pedaling all day for many days in a row. Many people feel a wider platform is comfier underfoot because it spreads the pressure and allows for more flexible shoes.

Adaptability: On bikepacking trips, sh!t happens. What if your cleat falls off, or your cycling shoes disappear from outside your tent at night?

Reliability: As someone who has killed a few cheap pedals in inconvenient places, I recommend spending a bit more for a durable model. Platforms should generally be metal, not plastic. If you want your pedals to survive many thousands of miles, choose a set that’s serviceable and offers a rebuild kit.

Installation tools: Many pedals can be installed with a large allen wrench found on your multitool, which is handy if you need to remove your pedals for mid-ride servicing or to pack your bike for a flight. Try to avoid pedals that require you to carry a pedal wrench.


very muddy bike tire and bottom of cycling shoe


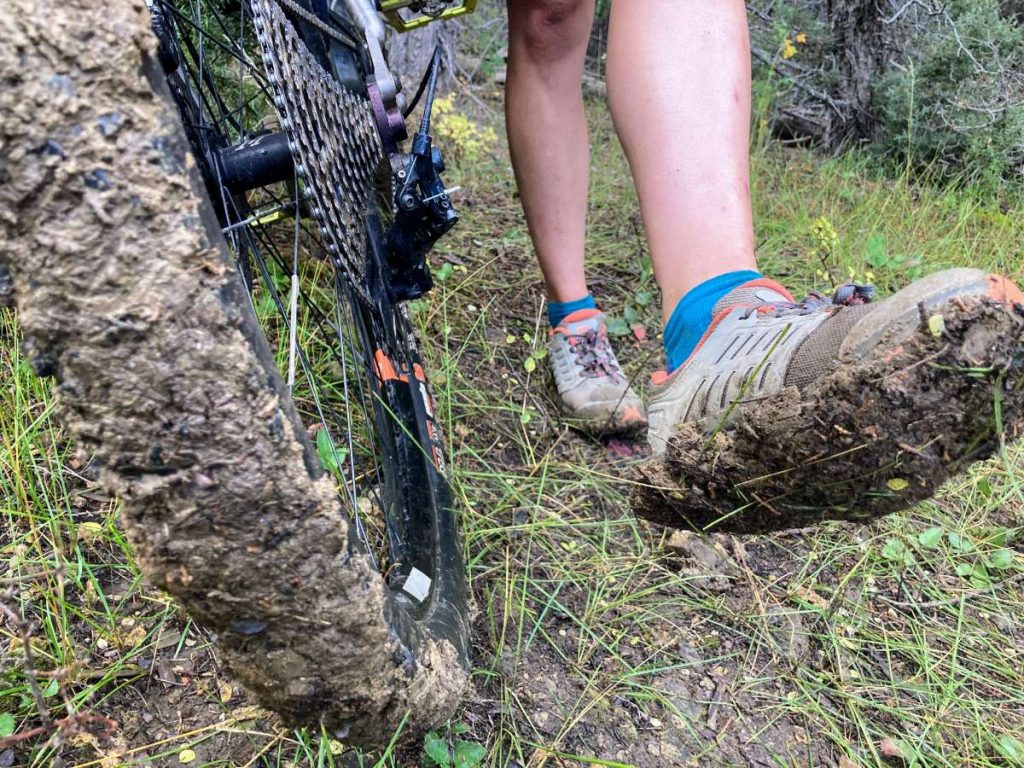
Sometimes an SPD shoe turns into a flat shoe (the author’s foot and bike on a muddy stretch of the Western Wildlands bikepacking route through Utah)


Pedals for Bikepacking: Find Your Spot on the Walk-Ride Spectrum


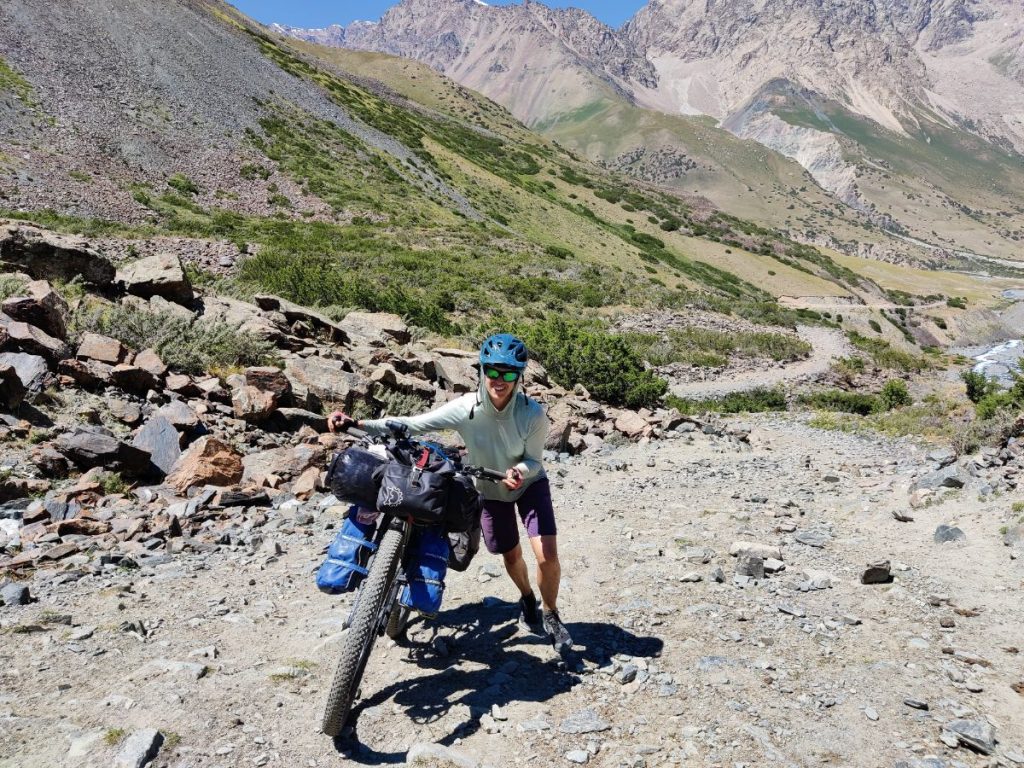
Many bikepacking routes include some quality time on foot, where shoe comfort and flexibility becomes a big factor.

The Walk – Ride Spectrum

For purposes of this post, I made up something I’ll call the walk – ride spectrum of bike pedals and shoes. This is really the crux of the issue for bikepackers: do I optimize for time spent on the bike, or time spent off it?

If you answered “Time ON the bike, obviously” I’m willing to bet you don’t ride particularly rugged routes or travel for long periods on your bike. And that’s fine – you can choose pedals and shoes from closer to the “ride” end of the spectrum.


Pedals for Bikepacking: Find Your Spot on the Walk-Ride Spectrum


In the sections that follow, I’ll work through this spectrum from left to right starting with the most walkable and versatile of shoe / pedal combos: flats.

Flat Pedals

This is my favorite pedal style for bikepacking on technical singletrack. I also used it on my early long-distance tours before I was confident with clipless.

Flat pedals, also called platform pedals, are a simple and classic option. Though popular with beginner cyclists, don’t underestimate this style of pedal for bikepacking even if you’re more experienced.

Flats work especially well for bikepacking on more technical terrain where you may want to put a foot down in a hurry. They’re great for riding in city traffic with frequent stops. They’re also popular on long-haul bike journeys involving a lot of walking and side trips.


Pedals for Bikepacking: Find Your Spot on the Walk-Ride Spectrum


I especially like bikepacking with flat pedals, like these Funndamentals on my hardtail, on technical singletrack.

Flat pedals, and more importantly the shoes that pair with them, win the walkability and comfort contest no question. The downside is that some people, usually more experienced cyclists, don’t feel as good pedaling with them.

Pros of flat pedals for bikepacking:

  • Compatible with any shoe
  • No cleats = easier to walk around in your bike shoes
  • Confidence inspiring because it’s easy to put a foot down, whether on technical trails or in chaotic city traffic
  • Can still be used with mud or snow on your shoe bottom
  • Fewer mechanical parts that can fail, no worries about losing cleats or bolts
  • Can promote good riding technique if you put in the effort

Cons of flat pedals for bikepacking:

  • Foot placement requires more care
  • Can’t “pull up” on the pedals or push them as powerfully around the entire circle
  • Feet can bounce off on rough ground
  • Large flat pedals more prone to nasty rock and shin strikes
  • Won’t feel as smooth and efficient as SPD pedals, especially on smooth consistent terrain

What to look for in flat pedals:

  • Pins: They help with traction but can do serious damage to your shins if your feet slip off or you hit a pedal while hike-a-biking. Most good MTB pedals have pins that are removable and sometimes adjustable in height, so you can configure them. Pins that screw in from the inside are ideal, so the tiny hex fitting is protected from rock strikes.
  • Platform size: A larger size feels more stable and helps spread pressure for comfort. People with bigger feet often prefer bigger platforms.
  • Durability: There are some very high-quality flat pedals, but most of the lowest quality pedals in existence are also flats. Avoid the latter! I prefer metal over plastic for any long journey.

Popular Flat Pedals

Flat pedals are a popular choice for bikepacking and for mountain biking in general, so there are many options to choose from. Here’s a selection of popular and reliable favorites.

Funn Funndamental: Good value MTB pedal with huge aluminum platform, configurable pins, and Grease Renew System for easy maintenance. I currently use these for bikepacking on my hardtail and find them very grippy and stable.

Race Face Atlas: A light and stylish premium aluminum MTB pedal with large platform and slim concave profile.

Crankbrothers Stamp 3 or 7: Stamp is a classic line of platform pedals at various price points, weights, and sizes. For bikepacking I think the Stamp 3 or 7 hit the sweet spot for value and quality.

MKS Lambda: An odd and beloved platform pedal with unique design free from aggressive traction pins. Japanese company MKS makes a variety of interesting pedals, some with a tool-free quick release mechanism (“Ezy Superior”) specially designed for travel and hike-a-bike.


Single-Sided SPD Pedals

This is my favorite pedal style for bikepacking mixed off-road routes with varied conditions and occasional rough sections where I might want to ride unclipped.

If you’re comfortable riding clipless but want maximum versatility to handle the rigors of bikepacking, a single-sided SPD pedal is the best of both worlds. This is the pedal style I usually bikepack with and the one I most often recommend.

Pedals for Bikepacking: Find Your Spot on the Walk-Ride Spectrum
Riding platform side up in the snow because my cleats are caked with frozen mud.

Single-sided SPD pedals have, as the name implies, a clipless SPD mechanism on one side and flat platform on the other. Sometimes they’re also called “dual sided” or “hybrid” SPD.

The benefits of the flat platform side, from a bikepacking perspective, are all about versatility. You can comfortably ride the platform side for miles if your cleats become clogged with mud. You can even ride without cleats indefinitely if you lose one, or if a dog steals your cycling shoes from outside your tent at night. As every bikepacker eventually comes to understand, flexibility is key!

Pedals for Bikepacking: Find Your Spot on the Walk-Ride Spectrum
At times like this, when cleats are caked in mud, it’s really helpful to have a platform pedal on at least one side.

I particularly love this style of pedal for routes with a bit of technical trail. Sometimes I unclip for added confidence and safety on rough patches, and I can comfortably ride the platform side for as long as needed to get through it.

The only real downside to these pedals is that you need to pay attention to which side is up. This is a minor annoyance, but it can add up. If a route is so technical that I’m unclipping often, I would rather just ride flat pedals.

Pros of single-sided SPD pedals for bikepacking:

  • Possible to pedal normally in regular shoes or without clicking in
  • Platform adds comfort, makes it possible to wear more flexible walking-friendly shoes
  • All the benefits of SPD pedals: consistent foot placement, smooth pedal stroke, feet won’t bounce off

Cons of single-sided SPD pedals for bikepacking:

  • Pedal needs to be “right side up”
  • A bit heavier than XC-style SPD pedals (but not enough to matter to most bikepackers)

What to look for in single-sided SPD pedals:

  • Platform size: As with flat pedals, a larger platform offers more stability and support but more opportunities for shin strikes.
  • Pins: If you ride more rugged off-road routes look for gripper pedals with more traction pins.

Popular Single-Sided SPD Pedals

Funn Mamba and smaller Mamba S Single Sided: Big grippy MTB-style pedals with configurable pins and a handy grease renewal port. This is currently my favorite for mixed terrain routes.

Shimano EH500 SPD Sport Road Pedals: Shimano calls these “road” pedals, but the platform side has 8 pins and should be suitable for gravel and a bit of light trail.

Rockbros MTB Single-Sided SPD Pedals: A single-sided SPD pedal for smaller budgets. I would expect these to get the job done for shorter trips while lacking in the finer details of design and durability

Platform SPD Pedals

This is my favorite pedal style for bikepacking on more straightforward gravel and road routes.

Moving further along the spectrum toward traditional clipless pedals, we have double-sided platform SPDs. This style maintains a platform (may be large or smaller) for foot support, but has a click-in mechanism on both sides and is meant to be mostly ridden while clipped in.

Having a platform underfoot supports your foot for more comfortable long days. It also allows for riding in more flexible shoes, like my personal favorite the Pearl Izumi X-Alp Canyon, which are better for hike-a-bike and off-bike exploration.

This style of pedal can sometimes be ridden, albeit awkwardly, without clipping in. If your shoes are muddy or you want to pedal to the grocery store in your camp sandals, it’s doable. But the SPD mechanism is lumpy and your foot placement will be sloppy.

SPD shoe and clipped to pedal for bicycle touring
Platform SPD pedals are a good choice for bikepacking when you plan to almost always ride clipped in.

Pros of platform SPD pedals for bikepacking:

  • Platform adds comfort and support for tired feet
  • Pairs well with more flexible walking-friendly SPD shoes
  • Still possible to pedal (albeit awkwardly) in regular shoes or without clicking in
  • All the benefits of SPD pedals: consistent foot placement, smooth pedal stroke, feet won’t bounce off

Cons of platform SPD pedals for bikepacking:

  • Requires confidence with clipless riding
  • More mechanical parts that can fail (carry spare cleats and bolts!)
  • Clipping in all the time can lead to lazy technique
  • A bit heavier than XC-style SPD pedals (but not enough to matter to most bikepackers)

What to look for: The main stylistic difference between these pedals is platform size and design. Some are big and grippy (hello Funn Mamba) which may feel more comfortable to trail riders, while others are more svelte and less likely to take chunks out of your shins while hike-a-biking.

Popular Platform SPD Pedals

Funn Mamba and Mamba S Double Sided: Big grippy MTB-style pedals with configurable pins and a handy grease renewal port.

Look X-TRACK EN-RAGE Pedals: A sturdy platform SPD pedal designed to stand up to aggressive trail riding, so it should be durable enough for burly bikepacking trips too. The platform offers an unusual amount of shoe-to-surface contact for good grip even on a smaller platform.

Shimano PD-M8120 XT SPD Trail Pedals: Shimano’s double-sided cousin to the M8100 mentioned above. Designed for trail riding yet isn’t too bulky and lacks pins, making it more shin-friendly. As with all of Shimano’s pedals, it’s a quality build that should last a long time.

Shimano PD-ED500 Road Touring Pedals: I’ve had these affordable and durable Shimano pedals on my road touring bike for years. They’re not quite enough pedal for rough dirt, but I love them for relatively smooth riding on gravel and pavement.

SPD Pedals (XC Style)

I don’t use this style of pedal for bikepacking, and I don’t recommend it unless you already use it on day rides and care about speed and efficiency while bikepacking.

At the far end of the spectrum from flat pedals, we have XC-style or gravel-style SPD pedals. These are just a foot retention mechanism on both sides, with no supportive platform.

These pedals require a stiff shoe that can be hard to walk in, which is not ideal for bikepacking. They also don’t offer any good options if you need to ride unclipped for awhile.

I don’t recommend this style of pedal to most bikepackers. The people who prefer it are usually confident and experienced cyclists who have been riding with it for a long time. I see it most commonly among bikepack racers who prioritize a light and efficient setup and don’t spend much time off the bike.

Though SPD is most popular, there are a few competing styles like Crankbrothers “egg beater” pedals and Speedplay. These are comparable to XC-style SPD pedals in a bikepacking context and usually favored by experienced cyclists who already know what they like, so I won’t discuss them further here.

Pros of XC-Style SPD pedals for bikepacking:

  • All the benefits of SPD pedals: consistent foot placement, smooth pedal stroke, feet won’t bounce off
  • Lightest of all the options
  • Smaller size helps minimize rock and shin strikes

Cons of XC-Style SPD pedals for bikepacking:

  • Require stiff cycling shoes that aren’t great for walking
  • Mud can clog cleats and pedal mechanism, making it very difficult to pedal
  • Lack of broad base of support can be less comfortable on long days

Popular XC-Style SPD Pedals

Since this style of SPD pedal is just about the foot retention mechanism, there are fewer details to consider. Your best bet is a reliable SPD pedal from a respected manufacturer like Shimano, the original creator of the SPD standard (“Shimano Pedaling Dynamics”).

Shimano PD-M8100 XT XC SPD: Reliable and high quality choice.

Shimano M520 SPD: The most affordable XC-style SPD pedal in Shimano’s lineup, a bit heavier and clunkier than the others.

3-Bolt SPD-SL Road Pedals

Just don’t do it. 🙂 This standard of pedal and shoe is popular in road cycling, where you spend every second on the bike and change shoes the moment you’re done. The protruding cleats make it impossible to walk without an awkward hobble.

You may occasionally see people road touring in these shoes, but they will definitely be carrying an extra pair of regular shoes and hoping they don’t encounter any hike-a-bike.

Side view of two bolt and three bolt cycling shoes showing cleat differences

The Bikepacking Shoe Dilemma

If you plan to ride with cycling shoes on a long bikepacking trip, you’ll quickly run into this dilemma: Will my bike shoes be the only thing I put on my feet for the next few weeks / months?

Though SPD cleats are recessed into the bottom of the sole, a shoe’s stiffness can still interfere with walking. A stiff carbon shoe won’t be very comfy for strolling around town or taking a hike from the campground.

More casual SPD shoes and flat MTB shoes are flexier, but if you plan to do a lot of walking or hiking on your bikepacking trip they still may feel limiting. What to do?

Minimalist solution (for fast and light efforts): Bring only bike shoes; you’ll be riding most of the day anyway.

Compromise solution (most common for casual bikepackers): Bring walkable bike shoes (flats or flexy SPD) plus “camp sandals” that you can also wear around town or for short hikes.

Maximalist solution (for extended travel, trips with lots of hiking, or kitchen-sink-style packing): Bring cycling shoes for riding and a separate set of walking shoes for everything else.

No cycling shoes solution: If you want maximum versatility without carrying two pairs of shoes, and you don’t care about speed and efficiency on the bike, you can ride in walking or running shoes with flat pedals.

I’ve done all of these except the maximalist – just can’t bring myself to carry two pairs of shoes. Since switching to clipless I can’t ride in running shoes anymore, too flexy and inefficient. I’ll go with SPD shoes plus camp sandals on most trips, or ditch the sandals and go minimalist for a short intense effort like a bikepacking race.

Pedals for Bikepacking: Find Your Spot on the Walk-Ride Spectrum
Lightweight camp sandals strapped to a seat bag
Pedals for Bikepacking: Find Your Spot on the Walk-Ride Spectrum
Sturdier town sandals strapped to panniers

For town sandals I like a sturdy pair of Teva sport sandals, or if I’m trying to pack light, these Xero Z-Trail sandals. I know a number of bikepackers who carry Crocs as their town and camp shoes. They’re bulky, but easy to strap to the outside of bike bags and much lighter than they look.

Pro tip: If you’ll be doing a lot of walking in your SPD bike shoes, such as a few days of sightseeing on foot, consider removing the cleats. This eliminates that awful grinding sound on uneven ground and prevents extra wear and tear on your cleats.

Pedals for Bikepacking: Find Your Spot on the Walk-Ride Spectrum
Bikepacking can be hard on shoes, especially when there’s a lot of walking involved. Here’s a pair of mine after a few thousand miles.

Other Pedal-Related Bikepacking Tips

A few odds and ends learned the hard way:

Pack a spare cleat and a few spare bolts in your bikepacking tools and spares kit. If you have problems with bolts coming loose, add a dab of blue Loctite.

Grease the threads when you install the pedals. It’ll make them much easier to take off, especially with your multi-tool at the airport as you’re attempting to pack your bike.

Remember “loose toward the caboose” when removing pedals. The left pedal is reverse-threaded, which means you need to rotate the tool handle clockwise to loosen it. With the bike upright and tool handle pointing upward, you’ll be pulling the handle toward the back of the bike to loosen both pedals.

Service your pedals periodically to extend their life, especially if you have a good quality pair. When you start to feel a little bit of play in the spindle relative to the pedal body, or if they don’t spin as smoothly as they used to, it’s time.

More Bikepacking Resources

If you found this helpful, be sure to also check these out:

Or visit the bikepacking section for lots more.

Pedals for Bikepacking: Find Your Spot on the Walk-Ride Spectrum

About the Author

Hi there, I’m Alissa, founder of Exploring Wild. I’ve traveled over 19,000 miles by bike and still can’t stop planning my next ride (and helping you plan yours). Pavement and panniers or singletrack and seat bag, I love it all. On my bike I feel free. Learn more about me here.

Pedals for Bikepacking: Find Your Spot on the Walk-Ride Spectrum

Bike resources in your inbox?

There’s more where this came from! Sign up here for occasional emails full of inspiration and information about bikepacking and bicycle touring.

Pedals for Bikepacking: Find Your Spot on the Walk-Ride Spectrum

Town Day Checklist!

Sign up to receive the free downloadable bikepacking town day checklist to help with your resupply stops:

    You’ll also receive occasional emails with other bikepacking and touring resources. I think you’ll like them, but you can unsubscribe at any time.

    The post Pedals for Bikepacking: Find Your Spot on the Walk-Ride Spectrum appeared first on Exploring Wild.

    https://exploringwild.com/bikepacking-pedals/?utm_source=rss&utm_medium=rss&utm_campaign=bikepacking-pedals