The Pacific Northwest has a thing for loop trails circumnavigating volcanoes, and the iconic Timberline Trail is arguably the most accessible of these classic hikes. It’s shorter than the coveted Wonderland Trail around Rainier (and much easier to get a permit for) and more approachable than the rugged Loowit Trail around St. Helens.
The 40 mile Timberline Trail circles Mount Hood, an impressive glacier-capped behemoth, offering views from so many angles that you might actually get tired of stopping to gawk. It offers plentiful camping and water, zero-hassle transportation and permits, and challenging terrain to keep even experienced backpackers on our toes.
You can backpack the Timberline Trail with just a short drive from Portland, even without a car! The logistics literally couldn’t get any easier. Naturally this makes the Timberline a very popular trail. But the 40 mile circumnavigation, usually done in 3-4 days, still feels scenic and dramatic.
I’ve been wanting to backpack the Timberline Trail for years, and in late September 2023 I was finally able to sneak in a late-season hike during a road trip through the Pacific Northwest. My husband and I hiked around Mt. Hood in three days and two nights, making the most of two gloriously sunny late-season days (and one cold and rainy day).
This guide shares our pictures and observations, along with essential planning information for the Timberline Trail as of 2023, including the latest on the previously closed Yocum Ridge blowdown section.
Fun fact: Mt. Hood is considered the Oregon volcano most likely to erupt next! Don’t worry though, the odds are still very low and scientists are keeping an eye on it (right…?).
Related: 6 Backpacking Loop Trails in the Pacific Northwest
Shop Backpacking Resources
When you buy through affiliate links in this post, I may earn a small commission. Thanks for your support! I always offer unbiased opinions based on real experience from the road and trail. Learn more.
Timberline Trail at a Glance
Location: Oregon, about 1.5 hours drive from Portland
Distance: 40 miles
Days: 3-4 for most people, though some folks hike/run it in a single day
Elevation gain / loss: 9850 feet
Min and max elevation: 3260 and 7340 feet
Season: July – Sept, depending on snowpack and water crossings
Difficulty: hard (steep climbs, rugged trails)
Trail info and conditions: USFS website
Highlights
- interesting and varied terrain
- gorgeous views of Mt. Hood throughout
- plentiful camping and water sources
- accessible from Portland via public transit
- loop format is logistically simple
- no permit quota (free self-issued permit at trailhead)
Lowlights / potential challenges
- crowded trails
- tricky water crossings early in the season
- a few sections of loose sketchy footing
Who will love the Timberline Trail: experienced backpackers looking for a logistically simple route; those who can’t get enough of Mt. Hood’s beauty; anyone looking for a top-notch backpacking route that doesn’t require a car
Who might want to skip it: beginners; those with heavy gear; those who aren’t confident with water crossings if hiking early in the season
Bikes: not allowed on any section of the Timberline Trail (and would be a very tough ride anyway)
Dogs: allowed when within sight of owner and under voice control; leashes encouraged. River crossings are usually said to be the most challenging part of hiking the Timberline Trail with a dog.
Horses: Horses and stock are prohibited on most of the Timberline Trail except the 12 mile section that overlaps with the PCT. You’ll understand why when you see some of the loose steep gullies and downed trees.
Map and Navigation
The Timberline Trail, also referred to as trail #600, is well signed at most junctions. Still, a GPS navigation app or device is useful when finding your way into and out of the gullies, and important for general safety in case you lose the trail for any reason.
I use the AllTrails app with the premium membership that provides offline navigation; don’t expect to have phone service on the trail. Gaia GPS is another popular app with similar pricing and functionality.
If you’d like to carry a paper map – recommended as a backup to your electronic device especially for solo hikers – the National Geographic Trails Illustrated is a good one. We chose to not carry a paper map on this trip because we hiked together as a pair and both had the route downloaded to our phones, serving as each other’s backup.
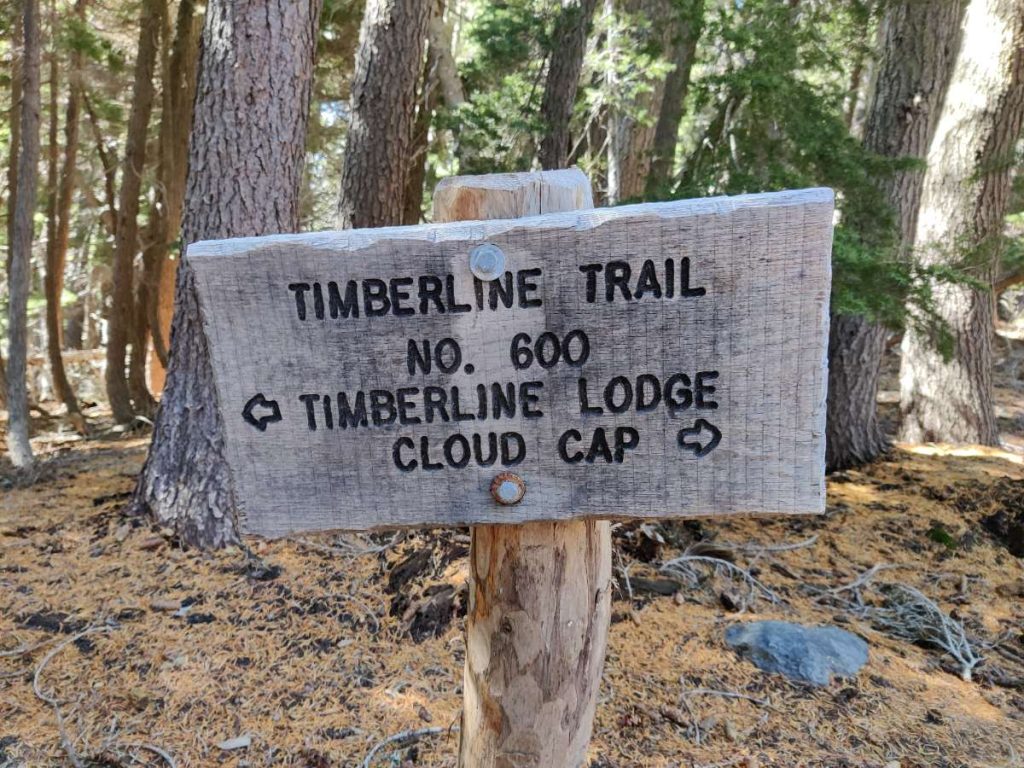
The Timberline Trail is mostly well-signed, but it’s still important to have a map that’s accessible offline.
When to Hike
The Timberline Trail is a summer hike. It’s usually doable from July through September, though that window varies from year to year. The biggest considerations are weather, lingering snow, and water crossings.
Lingering snow: The slopes of Mt. Hood are typically under snow throughout winter and spring, and after especially snowy winters the higher elevations may hold snow well into July. If you’re thinking of hiking in June or early July, check for recent trail reports on AllTrails to see how the melt is progressing.
Water crossings: The Timberline Trail crosses many gullies and glacial streams in its circumnavigation of Mt. Hood, and while snow is melting up high those streams and rivers flow fast and deep. Water crossings are a bigger issue earlier in the season, when some may be difficult and dangerous. By mid to late August most years the water crossings have calmed down. Don’t overlook this issue — it’s all too easy to assume you’ll just figure it out, only to find yourself stopped in your tracks by a violent glacial river you can’t safely cross. Again, check trail reports on AllTrails to understand current conditions and learn how to cross as safely as possible (see below).
Weather: You should be prepared for rain or even snow at any time, as the weather on Mt. Hood is notoriously changeable. By late September or early October the chances of rainfall increase, average temperatures drop (expect below-freezing nights), and early storms may dust the trail with snow. Check the weather forecast before heading out!
Other considerations: Wildflowers are at their best earlier, throughout July or August. Mosquitoes are also more plentiful during this time. Late-season hikers have fewer daylight hours to hike and more cold dark hours to pass in the tent.
With all that in mind, my ideal time to hike the Timberline Trail would be mid-August on an average snowpack year. This should be late enough for calmer water crossings but still early enough to enjoy warmer weather and longer daylight hours, and maybe some wildflowers.
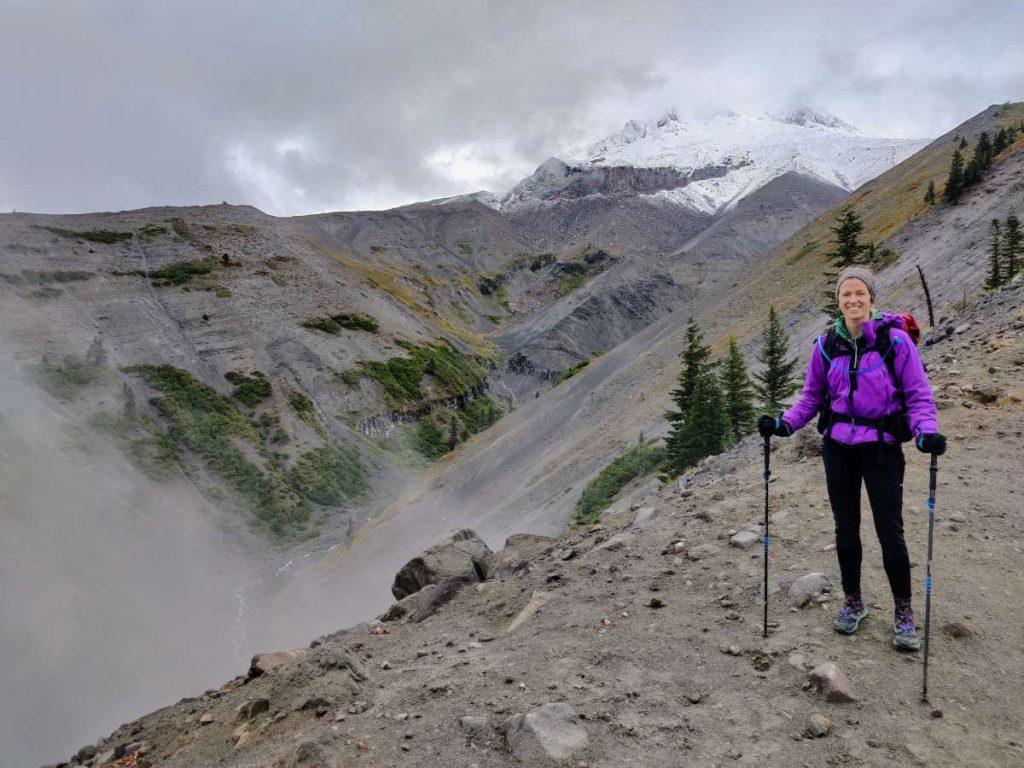
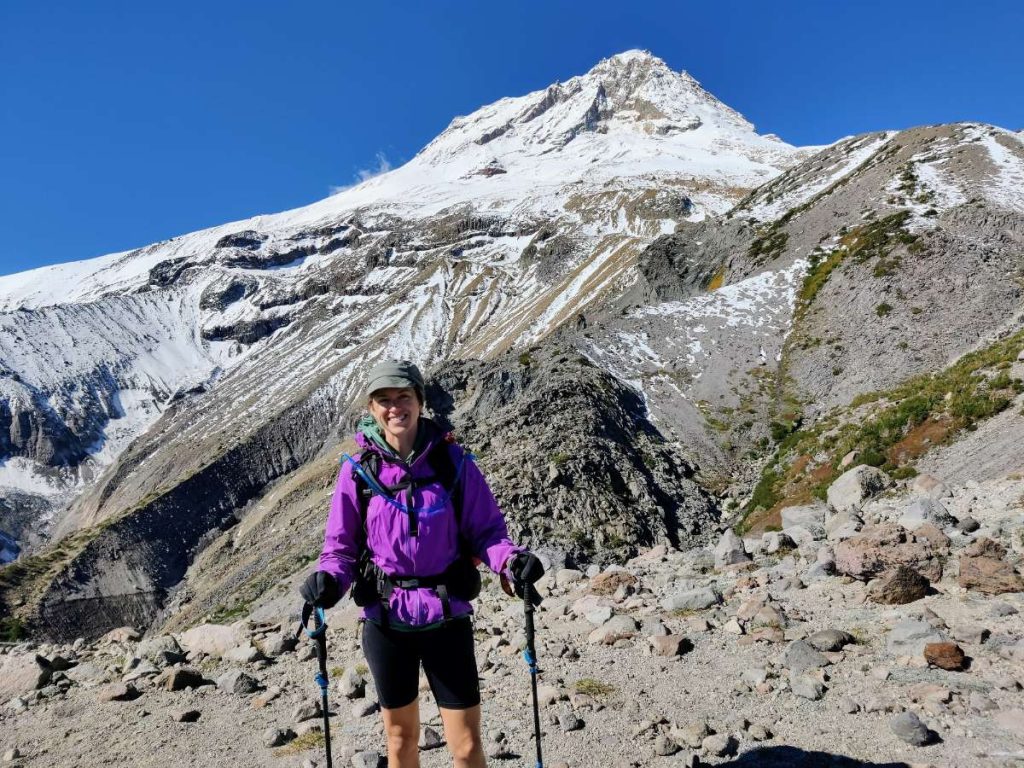
Our late-season hike, ending on October 1, was borderline. We checked the weather forecast carefully and chose a mostly sunny window, planning the higher and more exposed eastern section for the clearest day. Still, south of Cloud Cap we walked through several inches of snow accumulation from a storm a few days prior. The nights were chilly (below freezing) and long, limiting the amount of daylight hours available to hike. On the bright side, most water crossings were simple rock hops and the trail was less crowded than usual (though still far from empty).
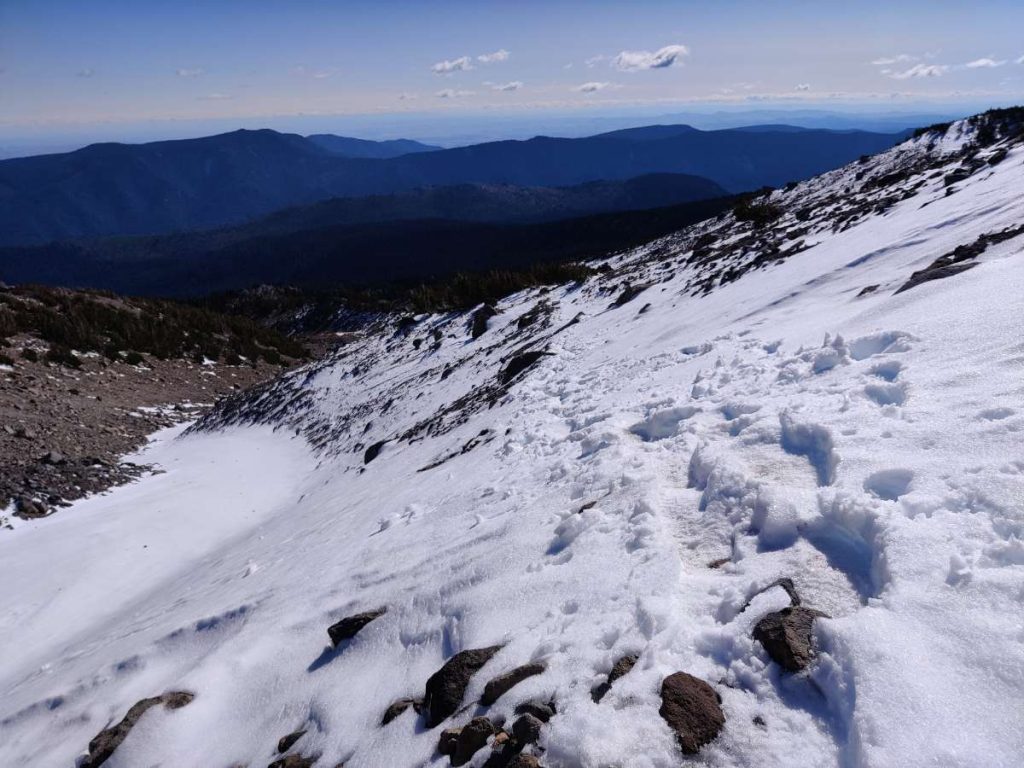
Snow near the high point of the Timberline Trail a few days after a late September storm.
How Many Days?
Most backpackers hike the Timberline Trail in three or four days. A five day itinerary would work too, allowing time for leisurely mornings or afternoons at camp and perhaps some side trips. There’s plenty of water on the Timberline Trail, so shorter days are feasible without needing to dry camp.
We hiked the Timberline Trail in three full days and two nights. This required some focus; the shorter daylight hours of late September didn’t leave much extra time for lounging at camp, and cold temperatures made it harder to get moving early in the morning. In the height of summer I think this pace would have felt a bit more leisurely, but those looking for a lot of time at camp might still prefer a four or five day itinerary.
Though the Timberline Trail is mostly well-maintained, expect to be slowed by a few sections of steep and slippery terrain as the trail crosses eroding gullies.
Access Trailheads
Timberline Lodge
The most common access trailhead is at Timberline Lodge on the south side of the loop, about a 1:15 hour drive from Portland via entirely paved roads. There’s a large parking lot with free overnight parking. It’s even accessible by public transport from the city or PDX airport using a combination of metro lines and the Mt. Hood Express.
Overnight parking is permitted at Timberline Lodge, but we found it a bit confusing. Whatever you do, don’t park at the top-most lot designated for lodge guests; park in either the main or overflow lower lots. Both these lots are dotted with an intimidating number of “no overnight parking” signs, and it’s unclear exactly which areas they apply to. I asked inside and was told to park in the overflow lot despite the signs, and this is what we did, carefully choosing a spot as far as possible from any visible sign. This worked out fine and we saw many other hikers doing it. If in doubt, ask inside the day lodge for the best overnight parking location.
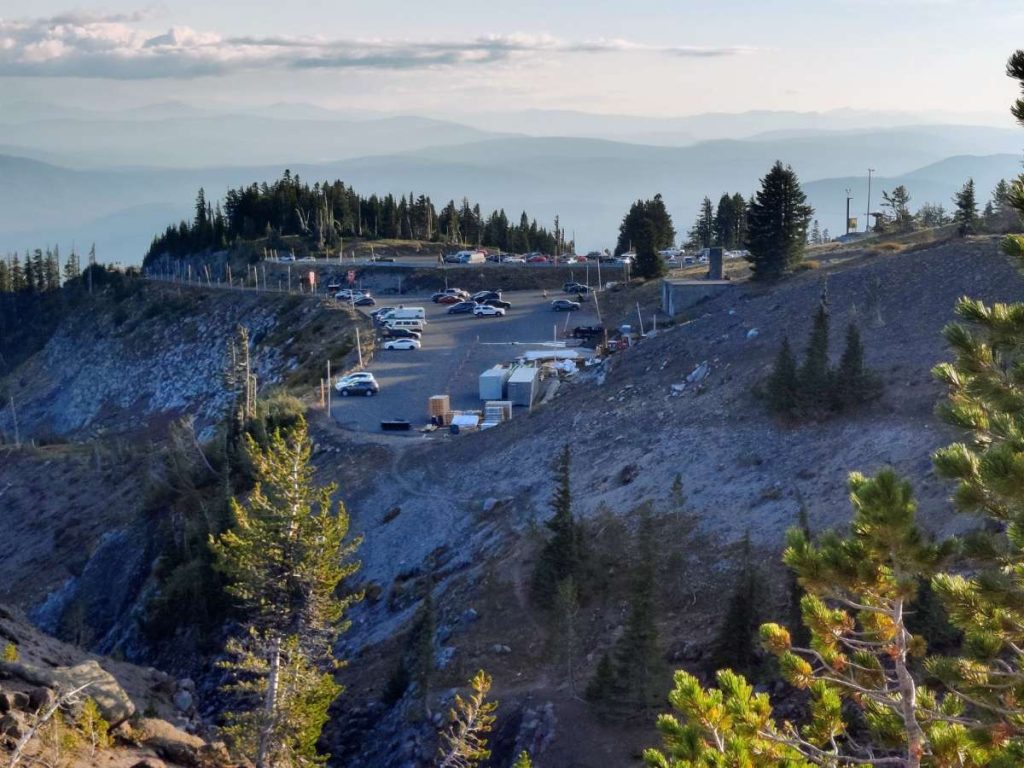
The Timberline Lodge overflow parking lot pictured here (and the main lot just behind it) allow overnight parking in certain areas.
Cloud Cap
The other popular on-trail access point is Cloud Cap in the northeastern section. It’s much smaller and calmer than Timberline Lodge, and a bit more convenient if coming from the north or east. There’s a campground here (first come first serve, $17) and parking is allowed with a day use fee or Northwest Forest Pass. The access road is gravel and doable in a 2wd vehicle, but take it slow.
Several other trailheads offer access to the Timberline Trail with a short additional hike, including Top Spur and Ramona Falls. Here’s a map of the Timberline Trail showing the two main access trailheads plus the major water crossings:
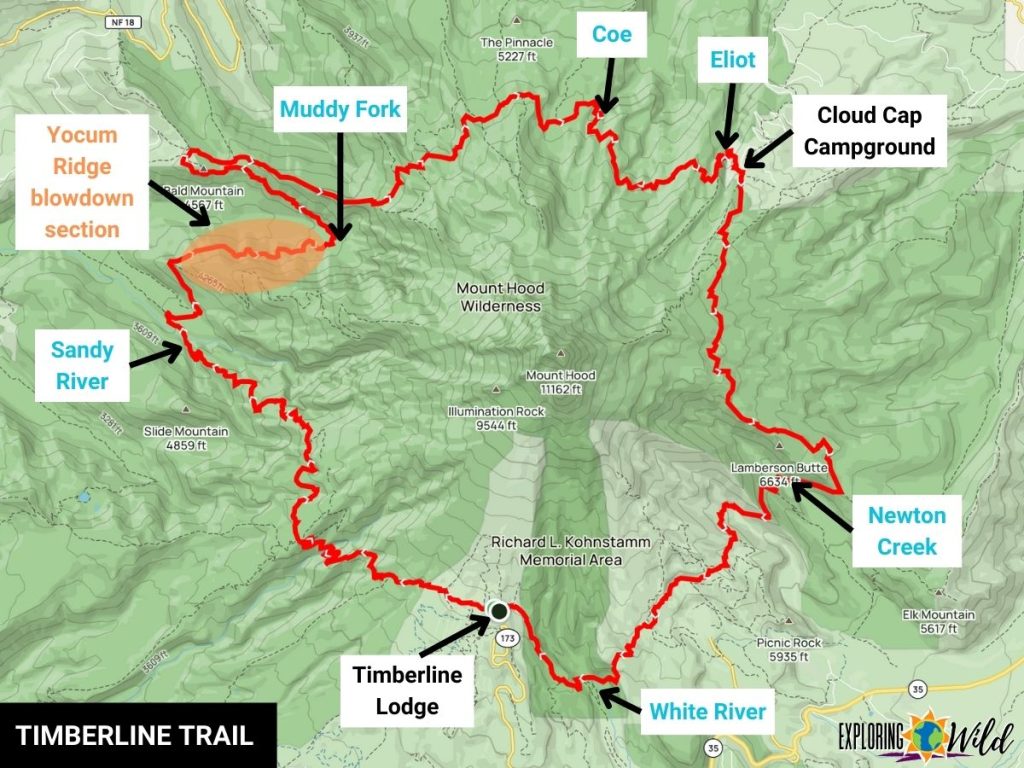
Map of the Timberline Trail showing popular trailheads and the biggest water crossings.
Which Direction to Hike
The Timberline Trail loop works well in either direction, and I suggest making your choice based on which trailhead you choose and how your planned itinerary intersects with the weather forecast and water crossings.
The eastern section of the loop, south of Cloud Cap Saddle, is the highest and most exposed portion of the loop. I suggest planning the eastern section for the day you’re most likely to have good weather. It can get nasty up there in a storm, and you’ll want clear skies to enjoy the views. Aesthetically speaking I liked working up to this scenic and dramatic section rather than starting with it.
Water crossings are another consideration, especially early in the season. Glacial streams are lower and calmer in the mornings, so you might want to plan some of the more notorious crossings (Newton, Coe, Muddy Fork, Sandy and especially White) for early in the day.
We hiked clockwise from Timberline Lodge, mainly because the weather forecast called for rain on the first day and sun thereafter and we wanted to save the highest terrain for good weather. Water crossings weren’t an issue since we hiked in late September.
Camping
Dispersed camping is readily available along most of the Timberline Trail. The only requirements are related to Leave No Trace:
- Camp in established sites on durable surfaces
- No camping in meadows and wetlands
- No camping immediately next to Ramona Falls (sites are available nearby)
You’ll find established sites fairly often, especially along the PCT section. You’d be hard-pressed to not find a site every couple of miles, though in peak season you’ll have other backpackers to compete with. You’ll find clusters of sites near most major water sources and plenty of dry sites tucked away in between. Some sites are highly scenic while others are more utilitarian.
Here are some of the nicest camp locations with multiple good sites and water sources, listed in clockwise order starting from Timberline Lodge:
- Sandy River – mile 9
- Ramona Falls (but not within 400 feet of the falls) – mile 10
- Cairn Basin – mile 18.5
- Wy’east Basin – mile 19.5
- Elk Cove Camp – mile 21
- Cloud Cap Saddle (paid campground, and a few free spots on the beginning of the subsequent climb) – mile 26
- About halfway down descent from highest point (unsure about water here) – mile 30
- Newton Creek – mile 32
Don’t feel limited to those though; there are many others. In hindsight we didn’t pick the most scenic places to camp, simply stopping where we were when the time was right. If you have a more leisurely itinerary you might consider planning your camp locations to include some of the great options above.
Most campsites on the Timberline Trail are small flat areas like this. Make sure to camp in previously used spots on durable surfaces (not live foliage) to keep impact minimal.
Tents are the most common type of shelter you’ll see on the Timberline Trail, but tarps and bivvies work too. Hammock campers will find plenty of trees on all sections except the exposed area south of Cloud Camp Campground. The treeline is a little over 6000 feet here, and above that the few campsites are exposed and treeless.
There is one pit toilet on the entire Timberline Trail at Cloud Cap Campground, and Timberline Lodge has indoor restrooms. Otherwise, you’ll be doing your business outdoors. Make sure you know how to responsibly poop in the woods so we don’t turn this lovely trail into a public toilet.
Suggested Itineraries
The Timberline Trail is a loop with multiple access points and plentiful water and camping, so there are many possible itineraries. You don’t need to commit to one in advance if you prefer to stay flexible, but it helps to have a general sense of the options and how they fit with your expected pace.
As mentioned above, I suggest avoiding the exposed eastern section in bad weather and trying to tackle some of the major water crossings in the mornings.
Here are a few example itineraries. They all start from Timberline Lodge and go clockwise, but you could shift them to begin at Cloud Cap and/or switch directions if you prefer.
2 Day Itinerary
For the very fit fastpacker moving fast and light.
- Day 1: Timberline Lodge to Elk Cove (21 miles)
- Day 2: Elk Cove to Timberline Lodge (19 miles)
3 Day Itinerary
For the experienced lightweight backpacker.
- Day 1: Timberline Lodge to Ramona Falls (10 miles, mostly downhill). Alternatively, you can make tomorrow shorter by continuing 3 miles to Muddy Forks, but this section is the infamous “blowdown section” and is slow-going.
- Day 2: Ramona Falls to Cloud Cap Campground or free spot just above (16 miles)
- Day 3: Cloud Cap Campground to Timberline Lodge (13 miles)
Cloud Cap Campground is a paid car camping site ($17) and spots are first come first served, so they might be full during busy periods. There are a few dispersed sites just south as the climb continues, but not many. Before Cloud Cap, near the Eliot crossing, there also aren’t many sites. For a more reliable high-season itinerary that avoids Cloud Cap Campground, see our 3 day itinerary below.
Our Itinerary (3 days)
We didn’t plan our camp spots in advance, and were dealing with some rainy weather on day 1 and short late-season daylight hours. Thus these spots are simply where we ended up around 5pm. These are not the most scenic or popular places to camp, but they worked for us. This itinerary also avoids camping in the Cloud Cap area in favor of more solitude and free spots.
- Day 1: 13 miles to Muddy Fork crossing. Another option is to stop 3 miles sooner at Ramona Falls, making for longer day 2, but these 3 miles are slower than the preceding ones.
- Day 2: 11 miles to ~2 miles before Eliot crossing (a few scattered sites)
- Day 3: 16 miles to Timberline Lodge
Note: We intended to hike a longer day 2 and shorter day 3, but got a late start on day 2 due to a very rainy day 1 that left a lot of our gear soggy.
4 Day Itinerary
For folks with heavier gear or who want more time at camp.
- Day 1: Timberline Lodge to Ramona Falls (10 miles, mostly downhill)
- Day 2: Ramona Falls to Elk Cove Camp (11 miles)
- Day 3: Elk Cove Camp to mile ~30, about halfway down big descent (9 miles). Alternatively, continue 2 more miles to Newton Creek.
- Day 4: Mile ~30 to Timberline Lodge (9 miles)
5 Day Itinerary
Leisurely and chill.
- Day 1: Timberline Lodge to Sandy River (9 miles, mostly downhill)
- Day 2: Sandy River to Cairn Basin (9.5 miles). This day becomes easier and shorter if you take the Yocum Ridge blowdown bypass described below.
- Day 3: Cairn Basin to Cloud Cap Campground (7.5 miles)
- Day 4: Cloud Cap Campground to Newton Creek (6 miles, including big climb)
- Day 5: Newton Creek to Timberline Lodge (7 miles)
Food Storage
There are black bears on Mt. Hood, but they are scared of humans and you’re unlikely to encounter them. Chipmunks and critters are more of a potential threat to your food. Still, it’s important to store food responsibly to prevent the emergence of “problem bears” like we have in other areas.
What this means for food storage: a standard bear hang, Ursack Major, or sleeping with your food are all valid options. We slept with our food in our tarp, but if that makes you nervous an Ursack Major is a good option.
Drinking Water
First thing first: definitely filter or treat all your drinking water on the Timberline Trail! This is a high-use area and drinking directly from streams is asking for Giardia.
Water sources are abundant on the Timberline, even late in the season. We never needed to carry more than 2 liters at a time, though we had 3.5 liters of capacity each, just in case.
We used a Sawyer Squeeze filter combined with a CNOC Vecto bag as a gravity filter setup. This is a convenient setup for mostly clear water sources and two people sharing a filter. For more on the pros and cons of various methods, see How to Carry Water While Backpacking and Best Water Filters for Backpacking.
I tried a new water carrying system on this trip: the Smartwater Bottle drink tube from One Bottle Hydration. I’ve long been a hydration bladder fan since I can’t reach bottles in my pack’s side pockets, but this system is the best of both worlds and my new go-to.
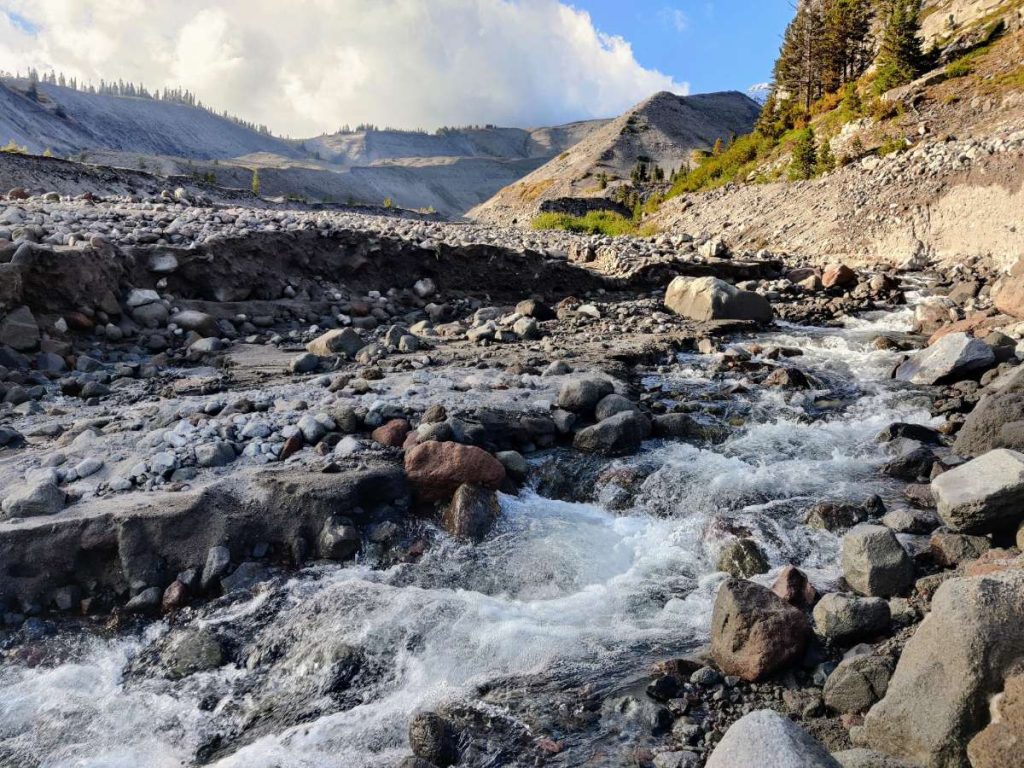
Water Crossings
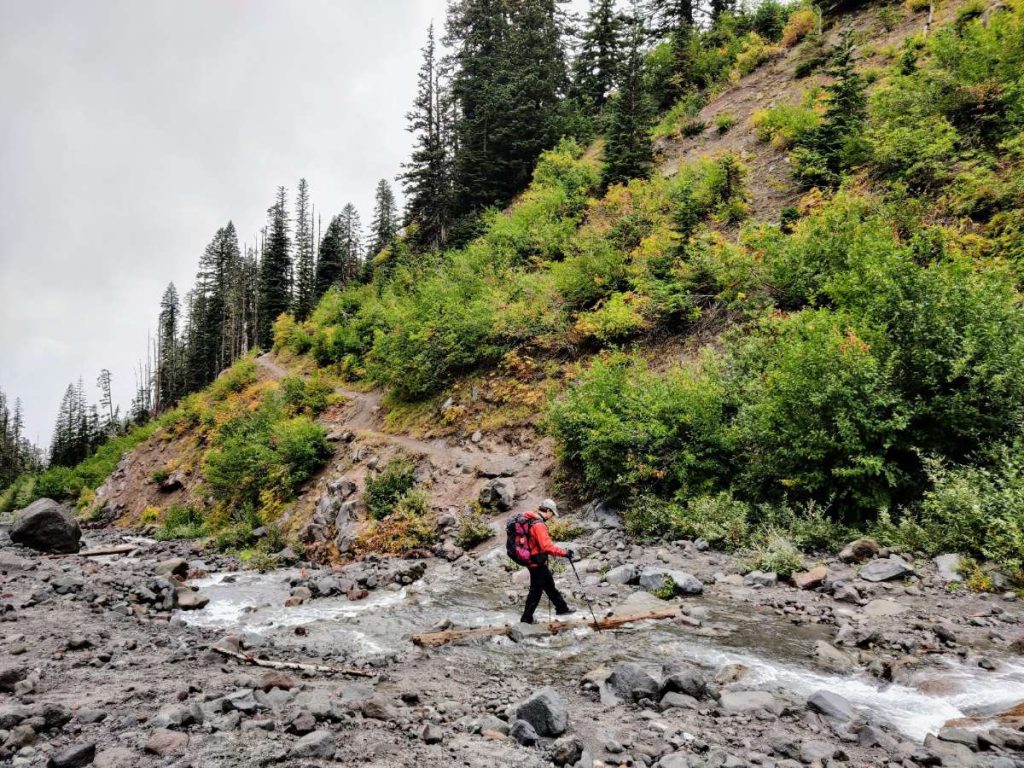
The Timberline Trail is notorious for its water crossings. In its circumnavigation of Mt. Hood the trail crosses a number of deep gullies carrying glacial streams, and these can be intimidating and dangerous while snow is melting fast up high. Even in late August, especially on a high snow year, some hikers find them difficult.
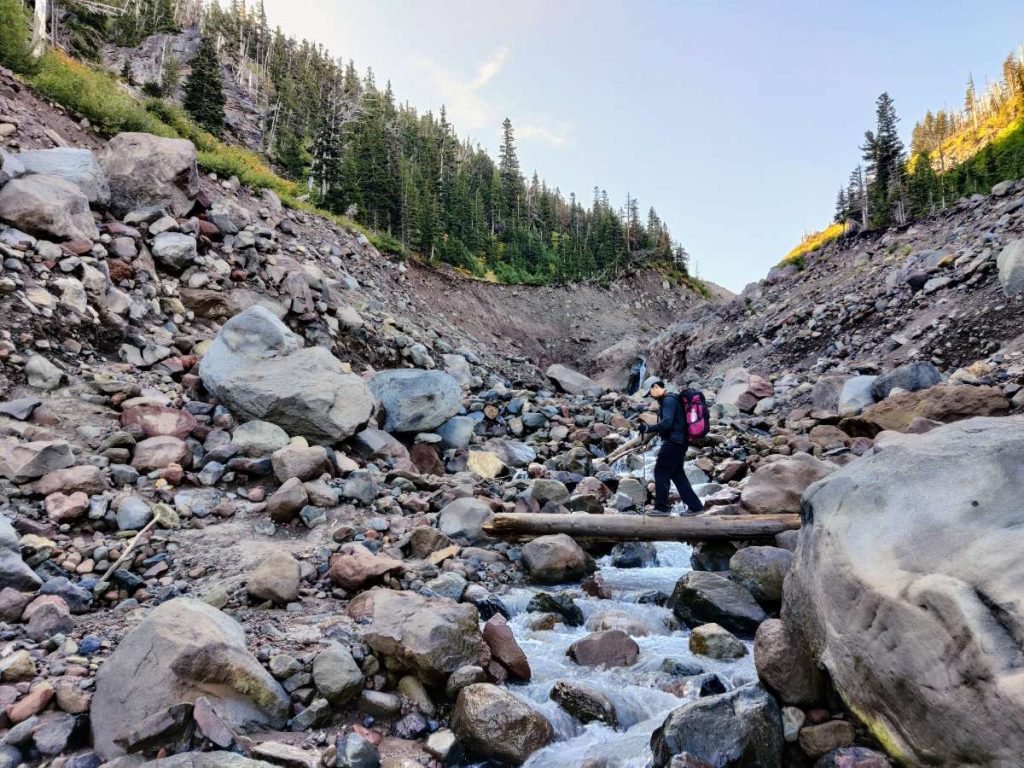
A sturdy log bridge made this crossing of Eliot Creek easier, as did tackling it first thing in the morning in late September.
Which crossings are the trickiest? The forest service has this to say: “Newton, Coe, Muddy Fork, Sandy and White Rivers are typically the most challenging fords but are typically not more than knee deep.” Many people also think Eliot is a tough crossing. Here’s a map of the Timberline Trail showing these crossings:
Map of Timberline Trail showing the major water crossings
I haven’t seen it mentioned elsewhere, but personally I was surprised by how close the Heather Creek crossing (just south of Newton Creek) passed to the top of a dangerous waterfall! Tread carefully here.
Be sure to take your time finding the best crossing; it may not be where the trail is. Look for cairns up or downstream, and keep in mind that the best option might change depending on time of day. Look for wider and slower areas to wade across.
Glacial streams are calmest and lowest first thing in the morning, so you may need to adjust your itinerary if you come to a difficult crossing late in the day. I read one trip report on AllTrails (a great resource for gauging current water crossing difficulty) from hikers who decided to camp before crossing the White River and save it for the morning, extending their trip by a night. And this was in late August!
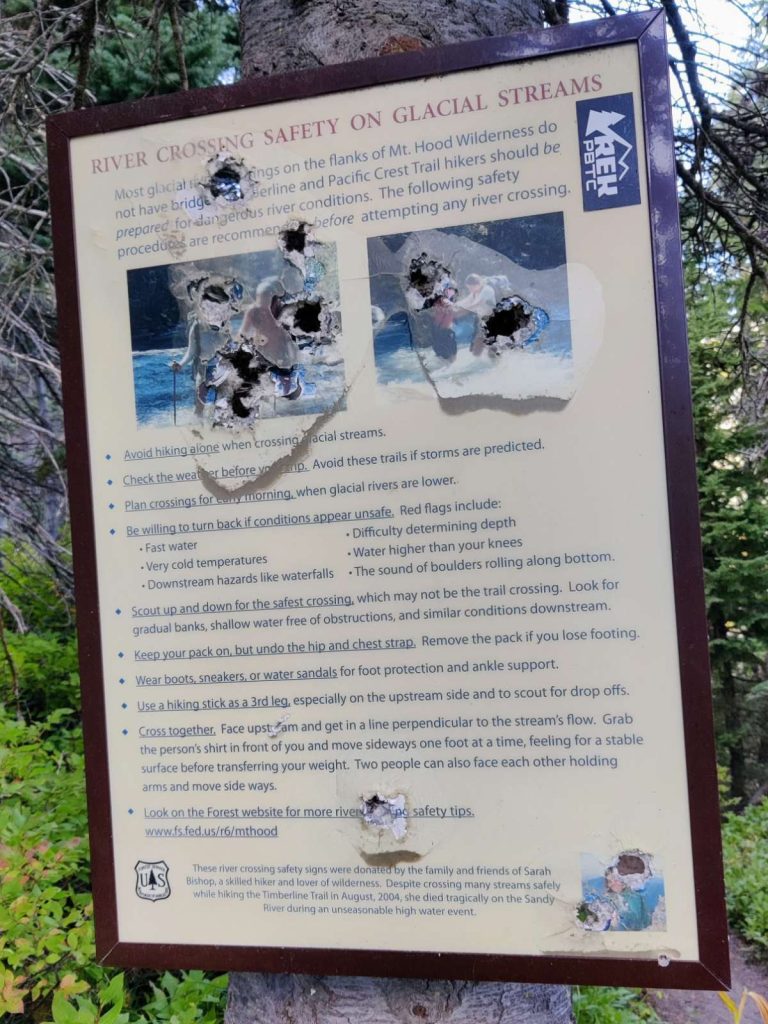
The Forest Service’s advice for tackling challenging water crossings (don’t mind the bullet holes…)
When we hiked the Timberline Trail in late September, almost all crossings were easy rock hops or log balances. In some cases it may be safer to just step into the water rather than attempt a sketchy jump or balance. Hiking poles are very helpful for water crossings and I would highly recommend them for this trail.
Yocum Ridge Blowdown Bypass
In September 2020, a historic windstorm toppled an extraordinary number of large trees along the hillside below Yocum Ridge, utterly destroying a section of the Timberline Trail on the northwest side of the loop. This section begins near the Yocum Ridge Trail junction around mile 10 (clockwise from Timberline Lodge) and lasts for about a mile until Muddy Fork.
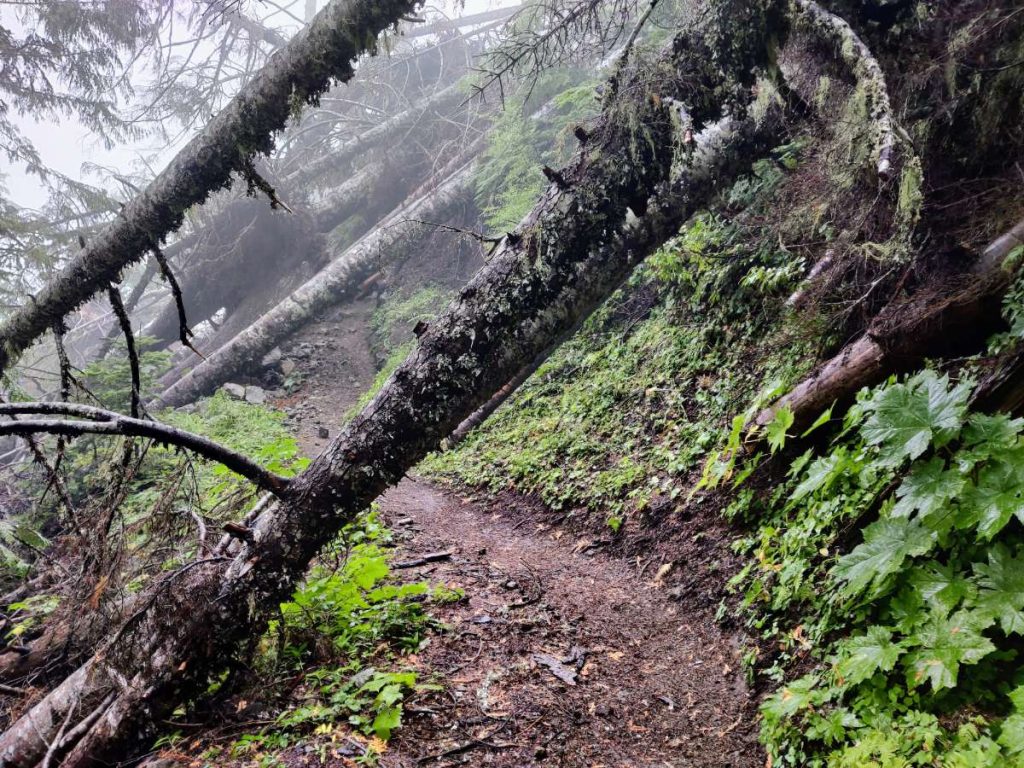
The Yocum Ridge section is passable but requires some clambering over and under fallen trees. Folks with big heavy packs may find it frustrating, but I thought it was interesting.
This section is now open and passable, and we hiked it in late September 2023. Though it’s slow-going and requires a bit of scrambling over and under dozens of downed trees, I found it very engaging and interesting. The sheer scale of nature’s force is incredible to see as you look at the massive root balls ripped from the ground. The countless hours of trail work that have made this section passable (and all with hand tools, since motorized equipment is not allowed in wilderness areas!) are on display and very worthy of appreciation.
There are some steep slippery hillsides and plenty of trees to clamber over and under. If you’re carrying a large heavy pack and don’t like this kind of thing, you might want to detour around on the PCT or a combination of the PCT and Ramona Falls Trail. Here’s what that detour would look like:
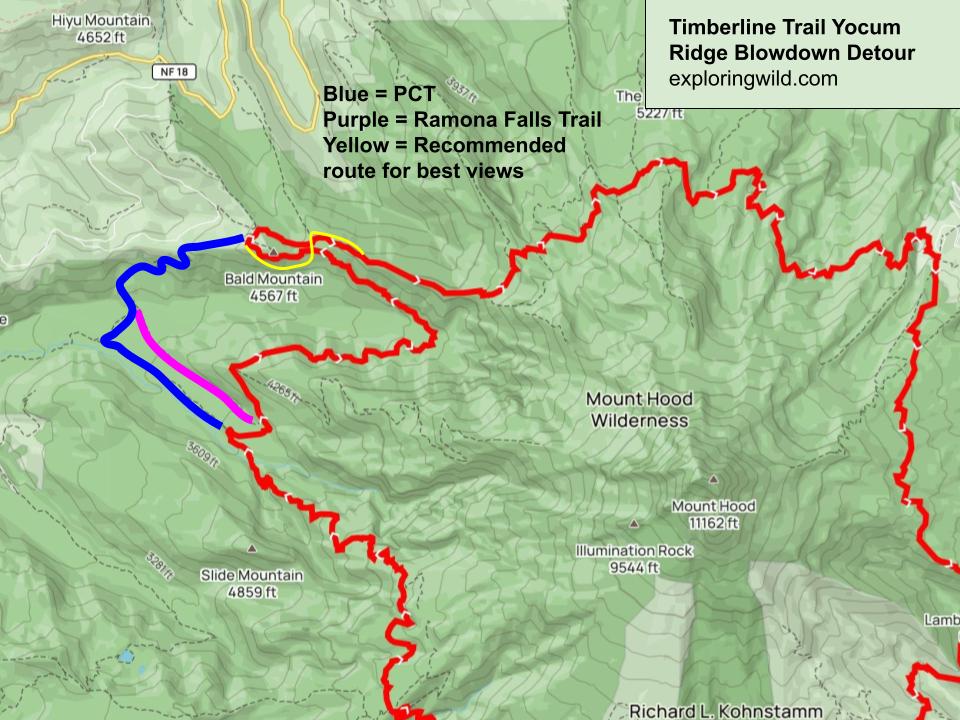
If you take that detour, I also recommend you hike around the southern side of Bald Mountain for the best views of Mt. Hood, using the Timberline Trail Cutoff to cross to the north side as shown on the map above.
All that said, I actually suggest that hikers who feel up to the challenge (and aren’t carrying huge packs) take the original trail as long as it continues to be safely passable. It’s really interesting!
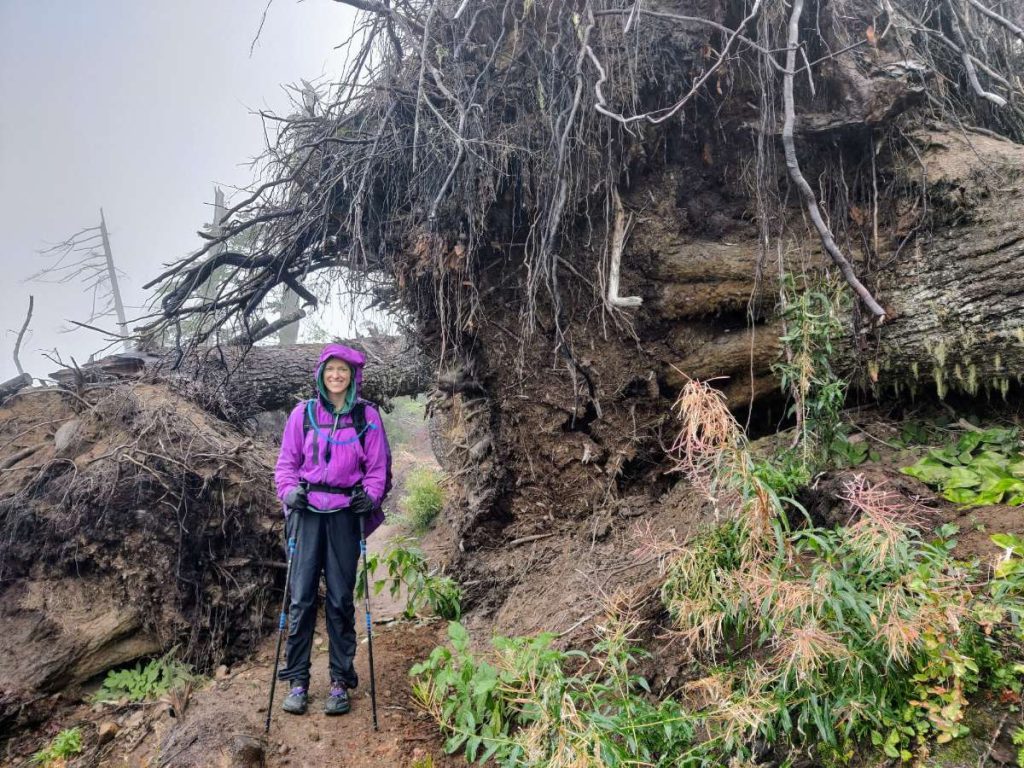
The size of the downed trees is truly impressive! Check out that massive root ball.
Permits for the Timberline Trail
Between May 15 – October 15 a free self-issued permit is needed to hike the Timberline Trail (or anywhere within the Mt. Hood Wilderness). There are no quotas currently; the permit is simply about tracking trail usage and informing hikers of the regulations. Let’s all make sure to follow those regulations to make sure this popular trail remains quota-free.
You can self-issue your own permit at various trailhead portals. You’ll find a box with blank forms and pencils which you use to fill out your information. Keep the “visitor copy,” pop the other section in the permit slot, and you’re good to go.
When starting from Timberline Lodge the permit station is down the trail a bit from where the loop starts (heading clockwise). At Cloud Cap it’s right where the trail leaves from the campground.
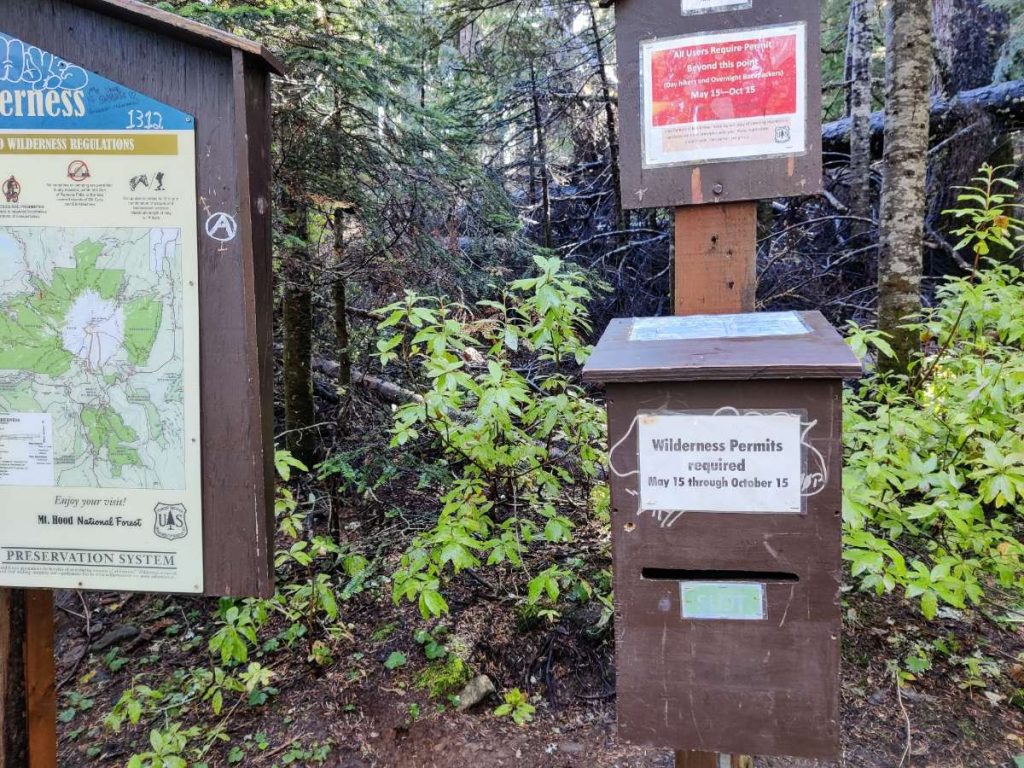
One of several self-serve permit stations on the Timberline Trail, this one at Top Spur.
Other Trail Users
The Timberline Trail is a popular backpacking route with easy access from Portland, and some sections are popular day hiking routes. Thus parts of the trail can get very busy on weekends and throughout the peak summer hiking season. When we hiked at the very end of September we found parts of the trail unpleasantly crowded, even in spite of chilly weather. Some areas to be aware of:
- Pacific Crest Trail: The first 9 miles clockwise from Timberline Lodge (and a fraction of a mile the other direction) are shared with the famous long-distance PCT trail. Most thru-hikers hit this section in July or August, so expect extra trail traffic then.
- Ramona Falls is a popular day hiking destination
- Near Bald Mountain, roughly 15 miles CW from Timberline Lodge, is a popular day hike. You’ll understand why when you see those stunning views!
- Between Bald Mountain and the McNeil Point junction (mile 17) is popular with day hikers.
Trail Overview by Section
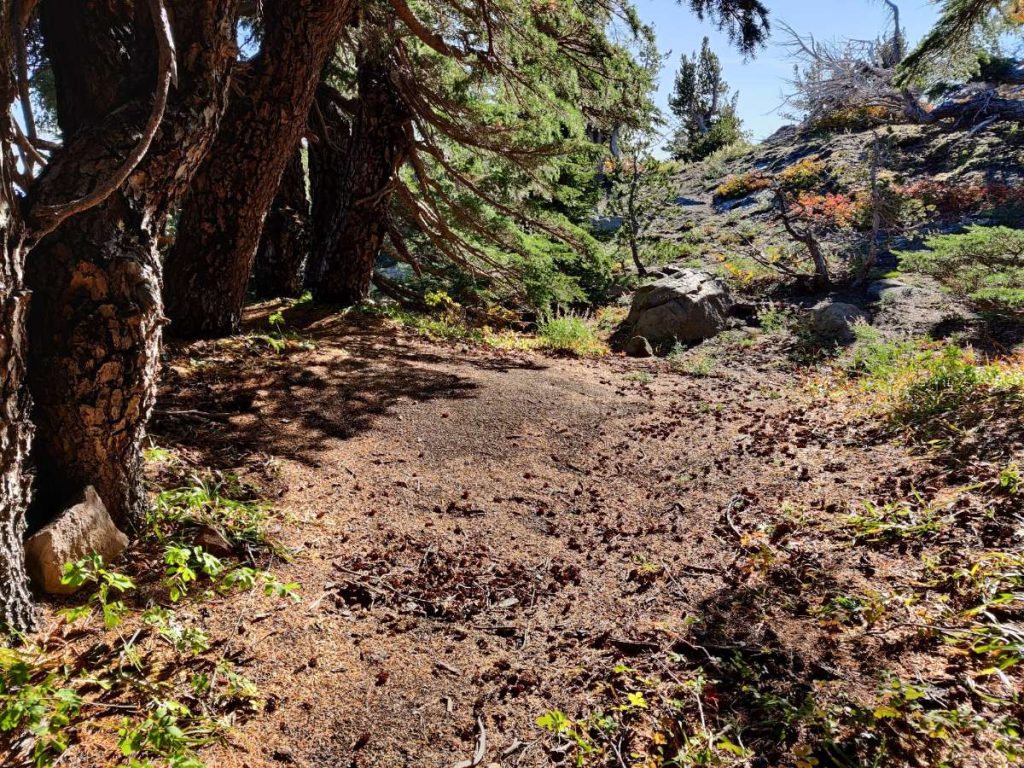
Timberline Trail to Ramona Falls
There are several short connectors from Timberline Lodge to the trail. The route mapped above follows a short paved road uphill to intersect with the PCT. Turn left for clockwise, and shortly you’ll come across the self-issue permit station. The next few miles of trail are well-maintained, mostly downhill, and relatively fast.
Our first view of Mt. Hood on this cloudy day, near Zig Zag Canyon.
You’ll cross a few gullies in this section, but mostly the trail is forested and punctuated by occasional views uphill to Mt. Hood. It was foggy and rainy when we hiked this section, which was atmospheric in its own way but we also missed out on some good views. The Zig Zag River and Sandy Rivers are the two main water crossings in this section.

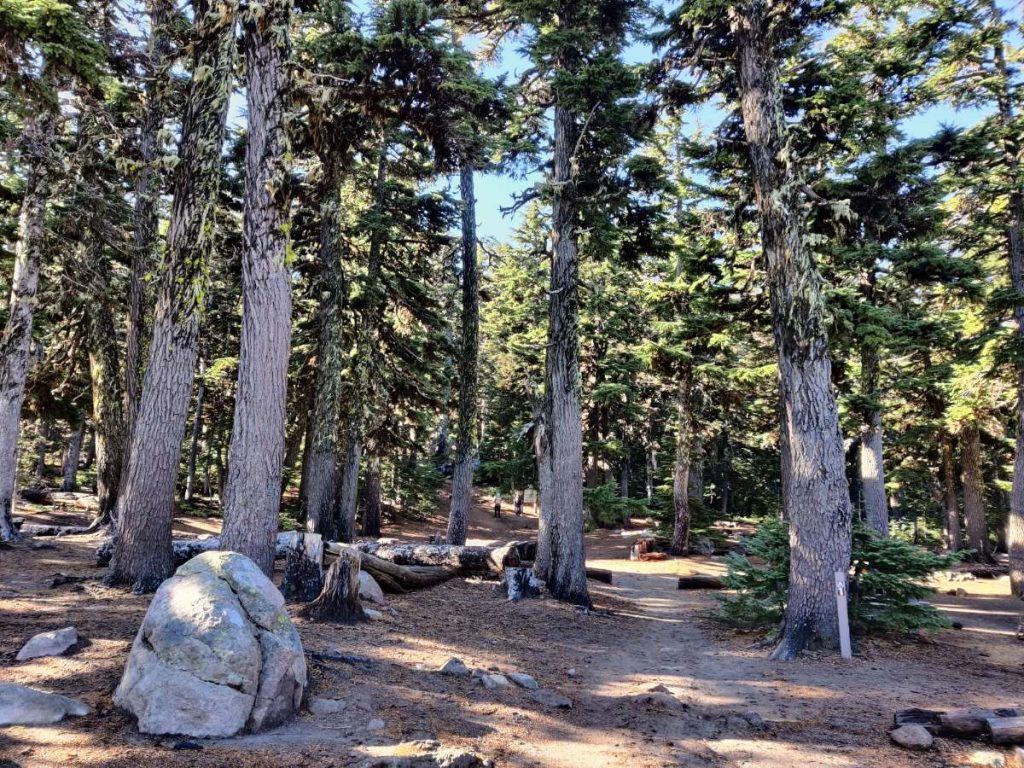
Peaceful mossy forest
Crossing Zig Zag Creek
About 10 miles in you’ll run out of downhill and arrive at Ramona Falls, a popular day hiking area. There’s a nice bridge (the only one on the Timberline Trail) and close-up views of the waterfall. You can camp in this area if sufficiently far from the falls; look for signs marking where you should and shouldn’t camp.
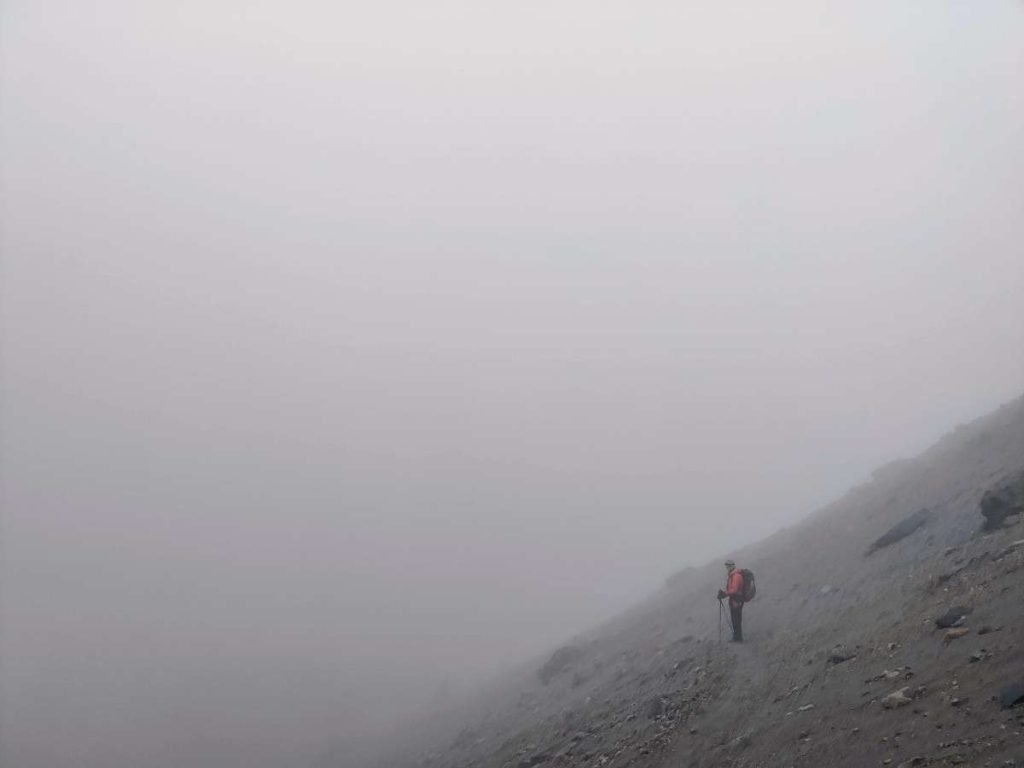
Staring into the void! This weather did obscure some good views but was interesting in its own way.
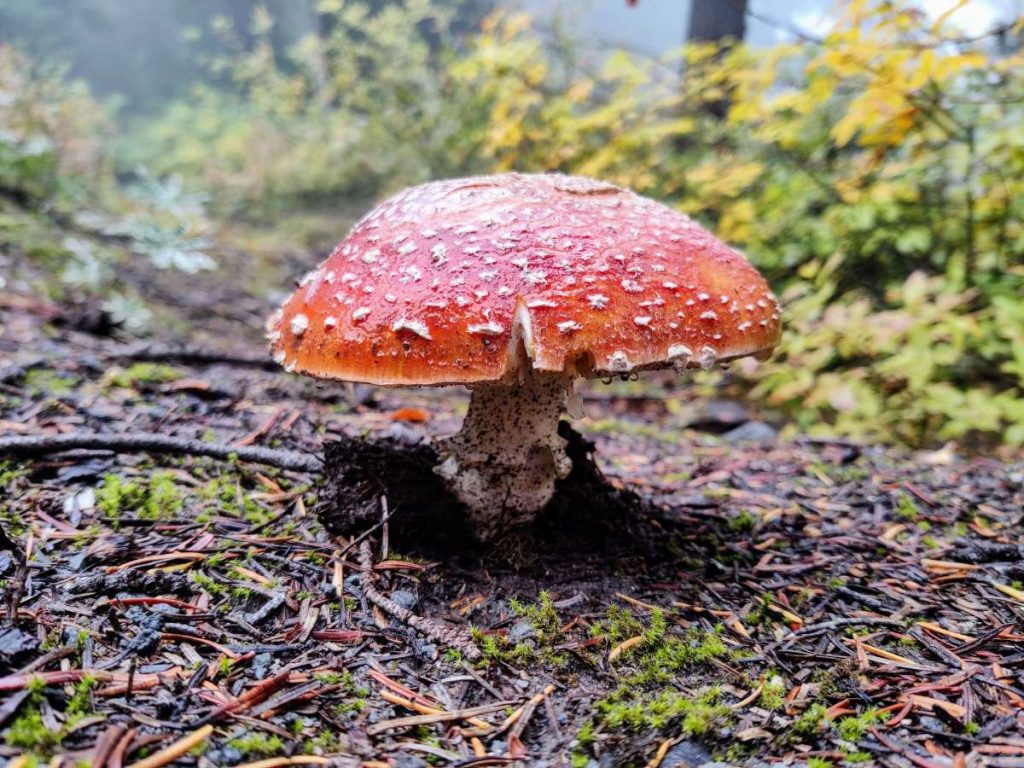
There are many mushrooms on the Timberline Trail (but don’t eat them!)
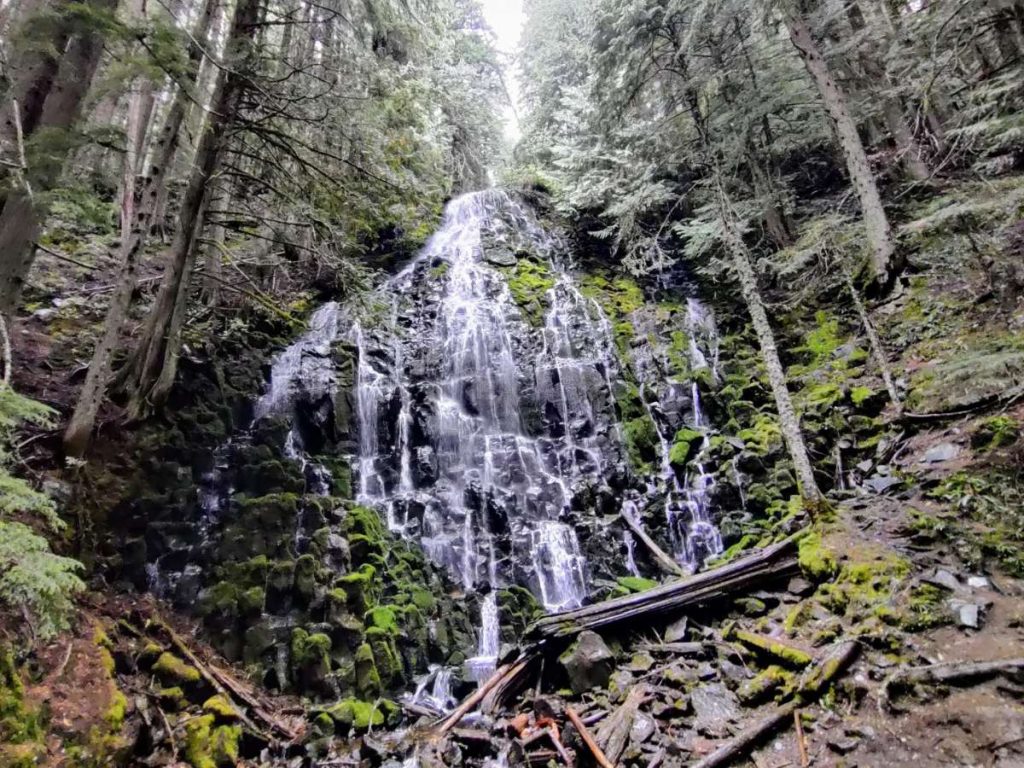
Ramona Falls
Ramona Falls to Cloud Cap Campground
Leaving Ramona Falls, you’ll start the blowdown section (unless you detour around it on the PCT – details above). This section was closed after the devastation that occurred in Sept 2020, but is now open albeit a bit slow-going. When you reach Muddy Forks – a braided river with several crossings – the hardest part is done. There are a few good campsites near Muddy Forks if you’re done for the day.
The Yocum Ridge section is slow-going because of the downed trees.

Rainy campsite at Muddy Fork

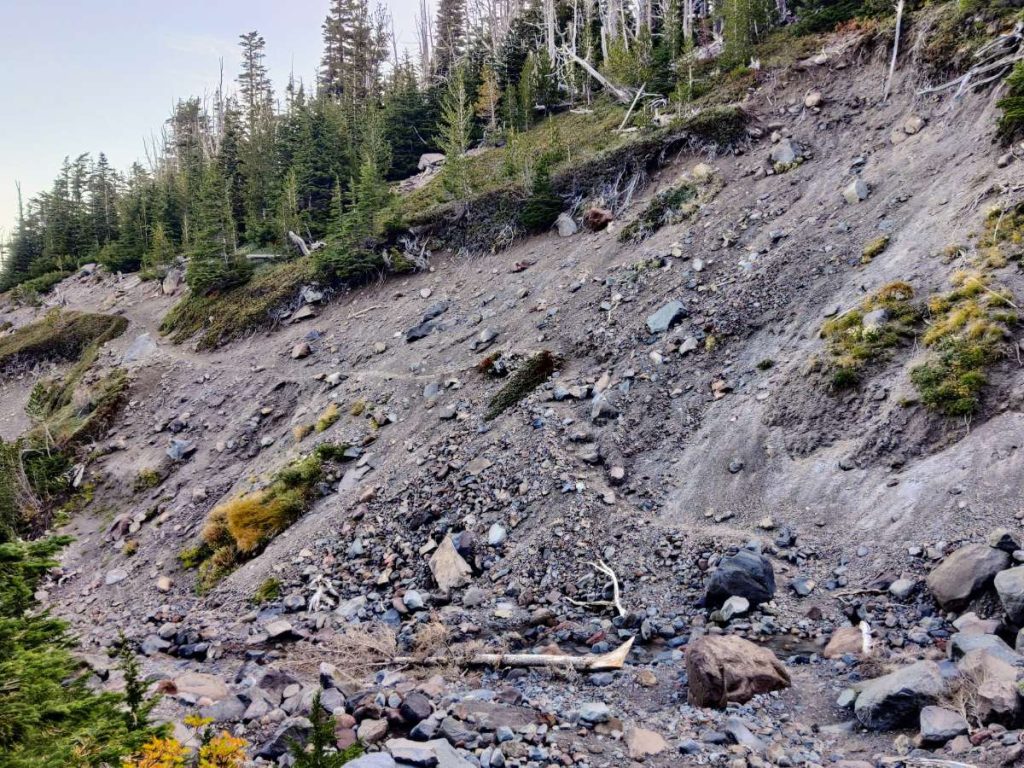
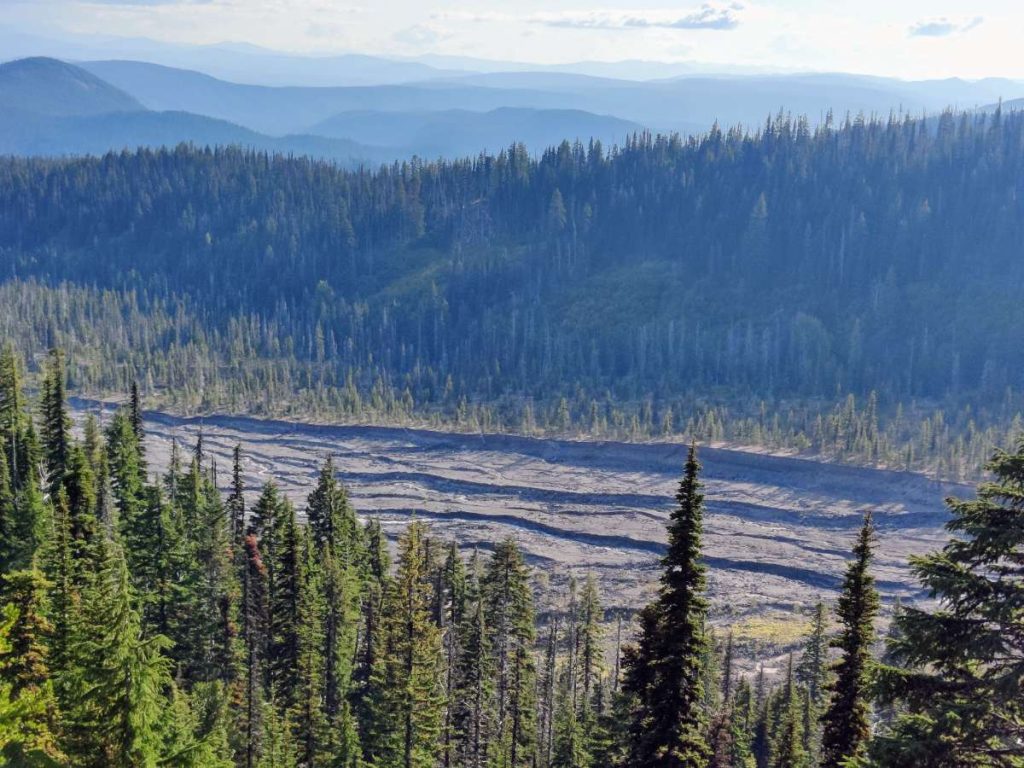
Leaving Muddy Fork, an eroding hillside showcasing the region’s unstable volcanic soil.
Near Bald Mountain be sure to look behind you for stunning views of Mt. Hood! The next section of trail traverses some gorgeous alpine meadows as well as eerie skeleton forests (fires? beetles?).
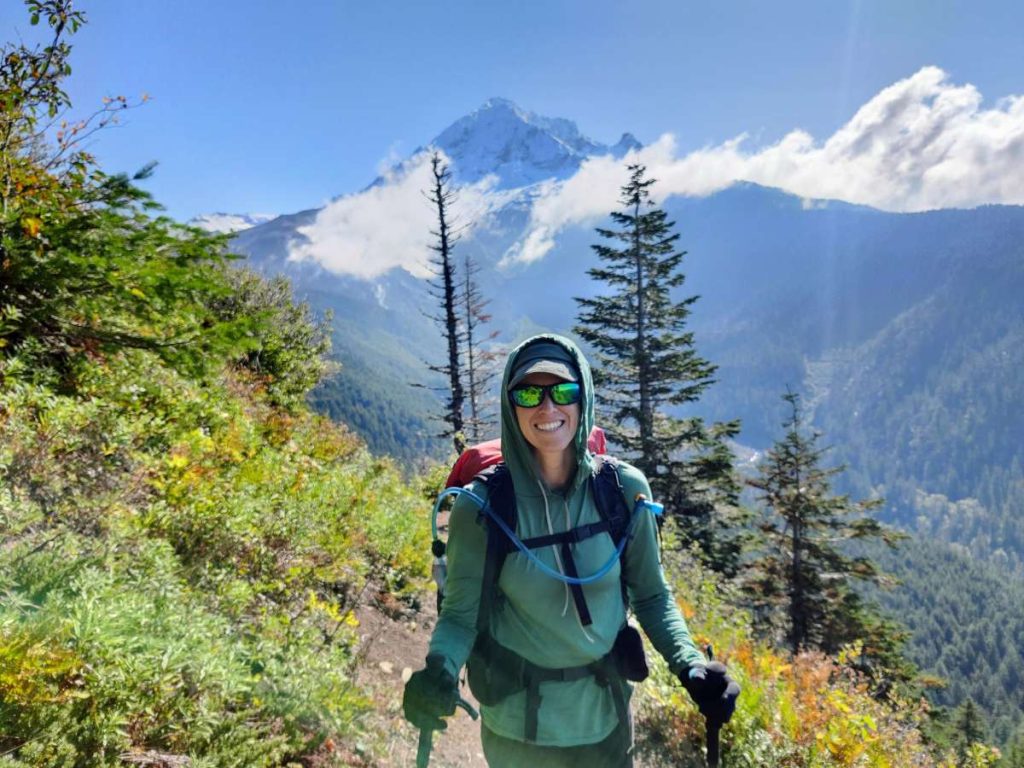
Gorgeous views of Mt. Hood near Bald Mountain. If traveling the route as mapped in this post, be sure to look behind you!

It’s sad to see these huge patches of dead forest near Cairn Basin.
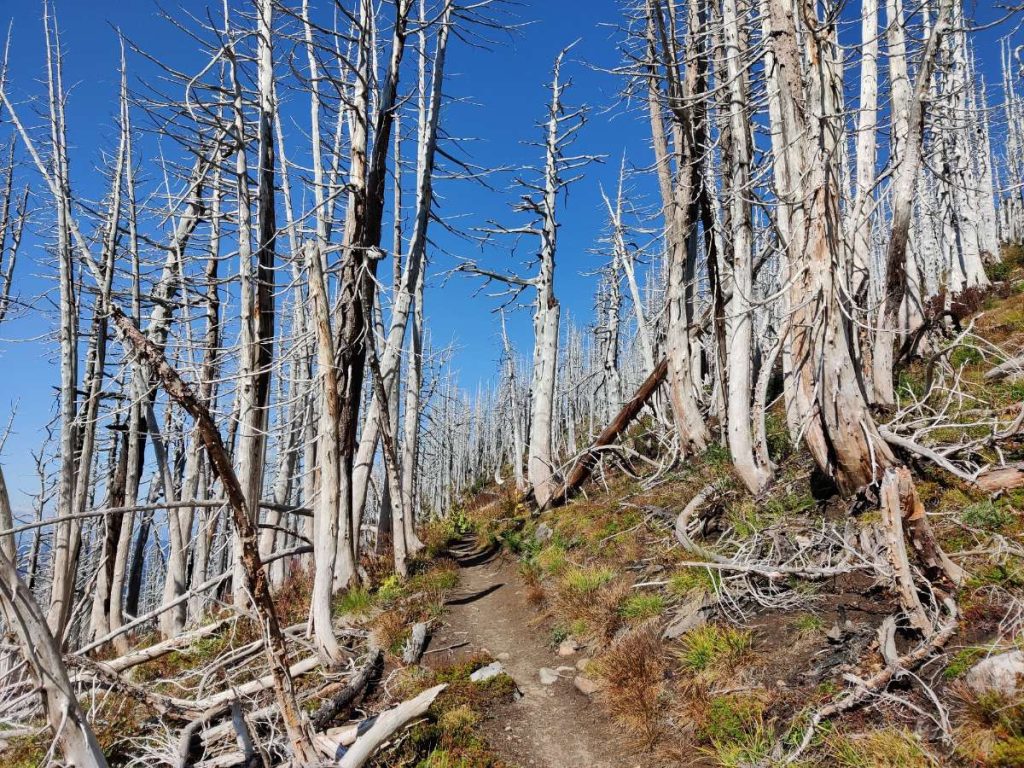
I’m not sure of the cause but suspect fire, beetles, or both.
Some of the best camping on the trail is in this northern part of the loop at Cairn Basin, Wy’east Basin, and Elk Cove. Parts of this section can also be busy with day hikers, but it’s hard to fault them when you see how pretty it is.
Continuing from Elk Cove the trail squiggles in and out of a number of deep drainages. Eventually you’ll cross Coe and Eliot creeks and begin the climb up to Cloud Cap saddle where the paid campground awaits. There are a few decent (dry) campsites a couple miles before the descent to Eliot Creek, but I only recall one or two small sites right near the crossing.
Crossing Eliot Creek on a sturdy log.
Cloud Cap Campground, though empty here during midday in fall, may be crowded with car campers in the summer. It costs $17 to stay here.
Cloud Cap to Timberline Lodge
Leaving Cloud Cap Campground the real climbing begins, at first steeply up to treeline and then more gradually across the exposed volcanic flanks of Mt. Hood. You’ll find a few campsites in the forest after leaving the campground, and then none until near the top (and these are very exposed).
One of the last campsites on the climb from Cloud Cap before passing treeline.
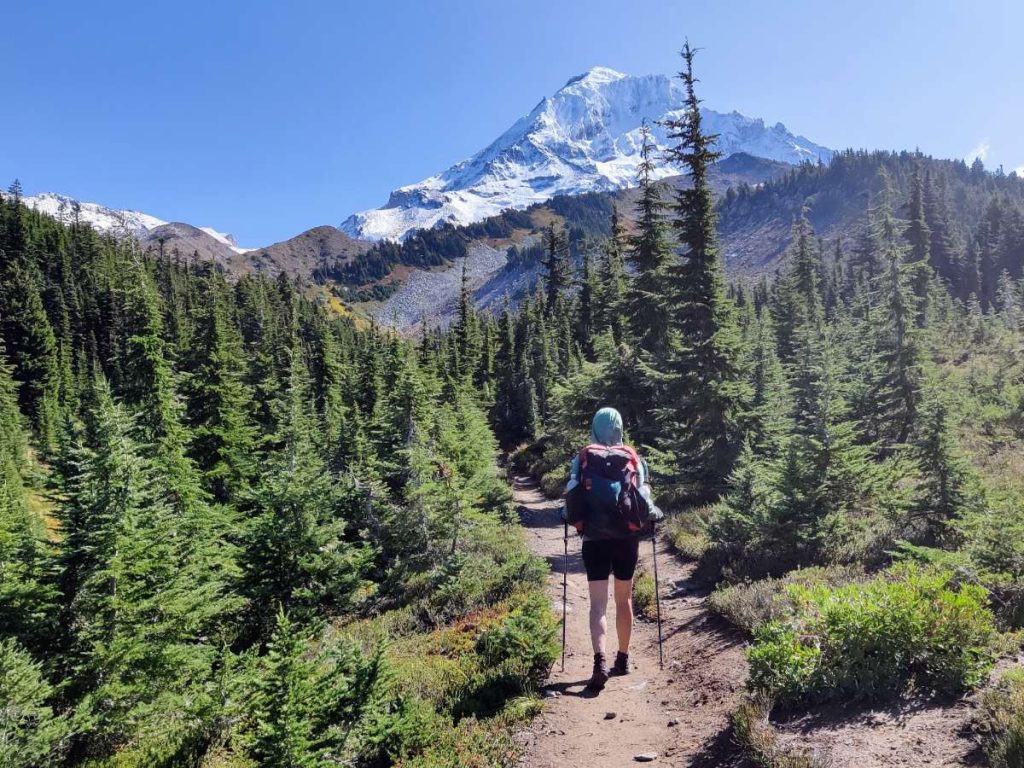
This section, the climb to the highest point of the Timberline Trail at 7340 feet, may hold snow later in summer or be dusted by early storms in September (or, occasionally, any time throughout the summer). This is the only section of the trail that stays above treeline consistently, so enjoy the views!
Fresh snow in late September near the high point of the Timberline Trail.

One of the first semi-protected campsites when coming down from the high point.
Trees return about halfway down the descent. Once back in the forest there is some lovely camping, though water may or may not be found nearby. Cross a series of streams and gullies en route to the Mt. Hood Meadows ski area, where you’ll traverse the grass-carpeted ski runs and cross more small streams. As you cross Newton Creek there are a number of lovely campsites on both sides.

Hood Meadows ski area is full of grassy hillsides and small streams.
Eventually you’ll take the final plunge to the White River, which can be challenging to cross during times of peak snowmelt. Once you make it across it’s a steep climb back to the Timberline Lodge, and then you’re done! Stop into the lodge or drive down the hill to Mt. Hood Brewing Company in Government Camp for the traditional post-hike feast.
The White River, a substantial water crossing, seen from above
The White River can be difficult to cross early in the summer (shown here in late September)

Some final gorgeous Mt. Hood views nearing the finish at Timberline Lodge.
Hiking Solo
Though I hiked the Timberline Trail with my husband, I also love hiking and adventuring solo. If you’re wondering whether the Timberline Trail is an appropriate route to backpack solo, here’s my two cents.
Being an experienced backpacker, I would not hesitate to hike the Timberline Trail solo except early in the season when water crossings are challenging. If you’re not experienced with water crossings you may find them intimidating and having a partner would add a margin of safety. Later in the season, when snowmelt has slowed, you’re less likely to have issues.
Cold and stormy weather can also be a danger, and all hikers should be prepared for this, solo or not. Otherwise, this is a well-traveled popular trail without major hazards (except potentially the water crossings). As long as you have appropriate experience, go and enjoy a solo adventure!
Timberline Trail vs. Loowit Trail
I had the privilege of backpacking both these famous trails in a single trip, about one week apart. Both are iconic 2-4 day PNW backpacking trips around volcanoes, both are challenging and rugged in places, and both are logistically simple loop routes with no permit quotas. Here are my thoughts on their differences.
Timberline Trail:
- more crowded
- fewer rugged and sketchy sections (but still some)
- more forested miles
- more hard water crossings
- more water sources throughout the season
- dormant volcano, terrain was formed a long time ago
Loowit Trail:
- less crowded
- more rugged trail and sketchy footing, thus harder but more engaging
- more exposed terrain above treeline
- fewer hard water crossings (but still some)
- fewer late-season water sources, so longer water carries
- active volcano with more obvious volcanic upheaval from recent eruption (1980)
In terms of overall vibe and impressions, I felt like the Timberline Trail was more dramatic on a large scale (bigger and taller mountain, longer climbs and descents, longer route) while the Loowit Trail was more dramatic and engaging on a smaller scale (more rugged little gullies, boulder hopping, rope-assisted scrambles, nearly constant views of recent volcanic upheaval). Both are great! The Timberline Trail may be slightly more accessible and “easier” but is by no means easy, and early in the season the water crossings can be a significant issue.
Related: Backpacking the Loowit Trail Around Mount St. Helens
Backpacking Gear
I always recommend a relatively lightweight backpacking gear setup because it’s more comfortable and fun, and this is certainly true for the Timberline Trail. Steep climbs, downed trees, loose gullies, and water crossings all favor a light pack and nimble footing.
Here are some of the key gear items I use on most backpacking trips, and on the Timberline Trail specifically. For more, see my favorite backpacking gear.
Backpacks: We both carried ULA Circuits. We love them because they’re lightweight, adjustable, and have a very flexible 68 liter capacity. On this short trail we kept them cinched down to a smaller volume, but they also expand to manage 7-day food carries when needed.
Sleep: Therm-a-Rest NeoAir XLite sleeping pads (warm and light) and Enlightened Equipment Convert quilts with synthetic hoods. The Convert is a great middle ground between a sleeping bag and a lightweight quilt because the full zipper helps prevent drafts in cooler temps.
Shelter: Borah Gear bivvies and a Six Moon Designs Haven tarp. We love this setup for backpacking as a couple because we can set up the bivvies alone on clear nights for a bit more space and stargazing, or we can get cozy in the tarp when more warmth or weather protection is needed. We ended up pitching the tarp every night on the Timberline for rain protection and added warmth.
Shoes: Altra Lone Peak trail running shoes. We’ve both been hiking and running in these for many years and won’t wear anything else. They were more than adequate for the slippery sections of the Timberline and they dry very quickly, so you can keep them on during water crossings.
Cooking: JetBoil MicroMo, super fast at boiling water for rehydrating meals. Snow Peaks titanium mugs for drinks (a luxury item), Sea to Summit collapsible X-Mugs as bowls, Toaks titanium long-handled spoons.
Water: Sawyer Squeeze filter in gravity mode with CNOC Vecto 3 liter dirty bag. Easy and efficient.
Electronics: Garmin InReach Mini, Petzl Actik headlamp, power bank and cables
Other must-have items:
- Hiking poles for balance, both on the trail and during water crossings
- Sunscreen, hat, perhaps arm sleeves or a sun hoodie for the exposed eastern section
- Warm gloves, used extensively during chilly mornings of late September
More Resources
If you’re interested in backpacking the Timberline Trail, you might also enjoy these posts:
Or visit the backpacking home page for lots more!
About the Author
Hi there, I’m Alissa, founder of Exploring Wild. I’ve had the pleasure of hiking the Arizona Trail, Colorado Trail, John Muir Trail, Tahoe Rim Trail, and countless shorter amazing trails throughout the US and abroad. I love solitude, big views, and a good lightweight gear setup. Learn more here.
Hiking resources in your inbox?
There’s more where this came from! Sign up here for occasional emails full of inspiration and information about backpacking and hiking.
The post How to Backpack Around Mt. Hood on the Iconic Timberline Trail appeared first on Exploring Wild.
https://exploringwild.com/how-to-backpack-timberline-trail/?utm_source=rss&utm_medium=rss&utm_campaign=how-to-backpack-timberline-trail
 CampingSurvivalistHuntingFishingExploringHikingPrivacy PolicyTerms And Conditions
