× CampingSurvivalistHuntingFishingExploringHikingPrivacy PolicyTerms And Conditions
Subscribe To Our Newsletter

Bikepacker’s Guide to Handlebars: Drop, Flat, Alt, Oh My!

Choosing handlebars for bikepacking is a critical part of choosing the whole bike. Should you go with one of those funky category-crossing drop bar mountain bikes? Maybe a hardtail with wide flat bars? What even are “Jones bars” anyway?

Just like any bike can be a bikepacking bike, any handlebars can be bikepacking bars. And yet, like with bikes, some are better (more practical and more fun) for certain styles of riding. Sure, some folks learn to shred singletrack on a drop bar gravel bike, but most of us would rather not.

There’s also a big comfort factor, which is highly personal. The bars that feel all-day comfy for one rider can easily make another’s hands go numb, and vice versa.

Lastly, we bikepackers have a consideration day riders don’t think about: cargo space. Most handlebar bags and harnesses can be adapted to work with most styles of bars, but some combinations are definitely more dialed than others.

I’m not here to sell you on one particular type of handlebar; I like them all. I’ve toured and bikepacked extensively with three different models of drop bar, each wider than the last. Eventually I accepted the inevitable, got a hardtail, and started bikepacking with flat bars. Both styles work for me, and my preference depends on the route.

So whether you’re choosing your first bikepacking bike or thinking about swapping bars, I’m here to help you understand the tradeoffs between different types of handlebars specifically in a bikepacking context.

Related: Packing for Bikepacking: What Goes Where?


Loaded Salsa Fargo bikepacking bike with flared drop handlebars on singletrack trail


The bikepacking world sometimes blurs traditional lines when it comes to handlebar choice, such as this rigid mountain bike (Salsa Fargo) with dramatically flared drop bars.

When you buy through affiliate links in this post, I may earn a small commission. Thanks for your support! I always offer unbiased opinions based on real experience from the road and trail. Learn more.

What Bikepackers Care About

Before diving into the different types of handlebars, let’s get on the same page about why the choice matters. When it comes to choosing a handlebar for bikepacking specifically, the biggest factors are (roughly in decreasing order of importance):

  • Bike style: the bar type you prefer strongly influences the bike options you can choose from (gravel, mountain, etc)
  • Control and stability appropriate for the terrain
  • Comfort of hand positions and riding postures, especially for back-to-back long days on bikepacking trips
  • Cargo space for handlebar bags and harnesses
  • Bar space for gadgets like a GPS nav device, headlight, phone mount, etc

There are plenty of other minor factors to consider, and I’ll list them all in the pros and cons below. But don’t let them distract you from those most critical considerations.

Bike Style: Where Do You Want to Ride?

If you’re shopping for a new bike, handlebar type is partly chosen for you based on the type of bike you choose, which should be based on the terrain you want to ride. This isn’t an absolute rule and bikepackers tend to be flexible about matching bikes to terrain, but it’s definitely a big influence.

Gravel and road bikes usually come with drop bars, while hardtails and full-suspension mountain bikes come with flat bars. That’s because, all else being equal, drop bars are best for smooth terrain and flat bars are best for rough stuff. Of course there are some category-defying options too, but these are less common.

So your first step in choosing handlebars is deciding what kind of bikepacking you want to do. Gravel or singletrack? Cruisy or rugged? If you haven’t thought about this, go read Bikepacking Bikes: The Best Choice for YOUR Riding Goals.

Bikepacking routes often mix, match, and blend terrain types, so you don’t have to get too specific just yet. But there’s no denying that each core style has its own vibe. Which one appeals most to you?


Bikepacker on dirt road in Mendocino National Forest


Does your ideal bikepacking terrain look like this (gravel)?


View of singletrack trail over mountain bike handlebars


Or does it look more like this (singletrack)?

Bikepackers Blur Boundaries

If there ever was a niche to blur traditional bike categories, it’s bikepacking! Flat bar gravel bike? Drop bar mountain bike? We embrace them all in this wacky sport where factors like cargo capacity and long-haul ergonomics trump category and convention.

In my opinion, this is partly because bikepackers spend a lot of time on varied surfaces. You can only find so many continuous miles of pristine gravel or technical singletrack, so many bikepacking routes make use of in-between surfaces: gravel and dirt roads of varying quality. And it’s exactly this type of riding that can work well with either drop bars or flat bars.


Bikepacking bike leans against tree with curve sign on dirt road through forest


A very typical bit of bikepacking terrain where any kind of handlebar can work well.

For example, the two bikes below are both fully rigid, both running 29 x 2.3″ tires, and both well suited to similar routes. One has drop bars and the other flat:


Loaded bikepacking bike in front of gate


Salsa Fargo with drop bars


Rigid mountain bike with flat bars loaded with bikepacking gear


Chumba Stella with flat bars

And this, I believe, is exactly why so many would-be bikepackers are curious about handlebar choice. Sometimes knowing your favorite type of terrain isn’t enough. So let’s get into more details about each handlebar type and why you might (or might not) want to bikepack with it.

Bikepacking With Drop Handlebars

Traditionally, drop handlebars were mainly for road bikes. Their narrower and lower grip encourages an aerodynamic position that maximizes speed, something bikepackers don’t usually care about.

Yet today, many people do bikepack with drop bars thanks to modern trends. When gravel bikes took off, so did wide flared drop bars that offer more stability and comfort for all-day rougher riding. Now you can even find drop bars on some mountain bikes, albeit at the tamer end of the MTB spectrum.

Two popular examples of bikepacking-friendly drop bars are the Salsa Cowchipper and PNW Coast Bar. I’ve bikepacked thousands of miles with each and find them very comfortable. They are wide, flared, and fairly shallow, all of which help with comfort and stability. If this type of handlebar is new to you, see my article comparing Salsa’s flared drop bars for an intro.

Bars like the Cowchipper and Coast do their best to offer the advantages of drop bars while minimizing the drawbacks. Read on for the most important tradeoffs in the context of bikepacking specifically.

Advantage: More Hand Positions

When riding all day, stuff gets tired. For some people, alternating between upright and forward postures (in other words, switching grip between the hoods and drops) helps stave off muscle fatigue and nerve issues. The externally rotated hand position also solves some problems with hand numbness and tingling.

If you aren’t riding a lot of rough or technical terrain and you find drop bars more comfortable, there’s little reason to not choose drop bars.


Five pictures of hand on drop handlebar, showing all the different positions.


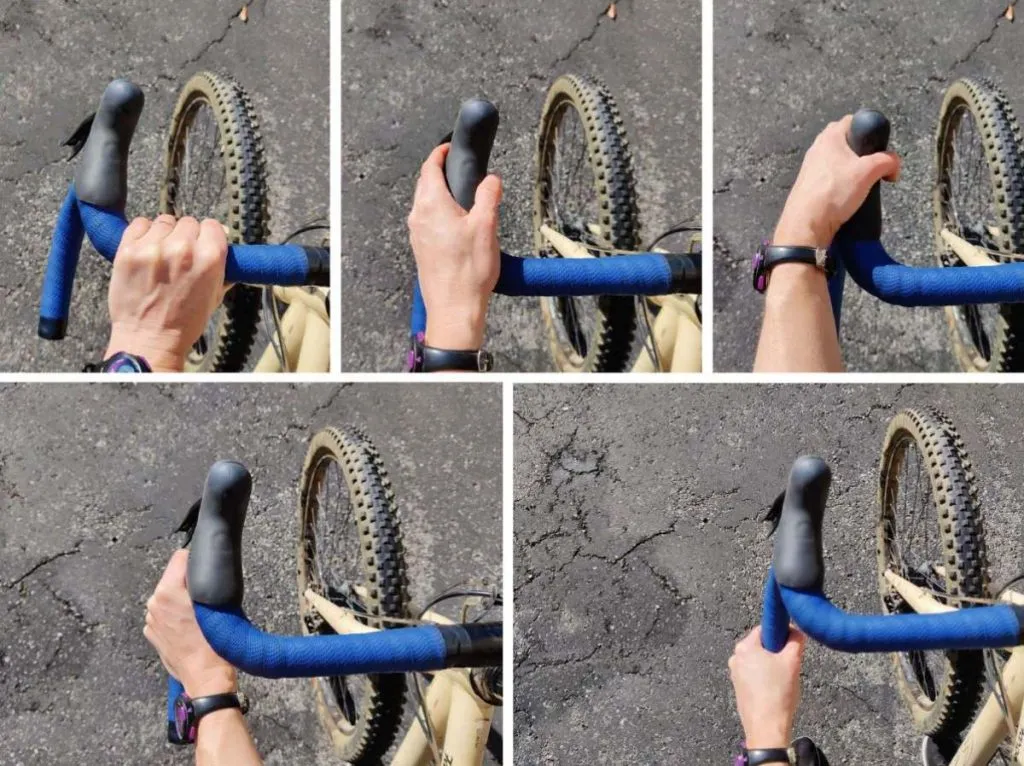
The five common hand positions on drop bars. (Top row: tops, ramps, hoods. Bottom row: hooks, drops)

Disadvantage: Less Stability

The main drawback of drop bars for bikepacking: they’re less stable and confidence-inspiring on rugged terrain. This isn’t to say you can’t ride singletrack or chunky jeep road with drops, because you certainly can (and many do). But if you love more technical riding and aren’t into underbiking, drop bars probably aren’t the best choice for you.

I say this from experience: I bikepacked many thousands of miles with gravel-style drop bars and got through everything I needed to get through. But I only started making real progress in my mountain biking skills when I switched to a flat bar bike.


Woman bikepacking on rocky desert road with drop bar bicycle


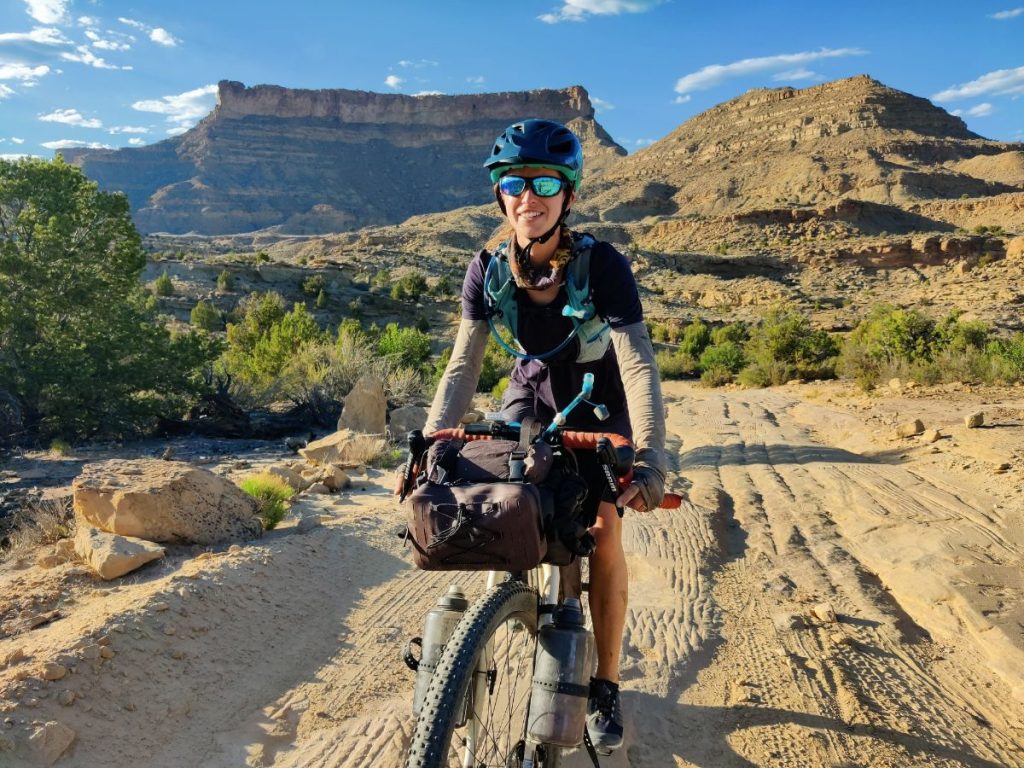
Me bikepacking in Utah on a rough dirt road with drop handlebars.

Disadvantage: Less Space for Cargo

In the puzzle of loading a bikepacking bike, handlebar space is key real estate.

The good news: Most handlebar bags and harnesses work on drop bars, especially wider gravel-style drops.

The bad news: Space is limited. You’ll have to roll up your dry bag shorter and can’t get into the ends as easily. You might need a bikepacking-specific tent with short poles.

Tip: When I bikepack with drop bars I usually put a compression sack like this in my handlebar harness to make the best use of limited space. When using flat bars, on the other hand, I prefer a wider dry bag with openings on both ends for easy access.

Related: Revelate Handlebar Harness Review (Both Drop and Flat Bars)


View of handlebar bag on wide gravel drop bars


Here I’m using a compression dry bag in my handlebar harness to help my sleeping bag fit between my drop bars.

Disadvantage: Less Space for Gadgets

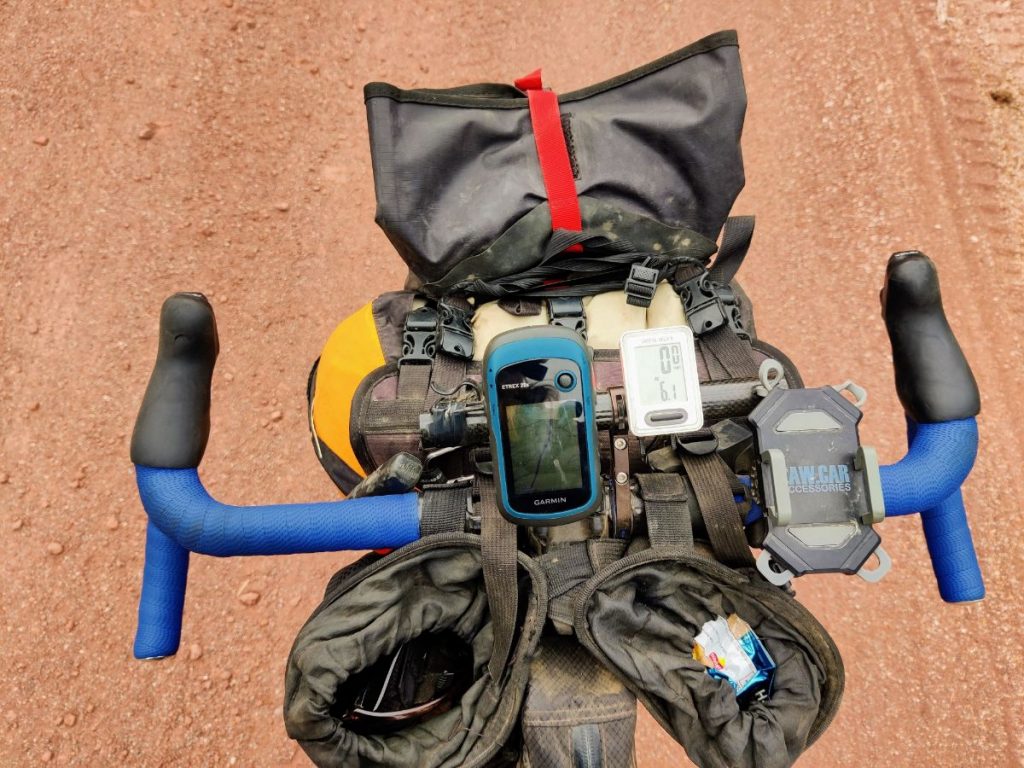
Bikepackers tend to load up our bars with gadgets: phone holders, GPS devices, bike computers, headlights… When combined with the straps from handlebar bags and stem bags, space is at a premium! Most drop bar cockpits simply don’t have room for all these items at once.

To solve this problem I highly recommend picking up one of these inexpensive and very useful bar extenders. I rarely bikepack without one on my drop bars. You can see it in the picture just above.

Other Pros and Cons of Drop Bars for Bikepacking

In my experience the above factors are most important, but here are a few other pros and cons that may matter to some riders.

Advantages:

  • Ability to get low and “aero,” not usually a big factor for bikepackers (unless you’re racing) but might come in handy for headwinds or the occasional sprint into town before the burger joint closes.
  • May feel more comfortable and familiar to folks with a history of road riding
  • Need to be re-wrapped from time to time (so you can choose a new bar tape color, yay)

Disadvantages:

  • More forward-leaning position (all other things being equal) can be uncomfortable on long days. Try switching to a shorter stem with more rise if you have this problem.
  • Need to be re-wrapped from time to time, a bit of extra work
  • Hydraulic disc brake options more limited
  • Parts may be slightly harder to find in developing countries where cheaper mountain or hybrid bikes are the norm (but it depends)

Bikepacking with Flat Handlebars

Flat handlebars, also called straight bars or MTB bars, are usually found on mountain bikes. Their wide high-leverage design gives riders ultimate control on the roughest trails. As with gravel-focused drop bars, the trend of late has been wider and wider. If you can fit your mountain bike through the door, your bars are apparently too narrow!

Two popular bikepacking-friendly flat bar options are the SQlab 30X 16 degree (currently on my hardtail) and the Salsa Rustler Riser. Both these bars feature some backsweep (where the ends angle back toward the rider) for better ergonomics, which I’ll get into more below.

Advantage: Control and Stability

There’s no question that wide flat bars are the most confidence-inspiring way to ride rough and technical terrain. When I finally started bikepacking with flat bars, my MTB skills really took off. The position is more stable and easier to control in response to obstacles.

That said, don’t be put off from drop bars if you plan to ride mixed terrain routes. It’s absolutely possible to ride rough terrain with drop bars, especially the wide and flared kind. You may have to go a bit slower but you’ll get through it.

In my opinion the question is whether you really love to ride rough stuff and ride it well, in which case you will most likely prefer a bike with flat bars.


Looking over mountain bike handlebars to muddy trail


When the trail gets rough, flat bars offer the best control and leverage.

Advantage: More Cargo Space

Not gonna lie, when I started bikepacking with flat bars all that extra cargo space felt luxurious! Being able to use my handlebar bags at their full width, rather than rolling the ends up to fit between drops, added a few extra liters of capacity to my bike.

As a nice bonus, flat bars work really well with double-ended dry bags. This creates more easy-access space for layers, gloves, etc, which is always at a premium when bikepacking.


Bikepacker’s Guide to Handlebars: Drop, Flat, Alt, Oh My!


Flat bars allow for a wider handlebar bag, really helpful especially on smaller frames. I like to use this double-ended dry bag with flat bars because it offers easy access to extra layers throughout the day.

Advantage: More Gadget Space

As I mentioned above, I usually use a bar extender when bikepacking with drops. Not so with flat bars! I can line up my gadgets and bag straps with no issues on my flat bars, which keeps my cockpit cleaner.

Disadvantage: Fewer Hand Positions, Worse Ergonomics

Flat bars offer only one hand position out of the box, and it requires internal rotation of the forearms and shoulders that is not ideal for long ride comfort. For some people this can cause hand pain and nerve issues.

I highly recommend bikepackers look for flat bars designed with backsweep (where the bars angle back toward the rider slightly) to help with this. A backsweep of 10 – 15 degrees is usually enough to put the wrists at a comfortable angle, provided the bars aren’t too wide for the rider.


Close up of hand on grip of mountain bike handlebar


It’s worth noting that some people have no problems with the flat bar hand position. Personally I experience less hand numbness and weakness when bikepacking with flat bars as compared with drop bars, though neither is a problem at all unless I’m riding super-long back-to-back days.

Beyond choosing a bar with some backsweep, upsweep, and rise, here are other ways to make flat bars more comfortable for bikepacking:

Bar ends: I’m a big fan of Cane Creek Ergo Control bar ends. They’re an easy addition, offer an extra hand position with more natural wrist angle, improve leverage and body position on tough climbs, and (bonus) make it easier to lean the bike against a wall. Read more: MTB Bar Ends

Foam grips: Like extra-thick bar tape on drop bars, a pair of fat foam grips can reduce vibration and hand fatigue during long rides. I like the Fat Paw Cam grips from Wolf Tooth.

Aero bars: Adding aerobars to flat handlebars is definitely an unusual move. However, a small group of folks (mostly endurance bikepack racers) find them helpful mainly for the extra riding position.


Bikepacker’s Guide to Handlebars: Drop, Flat, Alt, Oh My!


Flat bars are often found on mountain bikes, but there’s no reason they can’t be used for gravel touring or even pavement if you find them comfortable.

Other Pros and Cons of Flat Bars for Bikepacking

Flat bars have some other tradeoffs too, especially when it comes to bikepacking and bike travel. These are less important but still good to be aware of.

Advantages:

  • Shift and brake controls are a bit easier and cheaper to maintain and repair compared to integrated brifters used on drop bars
  • Wider range of brake options suitable for heavy loads on big descents
  • Compatible parts may be easier to find in some developing countries, depending on your bike

Disadvantages:

  • Posture is less aerodynamic, so you will ride a bit slower on smooth roads or into headwinds
  • When traveling by bike, super-wide bars can be awkward in situations like chaotic city traffic, cramped motel rooms, or traveling by bus.

Alt Handlebars

Still can’t choose between flat and drop? You’re in luck, there’s a third option! Alt (short for “alternative”) bars are designed to offer the varied hand positions and comfort of drop bars plus the leverage and real estate of flat bars.

The best of both worlds? They certainly could be, especially if you like technical riding and want the leverage of flat bars but don’t find them comfortable. They’re also popular for folks who require multiple hand positions but don’t like drop bars for stylistic or other reasons.


Bikepacker’s Guide to Handlebars: Drop, Flat, Alt, Oh My!


Jones Loop bars on a Solace Cycles OM-2P

Alt bars use flat-bar style controls, so they’re compatible with the world of mountain bike brakes and drivetrains. This makes them an easy switch if you already use flat bars, but more difficult if you’re coming from drop bars and road components.

The Jones Loop H-Bar is the original alt bar. It uses a dramatic 45 degree backsweep for a comfy wrist angle while preserving lots of space for bags and gadgets. Its biggest competitor, the Surly Moloko, goes for less radical backsweep and adds mini bullhorns for yet another hand position. Both of these bars stretch further back and forward from the stem, giving the rider a choice between sitting upright, reaching forward, or somewhere in between.

It’s tough to generalize alt bars, but with the Jones Loop and Moloko in mind here are the biggest pros and cons.

Advantages of alt bars:

  • Varied hand positions for comfort and versatility
  • Lots of bar space for bags and gadgets
  • Easy switch from regular flat bars

Disadvantages of alt bars:

  • Ergonomics may come at expense of control on the roughest terrain (eg: dramatic backsweep)
  • Can require extra bar tape or non-standard ways of wrapping bars or mounting bags
  • Heavier than simpler bars (all else being equal) since there is more material
  • Large and awkward shape is harder to pack in bike box for transit
  • Some people think they look funny, but whatever.


Bikepacker’s Guide to Handlebars: Drop, Flat, Alt, Oh My!


This is my husband’s bike. He loves his Jones Loop H-Bar, a popular style thanks to its comfortable backsweep, MTB controls, and loads of gadget and gear space.

Popular Alt Bars for Bikepacking

Here are three popular alt bars commonly used for bikepacking:


Bikepacker’s Guide to Handlebars: Drop, Flat, Alt, Oh My!


Jones Loop Bar: Lots of backsweep and available in a ton of options, including fancy carbon and titanium.


Bikepacker’s Guide to Handlebars: Drop, Flat, Alt, Oh My!


Surly Moloko Bar: Tons of hand positions and space for gadgets.


Bikepacker’s Guide to Handlebars: Drop, Flat, Alt, Oh My!


Surly Corner Bar: A weird and wonderful innovation that mimics a drop bar but takes mountain bike controls. I don’t know why nobody thought of this sooner!

Related: Surly Moloko vs. Jones Loop H-Bar

Carbon Handlebars for Bikepacking?

Many popular handlebars in all categories – drop, flat, and alt – come in carbon options that weigh a few ounces less and cost a few hundred dollars more. This post wouldn’t be complete without addressing the question: are carbon bars a good idea for bikepacking?

Many people understandably rule them out based on price alone. When dealing with a loaded bike, cutting a few ounces of weight is hardly a top priority unless you’re focused on bikepack racing or need your bike to do double-duty for performance-oriented day rides.

For those who don’t mind spending money on carbon bars, comfort is a commonly cited benefit. Carbon’s material properties allow it to absorb road chatter and dampen vibration while still being stiff and strong. Some people swear this makes a difference for them, and others aren’t convinced.

If you want carbon bars and are willing to pay for them, the remaining question is: are carbon bars strong enough to handle the rigors of bikepacking? Carbon fiber is remarkably strong and very unlikely to snap under a bikepacking load, or even during a typical crash.

Still, bikepackers should take extra steps to protect carbon bars from abrasions caused by bikepacking bags and gadget mounts. And if you travel overseas with your bike and sometimes transport it on the roof of a bus, you might find carbon bars aren’t worth the added stress.

Changing Handlebars

How important is it to make the right choice the first time? Can you change your bikepacking handlebars later if they’re not working for you?

Generally it’s easy to switch between bars of the same type (drop to drop or flat to flat) as long as both use standard size tubing. You’ll simply move over your current brake and shift controls and (if drops) re-tape the bars. You may want to make stem or stack changes if the new bar has dramatically different geometry, but otherwise no new parts are usually required.

It’s more complicated and expensive to switch between different types of bars (drop to flat or flat to drop). This requires also changing your shift and brake controls, which may require other changes like brake calipers and derailleurs, or getting fancy with adapters. There can be a whole cascade of compatibility issues if you go down this rabbit hole.

Switching between flat and alt bars is fairly simple, since alt bars take the same MTB controls as flat bars. You may have a few bike fit and cable routing changes to make, but shouldn’t need a bunch of new parts.

Switching between drop and alt bars is more complicated and expensive. You’ll have the same compatibility issues as switching between drop and flat bars.

Other Tips for Choosing Bikepacking Handlebars

Test ride (rent, borrow, ask at your local bike shop) a few bikes if you can, especially if you’ve never ridden with a particular category of bar before. It’s hard to understand the details of drop bar hand positions, for example, without trying them yourself.

That said, small differences in bar design and bike geometry can make a big difference in feel and comfort, even within the same general category. Two helpful tools for visualizing differences if you’re comparing options: whatbars.com for handlebar comparisons and bikeinsights.com for bike comparisons.

Don’t underestimate the importance of bike fit when it comes to handlebar comfort. A different stem or change in seat position could turn a painful posture into a workable one without any changes to your handlebars. It’s worth talking to your local bike shop if unsure about your bike fit.

Still unsure? Unless you already know your comfort preference, my final advice is to let terrain be the deciding factor. Do you fancy yourself a singletrack shredder or feel drawn to the ruggedest of 4×4 tracks? Flat bars will help you reach your full riding potential. Otherwise, drop bars are the natural choice and offer the most hand positions.

Whatever you choose, be open to experimenting as you gain more experience and get a grip on (so to speak) your handlebar preferences. 😉

More Bikepacking Resources

If you found this article helpful, you might also like these:

Or visit the bikepacking section for lots more!


Bikepacker’s Guide to Handlebars: Drop, Flat, Alt, Oh My!


About the Author

Hi there, I’m Alissa, founder of Exploring Wild. I’ve traveled over 19,000 miles by bike and still can’t stop planning my next ride (and helping you plan yours). Pavement and panniers or singletrack and seat bag, I love it all. On my bike I feel free. Learn more about me here.

Bikepacker’s Guide to Handlebars: Drop, Flat, Alt, Oh My!

Bike resources in your inbox?

There’s more where this came from! Sign up here for occasional emails full of inspiration and information about bikepacking and bicycle touring.

Bikepacker’s Guide to Handlebars: Drop, Flat, Alt, Oh My!

Town Day Checklist!

Sign up to receive the free downloadable bikepacking town day checklist to help with your resupply stops:

    You’ll also receive occasional emails with other bikepacking and touring resources. I think you’ll like them, but you can unsubscribe at any time.

    The post Bikepacker’s Guide to Handlebars: Drop, Flat, Alt, Oh My! appeared first on Exploring Wild.

    https://exploringwild.com/handlebars-for-bikepacking/?utm_source=rss&utm_medium=rss&utm_campaign=handlebars-for-bikepacking