In part 1 of my hardtail bikepacking series I looked at choosing a hardtail for bikepacking: what kind of terrain hardtails are good for, what to look for when shopping, and a few specific models popular with bikepackers.
Now, welcome to part 2! Let’s talk loading and packing. This is always part art and part science, so check out my general post on packing for bikepacking as a starting point. Hardtails have a few idiosyncrasies that make them harder to load than a fully rigid bike (but much easier than full suspension, fortunately!).
This post is packed with tips and gear ideas to streamline your hardtail bikepacking setup. Most of them come from my own setups and testing, and a few from the bikepacking community at large. I hope they help!
When you buy through affiliate links in this post, I may earn a small commission. Thanks for your support! I always offer unbiased opinions based on real experience from the road and trail. Learn more.
Loading the Front
A suspension fork and flat handlebars are defining features of almost every hardtail (the rare hardtail drop bar mountain bike notwithstanding). This is a really capable setup for handling bumps in the trail, but it does add a few complications to a bikepacking setup.
Avoiding Tire Rub
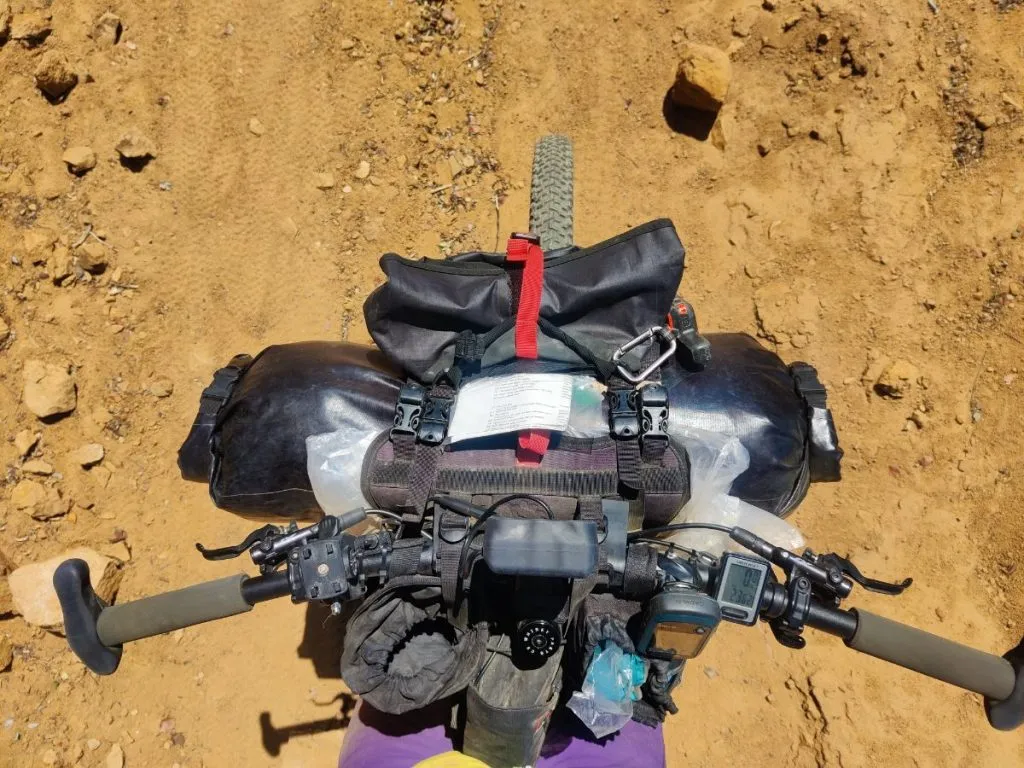
If you’re tall (lucky you) you can skip this section. I’m 5’5″, and I have to be mindful of tire rub at full fork compression on my 29er with loaded handlebars. With a rigid fork I can double-stack my Revelate handlebar harness with a dry bag and tent, but on my hardtail I have to choose one.
My suggestions to riders who share this problem:
- Use a smaller-diameter handlebar bag that is long and skinny (purpose-built bikepacking bags are best)
- Consider a harness / cradle with rigid mounts (like the Salsa EXP Anything) that can be angled upward, away from your tire
- Redistribute weight so there is more elsewhere on your bike or in a backpack (more ideas below)
Make sure to check for tire rub before starting your ride! You want your gear to not go below your fork crown when the fork is fully compressed. You can try compressing the fork with force, or eyeball it using your sag indicator O-ring (bottom of bags should be clearly above the indicator ring).
Related: Bikepacking Tips for Smaller Cyclists
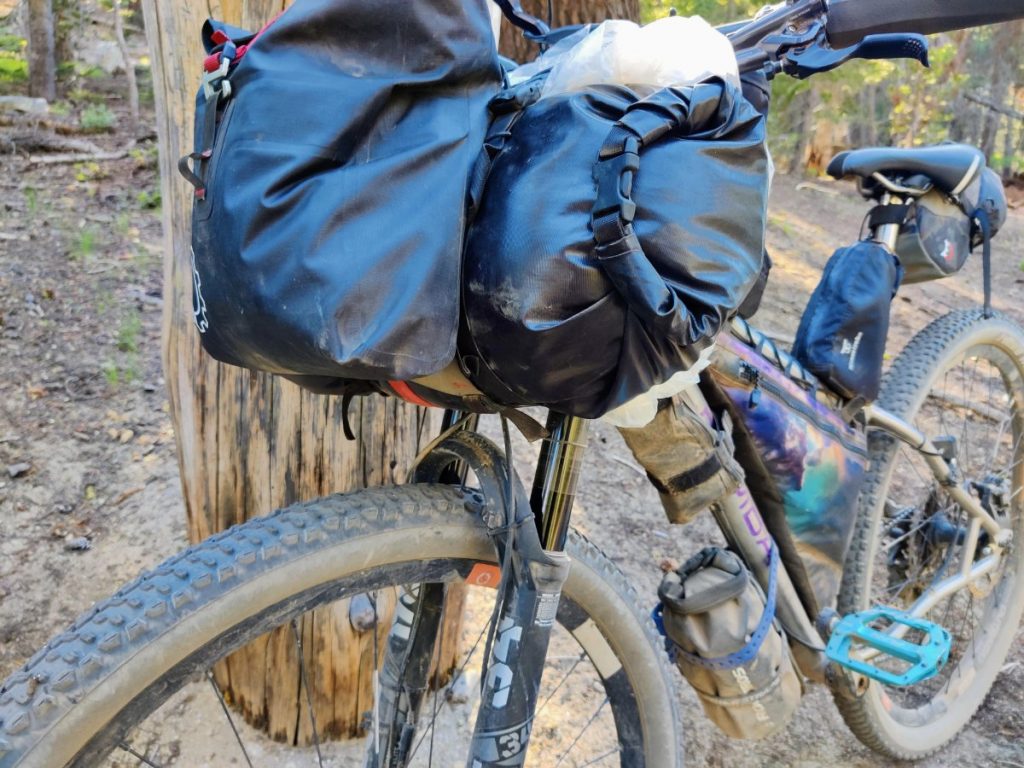
There’s just enough room for my handlebar bag to avoid hitting the tire when the fork compresses, but it’s close!
Ideal Handlebar Bags
The ideal handlebar bag for a flat bar hardtail is long and skinny with openings at both ends. Long for max capacity, skinny for no tire rub, and openings at both ends for more quick-access cargo space (may as well enjoy this advantage of flat bars over drop bars).
You can certainly use a regular dry bag if that’s what you have, but a bikepacking-specific bag will make the most of your cargo space. Here are a few I recommend based on their popularity and/or my own testing.
When I bikepack with a double-ended dry bag on my bars, I stash my jacket(s) and warm gloves in the ends so they’re easy to access during the day. In the middle is my sleeping quilt, which only comes out at camp.
Related: How to Choose Dry Bags for Bikepacking
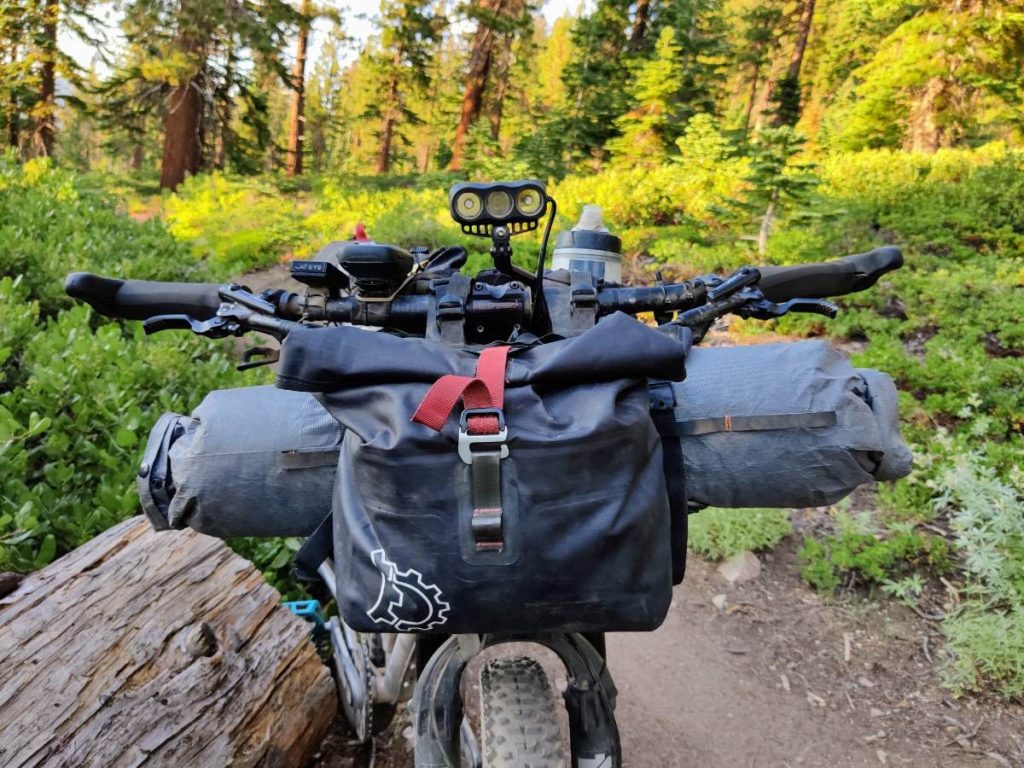
Wide skinny double-ended handlebar bag (MLD UltraX) and Revelate Egress pouch on my handlebars while bikepacking with my hardtail.
Dry bags that open on both sides offer convenient easy-access storage when used with flat handlebars.
Tune Your Fork if Needed
If you load more than a few pounds on your handlebars, you may need to increase your fork stiffness and/or sag. Details differ by fork, but this often involves pumping in a bit more air with a shock pump. Lighter riders especially may notice that smaller amounts of weight make a bigger difference.
Personally, if I’m just running a light single dry bag on my bars I don’t bother making a change to the fork. But if I load up with more, or I notice my suspension isn’t bouncing back as firmly as I’d like, I will add some air.
Watch Your Downtube Cage
Downtube cages are a great spot to stash a big water bottle. But if this is your first time bikepacking with a hardtail, it’s easy to forget that your downtube moves closer to your front tire as the suspension compresses.
You really don’t want to jam a bottle into your tire. I’ve made this mistake exactly once, and fortunately it was only a minor graze, but I don’t recommend it.
It’s ok to have close clearance here, but you’ll need to check carefully once your bars are loaded and fork is tuned.
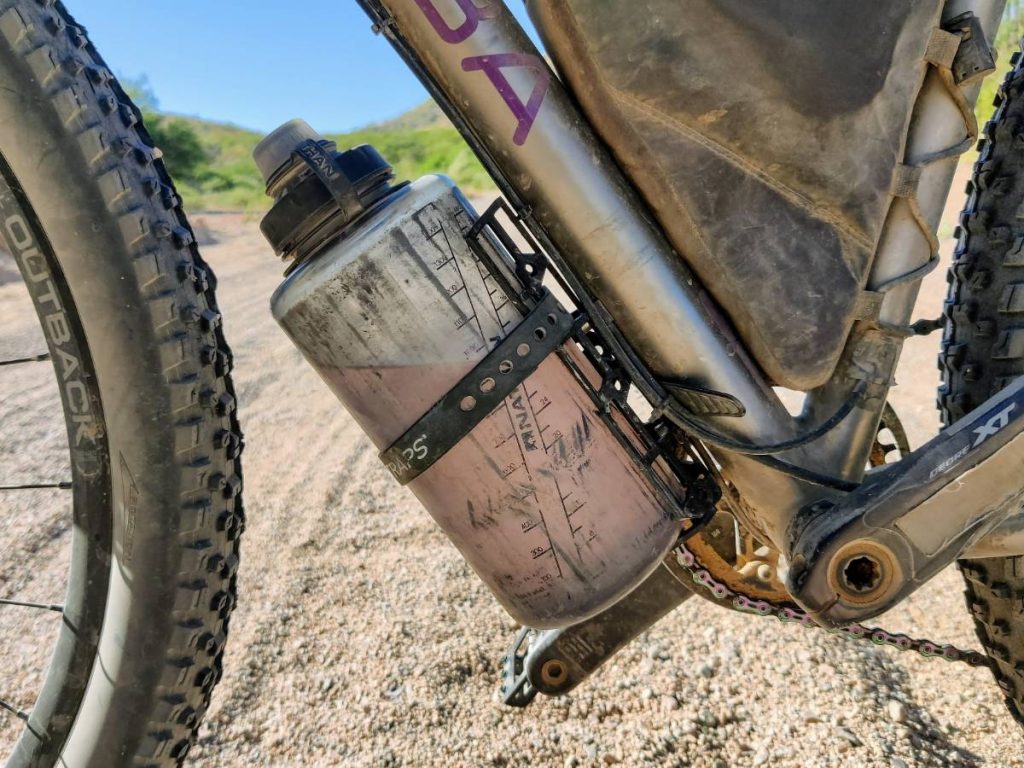
The downtube is a great place for a big bottle, but check to make sure it won’t hit your tire when the fork is compressed. The bike in this picture is running a rigid fork, otherwise this would be too close.
Cargo Cages on Fork Blades
Cargo cages are a super-functional way to add capacity to a bikepacking setup. I use them all the time on my rigid fork to carry water, food, my cook kit, or dry bags of clothing.
But suspension forks don’t come with those 3-pack mounts you find on rigid “adventure forks.” Determined MTB riders traditionally jerry-rigged their own mount systems using hose clamps or electrical tape, but this can be dangerous if the cage takes a hit on a rock and swivels into the spokes.
Early in 2024 Old Man Mountain released their Axle Pack solution, and it’s a game changer for bikepacking with a suspension fork. I’ve used it for two bikepacking trips on my hardtail so far, and will use it for more. It takes weight off the bars (less need for adjusting fork stiffness) and positions it low to the ground (good for handling).
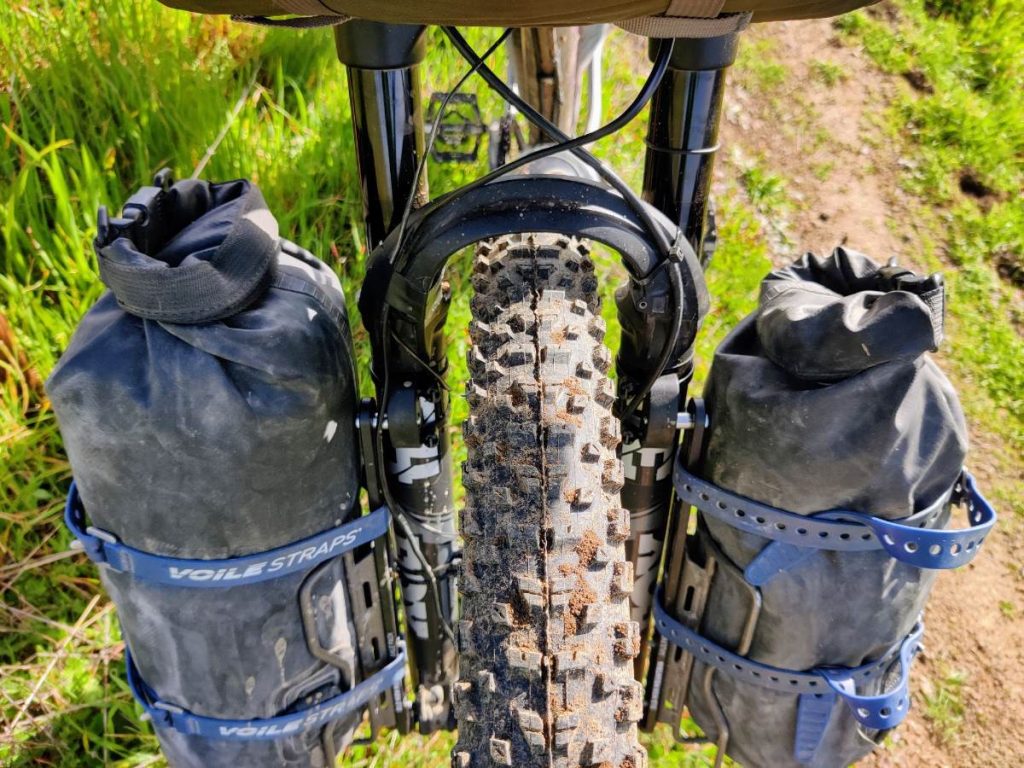
Using my Old Man Mountain Axle Pack to add cargo capacity to my hardtail with fork cages.
Front Racks
If you need even more cargo capacity on the front of your hardtail, consider running a front rack. Old Man Mountain makes axle-mounted racks (no eyelets needed) that can be run either front or back and work well on suspension forks. See my Elkhorn and Divide reviews for more.
As with cargo cages, putting too much weight up front will mute your bike’s singletrack shredding capabilities. It’s fine if you’re riding a hardtail for the comfort aspect, or because it’s what you have, but I don’t recommend it for folks riding hardtails for their technical prowess.
Loading the Rear
Many hardtails, though not all, come with dropper seatposts. This limits space for a bikepacking seat bag, a challenge made worse by the fact that many hardtails lack eyelets for racks. Fortunately, gear makers have caught onto this problem and offer a number of helpful solutions.
This section includes some quick tips for bikepacking with a dropper post on a hardtail, but if you run a dropper please check out Bikepacking With a Dropper Post for more ideas.
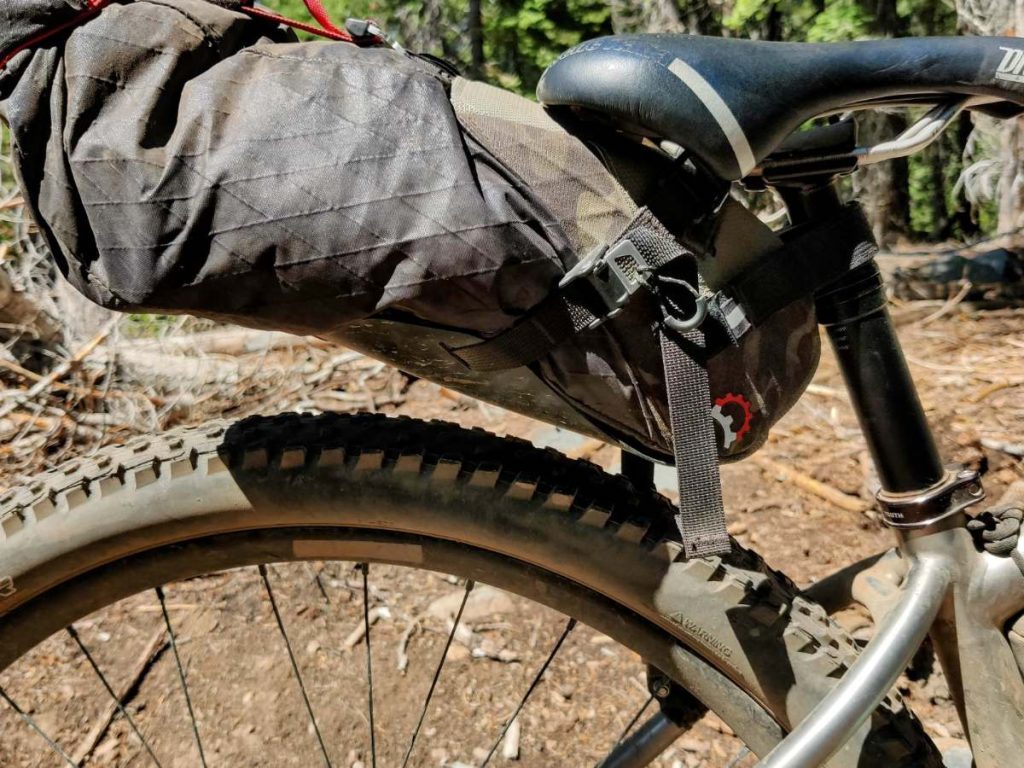
Dropper seat posts limit the space available for a seat bag, like mine shown here with very little clearance.
Remove the Dropper?
If you’re taking a long bikepacking trip on largely non-technical terrain, it may be worth the trouble to replace your dropper seatpost with a rigid one.
As someone who bikepacked without a dropper for years, I’m pretty confident that your ability to drop your seat is NOT going to be the most important part of your bikepacking setup unless you’re riding very singletrack-heavy routes.
A rigid post offers more cargo space, won’t get squishy or fail on you in the middle of nowhere, and won’t need maintenance when you get home. Just sayin.
Carry a Stanchion Clamp
If you run a seat bag with a seatpost strap on your dropper post, you should use a stanchion protector. The Wolf Tooth Valais (available in two sizes) is the most popular option and the one I use. I also hear good things about the Topeak DP.
If your dropper post drops a little too low for your seat bag, you can also use the clamp (or a second one) to avoid tire rub by limiting the dropper travel.
Even if you don’t run a seat bag, you might still want to carry a Wolf Tooth Valais. Droppers have been known to fail in the down position, leaving you with a very uncomfortable pedaling situation for the rest of your trip. A clamp like the Valais can be used to hold your seat up in this scenario.
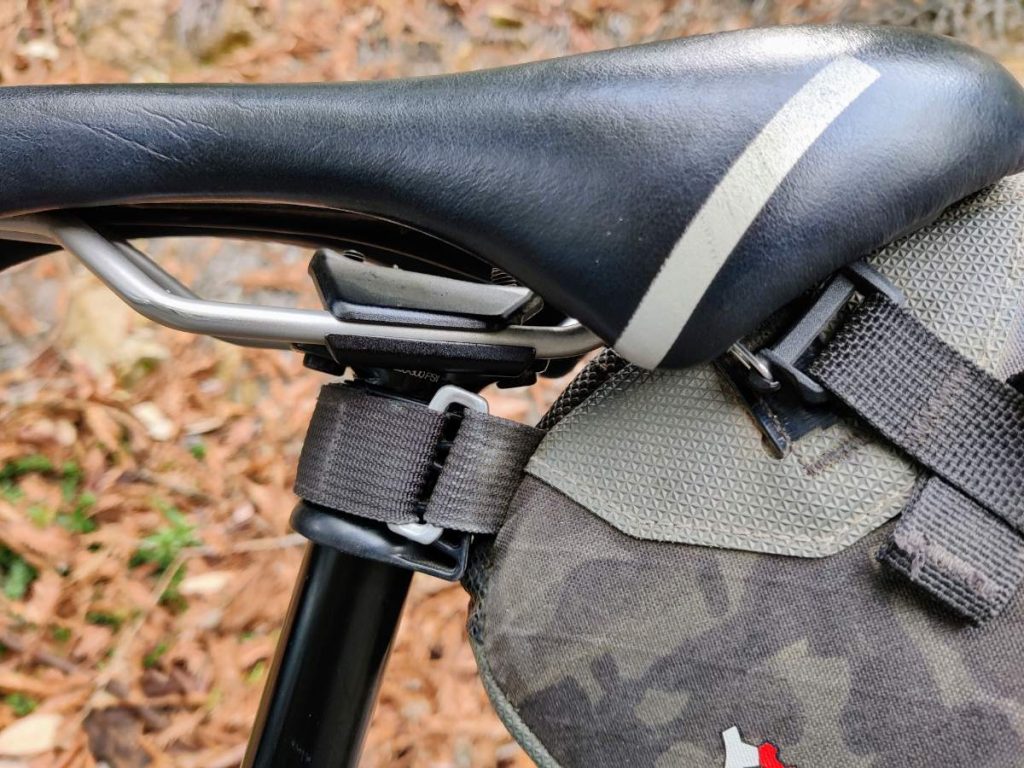
My seat bag strap wrapped around a Wolf Tooth Valais to protect the stanchion.
Dropper-Friendly Seat Bags
If you want to run a seat bag with a dropper post, you’ll need to watch out for two things: tire rub when the seat is dropped, and overall weight (too heavy and your post may struggle to rise).
Dropper-friendly seat bags are generally smaller, around 4 to 6 liters in volume. Some avoid a strap around the stanchion, though the clamps mentioned above can help otherwise.
A few seat bags specifically aim to help shorter riders with very limited clearance between their dropped saddle and rear tire. Check out the Rogue Panda Ripsey and Wayward Riders Louise if that’s your predicament.
Universal-Fit Racks
If you’re running a dropper post and need to carry more than a measly 5ish liters of gear in the back, it’s time to look at racks.
Racks are making a comeback in bikepacking lately, in part due to the dropper post issue. If your hardtail has rack eyelets, your options are wide-open. But for those of us riding hardtails without rack mounts, a few solutions exist:
Old Man Mountain Elkhorn: This is my personal pick for its balance of versatility, weight, and price. It mounts to a special replacement axle and can carry cargo cages on both sides.
Aeroe Spider: Heavier but also more affordable, and those seat stay clamps are more reliable than they look.
Tailfin AeroPack: Lightweight, axle-mounted, expensive.
Related: Bikepacking With a Dropper: Impressions of a Reluctant Convert
Here is my hardtail with a 1.5 liter water bottle on the downtube. The clearance is very close at full fork compression, but it does work. Check yours carefully!
Loading for Technical Riding
How you load your hardtail bikepacking setup should also depend on why you’re riding a hardtail in the first place.
If you just want the comfort of a suspension fork on non-technical dirt roads, by all means, load it down using the various rack and cargo cage solutions above (although your legs might disagree on the climbs).
If, however, you’re bikepacking on a hardtail because your route includes meaningful amounts of singletrack, I suggest being thoughtful about how much weight you carry and how it’s distributed. Loading down a hardtail (or any bike) with too much weight will blunt its technical capabilities, especially if you’re not a skilled mountain biker to begin with.
First of all, try your best to pack light. To make the best of a heavy load, balance weight front to back as much as possible. Position heavy stuff centrally, like in your frame bag, and as low to the ground as you can (racks and cargo cages are helpful here).
Wearing a Backpack
It’s no one’s favorite thing, but bikepacking with a backpack (or at least a hip pack) can give you back some of the cargo space a hardtail’s suspension and dropper post eat up. If you don’t want to add more weight to your setup with racks, it may be your only option.
Wearable cargo space is particularly helpful if you’re using a hardtail for technical trails. Such trails tend to have some rugged hike a bike, and taking a few pounds off your bike can make a surprisingly big difference (especially for smaller riders).
When I’m running a lightweight hardtail bikepacking setup, I load up my Osprey Salida 12 with part of my sleep kit, a day or two of food, and two liters of water. This buys me enough space that I can run a small dropper-friendly seat bag and keep my handlebars reasonably light.
Handlebar Ergonomics
Lastly, a note on the flat MTB-style handlebars most hardtails come with. The trend toward wider bars can, for some people, cause hand pain and numbness on long rides. Wide straight bars require a wrist angle that isn’t very ergonomic, especially for folks with narrower shoulders.
Also, flat bars have only one hand position. When bikepacking all day every day, rotating hand positions helps ward off aches and pains from overuse.
Here are some ways to mitigate these issues:
- Shorten your bars by an inch or so, especially if you have narrow shoulders.
- Switch to bars with some backsweep, around 15 degrees or so, like the SQlab 30X 16 degree.
- Add bar end grips for another hand position (I like Kane Creek Ergo Control grips).
- If you’re still having trouble, consider alt bars (read more about this option in Handlebars for Bikepacking).
Looking down on my flat bars from above, you can see a bit of backsweep (for a more natural wrist angle) and bar end grips for an extra hand position.
More Bikepacking Resources
If you liked this post, you might also like these:
Or visit the bikepacking section for lots more.
About the Author
Hi there, I’m Alissa, founder of Exploring Wild. I’ve traveled over 20,000 miles by bike and still can’t stop planning my next ride (and helping you plan yours). Pavement and panniers or singletrack and seat bag, I love it all. On my bike I feel free. Learn more about me here.
Bike resources in your inbox?
There’s more where this came from! Sign up here for occasional emails full of inspiration and information about bikepacking and bicycle touring.
The post Bikepacking on a Hardtail: Gear and Tips for a Dialed Setup appeared first on Exploring Wild.
https://exploringwild.com/loading-hardtail-for-bikepacking/?utm_source=rss&utm_medium=rss&utm_campaign=loading-hardtail-for-bikepacking
 CampingSurvivalistHuntingFishingExploringHikingPrivacy PolicyTerms And Conditions
